> ## Documentation Index
> Fetch the complete documentation index at: https://magicads.mintlify.site/llms.txt
> Use this file to discover all available pages before exploring further.
# CRON Job Configuration
> Essential steps to configure your Magic Ads installation for optimal performance and functionality.
## Setting Up the Cron Job
A cron job is essential for automating recurring tasks in Davinc AI, particularly for renewing subscription usages.
### Frequency and Interval
* **Recommended Interval**: The cron task should run once per minute for optimal performance.
Some hosting providers may limit cron tasks to a minimum interval of 5 minutes. In such cases, CRON tasks will still work as needed, but there might be a slight delay of up to 5 minutes.
### Configuring the Cron Task
To set up the cron job, add the following entry to your server’s crontab:
```php theme={null}
* * * * * /usr/local/bin/php /path/to/app/root/artisan schedule:run
```
This command runs the Laravel schedule command in your Magic Ads installation directory every minute.
Replace `/path/to/app/root/` with the actual path to your Magic Ads application’s root directory.
Double check that `/usr/local/bin/php` is needed path where your php bin folder is located. Every hosting is different hence it might differ from hosting provider to hosting provider.
## Set up CRON job in Cpanel
Every hosting provider might have different CRON setup page and different path for PHP bin directory. Instructions below are provided based on our hosting - Namecheap, so path to `PHP Bin` and path to script can be different. Check with your hosting provider if you are not aware how to setup similar CRON job in your environment.
### Configuring the Cpanel Cron Job
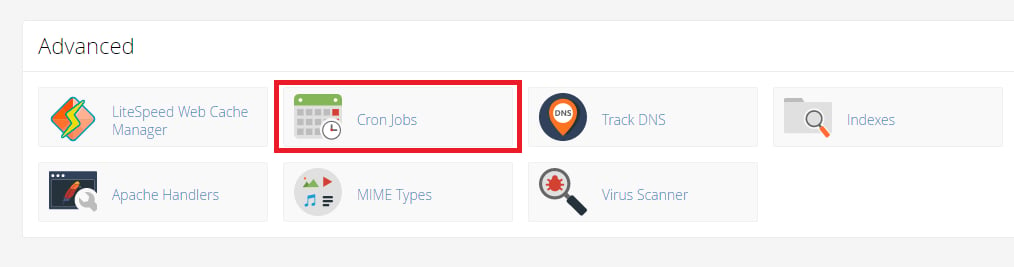
In your **Cpanel** find **CRON Jobs** option, it could be under **Advanced** panel as shown in the image.
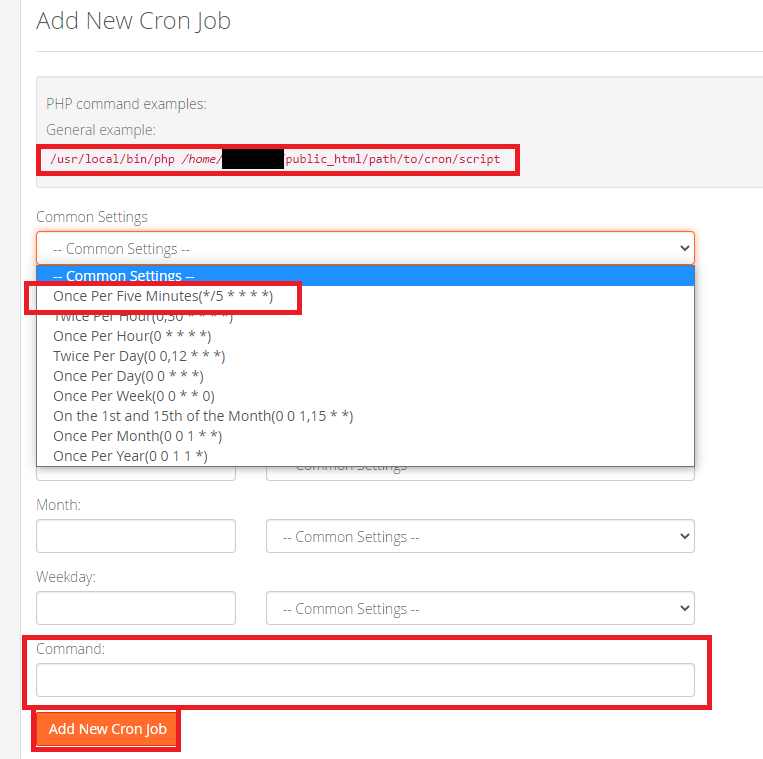
 In the **CRON Jobs** panel add a New Cron Job. Select the minimum time that your hosting provider allows you to run a Cron Job (minimum you can get is 1 minute).
Not every hosting provider allows you to run Cron Jobs every minute, for example shared servers of hosting provider (Namecheap) allows to run only every 5 minute.
Copy paste the command show in the first red box into the **Command** field.
```php theme={null}
/usr/local/bin/php /home/username/YOUR_DOMAIN_PATH/artisan schedule:run
```
In the **CRON Jobs** panel add a New Cron Job. Select the minimum time that your hosting provider allows you to run a Cron Job (minimum you can get is 1 minute).
Not every hosting provider allows you to run Cron Jobs every minute, for example shared servers of hosting provider (Namecheap) allows to run only every 5 minute.
Copy paste the command show in the first red box into the **Command** field.
```php theme={null}
/usr/local/bin/php /home/username/YOUR_DOMAIN_PATH/artisan schedule:run
```
Please note that above path of PHP bin directory and path for the directory can be different in your case. You might want to check with your provider to figure out where PHP bin folder is located in your hosting provider.
 After creating a CRON Job successfully you will see it listed among your **Current Cron Jobs list** in your Namecheap hosting platform for example:
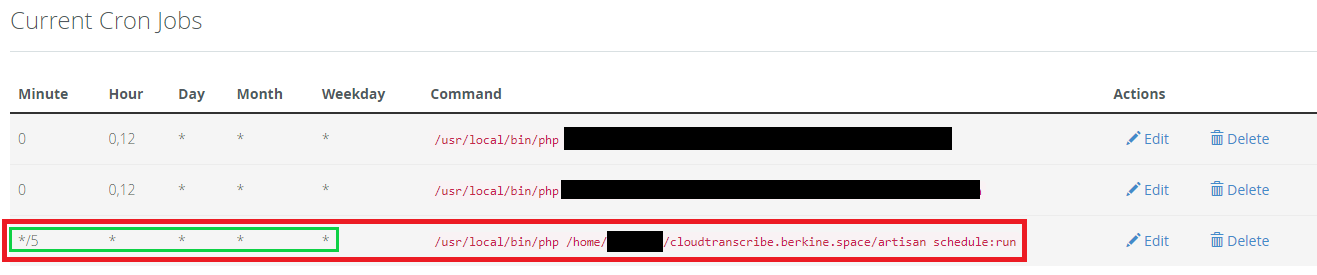 In case if your hosting allows you to enter entire CRON job command at ones, you can enter it in the following way (Keep in mind that if your hosting allows you to run tasks every minute, you will need to change \*/5 to \*/1):
```php theme={null}
*/5 * * * * /usr/local/bin/php /home/username/YOURDOMAINPATH/artisan schedule:run
```
You have successfully configured the CRON via Cpanel for Magic Ads
## Set up CRON job in Plesk
You might want to follow [these instructions](https://support.plesk.com/hc/en-us/articles/115003121073-How-to-add-a-scheduled-task-in-Plesk-UI-using-crontab-syntax-) for Plesk at least on the setup part
## Troubleshooting Cron Issues
If you encounter problems with running CRON Jobs:
1. Verify the cron task configuration is correct.
2. Check your server logs for any error messages related to the cron job or renewal process.
3. Ensure that the PHP path `/usr/local/bin/php` is correct for your server.
If issues persist, consult with your server administrator. They can help diagnose server-specific problems, verify cron job configurations, and ensure proper file permissions. If you still need assistance after consulting your server administrator, please don’t hesitate to contact our support team directly for further guidance.
In case if your hosting allows you to enter entire CRON job command at ones, you can enter it in the following way (Keep in mind that if your hosting allows you to run tasks every minute, you will need to change \*/5 to \*/1):
```php theme={null}
*/5 * * * * /usr/local/bin/php /home/username/YOURDOMAINPATH/artisan schedule:run
```
You have successfully configured the CRON via Cpanel for Magic Ads
## Set up CRON job in Plesk
You might want to follow [these instructions](https://support.plesk.com/hc/en-us/articles/115003121073-How-to-add-a-scheduled-task-in-Plesk-UI-using-crontab-syntax-) for Plesk at least on the setup part
## Troubleshooting Cron Issues
If you encounter problems with running CRON Jobs:
1. Verify the cron task configuration is correct.
2. Check your server logs for any error messages related to the cron job or renewal process.
3. Ensure that the PHP path `/usr/local/bin/php` is correct for your server.
If issues persist, consult with your server administrator. They can help diagnose server-specific problems, verify cron job configurations, and ensure proper file permissions. If you still need assistance after consulting your server administrator, please don’t hesitate to contact our support team directly for further guidance.