> ## Documentation Index
> Fetch the complete documentation index at: https://magicads.mintlify.site/llms.txt
> Use this file to discover all available pages before exploring further.
# AI Voiceover Setup
> Enhance your Davinci AI platform with advanced Text to Speech generation capabilities. This guide walks you through setting up and leveraging AI Voiceover feature to synthesize text to speech.
## Introduction
Davinci AI’s AI Voiceover features unlocks advanced text to speech generation capabilities for your platform. With access to cutting edge solutions for 5 different AI Vendors, you can synthesize text to speech in thousands of different voices and in more than 140 different languages and dialects.
### List of Text to Speech vendors
* Google Cloud Platfrom - Text to Speech Service
* Microsoft Azure - Text to Speech Service
* Amazon Web Services - Text to Speech Service
* IBM Cloud - Text to Speech Service
* Elevenlabs - Text to Speech Service
## Setup AI Voiceover
To be able to use AI Voicover feature, follow these steps to setup integration.
Star with configuration of preferred cloud vendors. AI Voiceover supports **GCP**, **Azure**, **AWS**, **Elevenlabs**, **IBM** vendors.
You can configure and enable any comination of these vendors.
You can activate only 1 vendor or all of them at the same time as needed
Please note that only the Voices and Languages of the activated vendor(s) will be available for your users.
### Configure preferred AI Voiceover Vendors
Use each link to get a detailed step by step guide for setting up each vendor
Setup TTS feature of GCP
Setup TTS feature of Azure
Setup TTS feature of AWS
Setup TTS feature of Elevenlabs
Setup TTS feature of IBM `(Extension)`
Setup TTS feature of Speechify `(Extension)`
As most shared hostings providers do not allow you to run **ffmpeg codec**, script comes with one included. Follow these steps to configure it accordingly:
FFPEG codec is needed to merge end results into a single audio file, or to add background music into an audio file etc
1. Make sure you have php `shell_exec` command enabled in your hosting.
As stated in the [requirements](/requirements) section, it is an important feature that must be enabled in your php settings
2. In the root directory of your domain, go to **vendor** -> **ffmpeg** folder.
3. Right click on the **ffmpeg** codec there and select **Change Permission**
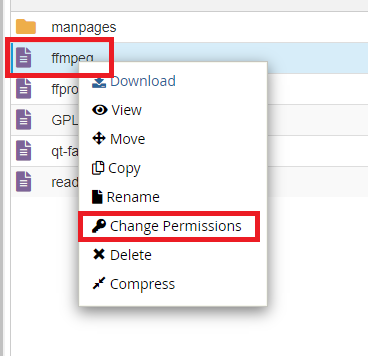 4. Change file permission of ffmpeg to be executable by anyone
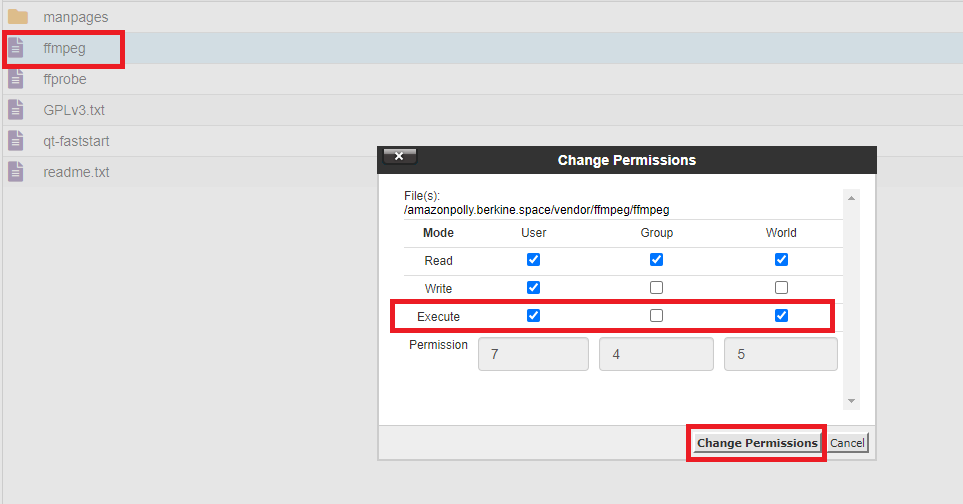 5. This completes the configuration of ffmpeg codec.
Next, enable the AI Voiceover feature itself.
1. Login to Davinci AI using your admin credentials.
2. In **Admin Panel**, navigate to **AI Settings** -> **General AI Settings** tab.
3. Under **AI Voiceover Settings** section
5. This completes the configuration of ffmpeg codec.
Next, enable the AI Voiceover feature itself.
1. Login to Davinci AI using your admin credentials.
2. In **Admin Panel**, navigate to **AI Settings** -> **General AI Settings** tab.
3. Under **AI Voiceover Settings** section
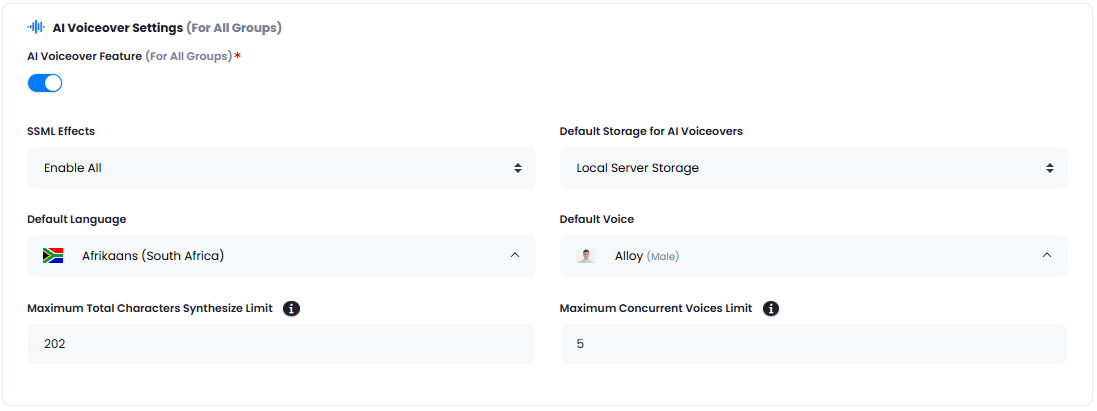 * Turn on the **AI Voiceover Feature** Checkbox
* Enable/Disable **SSML Effects**, these are additional voice effect features
Please note that not all vendors support each and every SSML effect. SSML effects change dynamically based on the selected voice automatically
* Set **Default Storage for AI Voiceovers** for storing your end results in different storage options. Make sure you configure those cloud storage options first before selecting them.
* Set **Default Language** for all new users that are yet to register. Users can change it afterwards to their preferred ones via **My Accounts** -> **Set Defaults** page.
* Set **Default Voice** for all new users that are yet to register. Users can change it afterwards to their preferred ones via **My Accounts** -> **Set Defaults** page.
* Set **Maximum Total Characters Synthesize Limit** for all of your users, both Free Tier and Subscribers.
Maximum supported characters per single synthesize task can be up to 100000 characters. Each voice (textarea) has a limitation of up to 5000 characters, and you can combine up to 20 voices in a single task (20 voices x 5000 textarea limit = 100000).
* Set **Maximum Concurrent Voices Limit** for all your users, both Free Tier and Subscribers.
You can mix up to 20 different voices in a single synthesize task. Each voice can synthesize up to 5000 characters, total characters can not exceed the limit set by Maximum Characters Synthesize Limit field.
4. Once you are done with configurations, click on **Save** button.
Davinci AI allows you to dynamically configure which TTS vendors you want to give access to your users. For example you can allow only 1 vendor for your Free Tier users, but enable all for Subscribers. This gives you sophisticated flexibility in feature and cost control.
### List for Free Tier users
1. In **Admin Panel**, navigate to **AI Settings** -> **Free Trial Features** tab.
2. Under **AI Voiceover Vendors Access** dropdown list, select which TTS vendors you want your Free Tier users to have access to. Make sure you have configured those vendors properly first.
* Turn on the **AI Voiceover Feature** Checkbox
* Enable/Disable **SSML Effects**, these are additional voice effect features
Please note that not all vendors support each and every SSML effect. SSML effects change dynamically based on the selected voice automatically
* Set **Default Storage for AI Voiceovers** for storing your end results in different storage options. Make sure you configure those cloud storage options first before selecting them.
* Set **Default Language** for all new users that are yet to register. Users can change it afterwards to their preferred ones via **My Accounts** -> **Set Defaults** page.
* Set **Default Voice** for all new users that are yet to register. Users can change it afterwards to their preferred ones via **My Accounts** -> **Set Defaults** page.
* Set **Maximum Total Characters Synthesize Limit** for all of your users, both Free Tier and Subscribers.
Maximum supported characters per single synthesize task can be up to 100000 characters. Each voice (textarea) has a limitation of up to 5000 characters, and you can combine up to 20 voices in a single task (20 voices x 5000 textarea limit = 100000).
* Set **Maximum Concurrent Voices Limit** for all your users, both Free Tier and Subscribers.
You can mix up to 20 different voices in a single synthesize task. Each voice can synthesize up to 5000 characters, total characters can not exceed the limit set by Maximum Characters Synthesize Limit field.
4. Once you are done with configurations, click on **Save** button.
Davinci AI allows you to dynamically configure which TTS vendors you want to give access to your users. For example you can allow only 1 vendor for your Free Tier users, but enable all for Subscribers. This gives you sophisticated flexibility in feature and cost control.
### List for Free Tier users
1. In **Admin Panel**, navigate to **AI Settings** -> **Free Trial Features** tab.
2. Under **AI Voiceover Vendors Access** dropdown list, select which TTS vendors you want your Free Tier users to have access to. Make sure you have configured those vendors properly first.
 3. Once you are done with configurations, click on **Save** button.
### List for Subscrbers
1. In **Admin Panel**, navigate to **Finance Management** -> **Subscription Plans** tab.
2. Click on **Create New Subscription Plan** button, or **Edit** your existing ones.
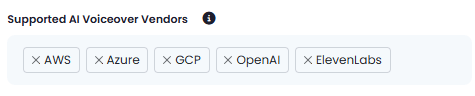
3. Under **Supported AI Voiceover Vendors** dropdown, select all the vendors that you want your Subscribers to have access to.
3. Once you are done with configurations, click on **Save** button.
### List for Subscrbers
1. In **Admin Panel**, navigate to **Finance Management** -> **Subscription Plans** tab.
2. Click on **Create New Subscription Plan** button, or **Edit** your existing ones.
3. Under **Supported AI Voiceover Vendors** dropdown, select all the vendors that you want your Subscribers to have access to.
 4. After you are done with further configurations, click on **Save** button.
Please note that Subscription plans are only available for Extneded License users
Congratulations! You have successfully completed the AI Voiceover setup process.
## How to Use AI Voiceover
After you have configured your respective cloud vendors, these intructions explain you how to synthesize text into audio in various formats.
4. After you are done with further configurations, click on **Save** button.
Please note that Subscription plans are only available for Extneded License users
Congratulations! You have successfully completed the AI Voiceover setup process.
## How to Use AI Voiceover
After you have configured your respective cloud vendors, these intructions explain you how to synthesize text into audio in various formats.