> ## Documentation Index
> Fetch the complete documentation index at: https://magicads.mintlify.site/llms.txt
> Use this file to discover all available pages before exploring further.
# Flux AI
> Flux AI extension allows you to leverage FLUX image generation models at AI Images feature in Davinci AI
This is a free extension available for anyone
* FLUX Realism
* FLUX.1 \[pro]
* FLUX.1 \[schnell]
* FLUX.1 \[dev]
## Extension Configuration
To be able to use FLUX models in AI Images feature, follow these steps to setup Flux AI Extension.
Go to the **Marketplace** in **Admin Panel** and install **FLUX AI** extension.
 After installation is completed, go to **AI Settings** page in Admin Panel and click on **Extensions** tab there. Click on **Flux AI** there.
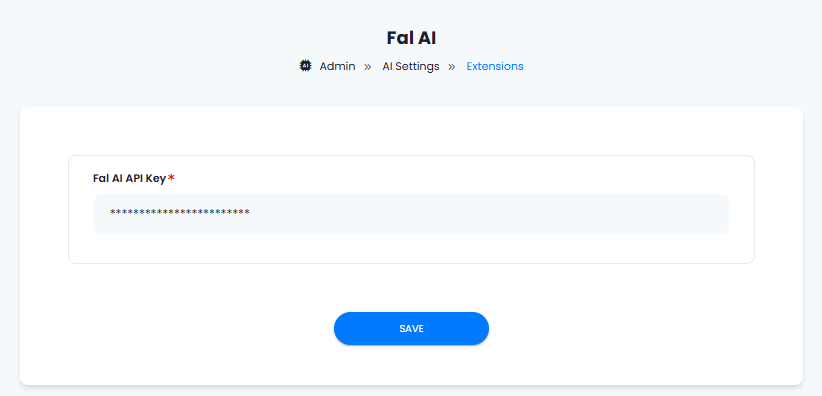
 Go to fal.ai website, sign up with them and get your **API Key** on your profile page after you successfully complete the registration process on their website.
Store your API key securely and never share it publicly. The key provides direct access to your account.
Enter your **API Key** in the Extensions tab - Flux AI page and click **Save** button.
Go to fal.ai website, sign up with them and get your **API Key** on your profile page after you successfully complete the registration process on their website.
Store your API key securely and never share it publicly. The key provides direct access to your account.
Enter your **API Key** in the Extensions tab - Flux AI page and click **Save** button.
 You now have completed the Flux AI extension configuration. Proceed to the section below on how to use it.
## AI Image Configuration
Davinci AI provides you full control on which image generation AI vendors you want your users to have access with in **AI Images** feature.
Plus you can control it both for Free Tier users and for Subscribers based on their subcription plans.
For Subscription plans you need to have an Extended License
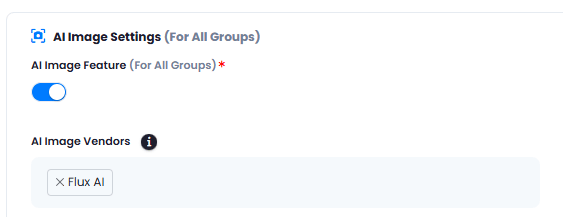
1. Go to **AI Settings** page in Admin Panel and select **General AI Settings** page
2. Scroll to **AI Image Settings (For All Groups)** section and select **Flux AI** among the list as shown on the image below and click **Save** button.
You now have completed the Flux AI extension configuration. Proceed to the section below on how to use it.
## AI Image Configuration
Davinci AI provides you full control on which image generation AI vendors you want your users to have access with in **AI Images** feature.
Plus you can control it both for Free Tier users and for Subscribers based on their subcription plans.
For Subscription plans you need to have an Extended License
1. Go to **AI Settings** page in Admin Panel and select **General AI Settings** page
2. Scroll to **AI Image Settings (For All Groups)** section and select **Flux AI** among the list as shown on the image below and click **Save** button.
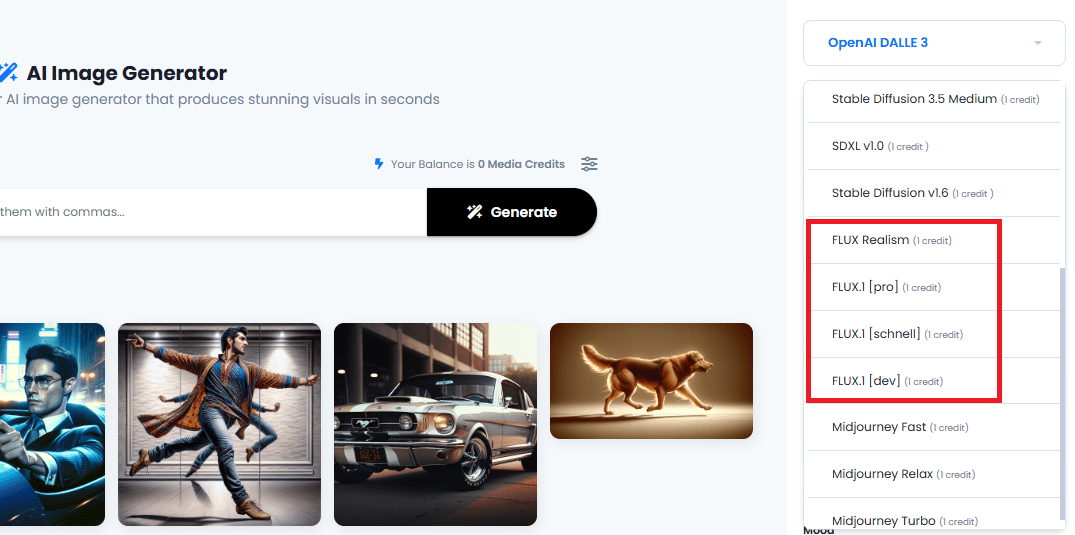
 3. Now all users can see Flux models available in the **AI Images** features upon selecting target image models.
 You have successfully comleted the setup process of this extension.