

This is a Free plugin that you can install directly from the in-app Plugins marketplace — no purchase required.
Introduction
Wasabi Storage lets you, the platform owner, offload generated studio results (Image Studio and Video Studio images and videos) from the local server disk to your own Wasabi bucket. Wasabi is an S3-compatible object store known for low, flat pricing with no egress or API-request fees — a cost-effective home for growing media libraries. Unlike the studios, Wasabi Storage is an infrastructure plugin: it doesn’t add any user-facing tool. It registers a new storage backend that the platform writes new results to, and serves those results back to users. It plugs into the same shared storage layer as the Amazon S3, Cloudflare R2 and Google Cloud Storage plugins — so exactly one backend is active at a time, chosen by you. Because Wasabi is S3-compatible, it works just like the Amazon S3 plugin. The one Wasabi-specific convenience: the endpoint is derived from your region automatically (https://s3.{region}.wasabisys.com), so you normally only need your keys, region and bucket.
This guide covers the full lifecycle — how to install it, how to create a bucket and access key, how to configure and test the connection, how to make Wasabi the active storage, and how offloading behaves.
What it adds
- Config screen — an admin page under General Settings → Plugins to enter credentials, tune options and test the connection.
- Storage provider — registers Wasabi as an option in the platform’s Default Storage selector.
- Automatic offload — when Wasabi is the active storage, every newly finalized studio result is uploaded to your bucket, and the platform records that the file now lives in Wasabi.
- Transparent serving — reads, downloads and deletes for offloaded results resolve through Wasabi (or your CDN) automatically.
The plugin only affects where generated results are stored. It doesn’t change how anything is generated, priced or gated — it’s purely a storage backend.
Installation
Wasabi Storage is a free plugin distributed through the in-app plugin marketplace — installation happens inside your MagicAds admin. There’s no third-party download and nothing to purchase.1
Open the Plugins marketplace
Sign in as an admin and go to Admin → General Settings → Plugins. Find the Wasabi Storage card in the marketplace catalog.
2
Install / activate
Click Install on the Wasabi Storage card. The platform downloads the archive, unpacks it, runs its migration and activates the plugin. Its provider details (key, secret, region, bucket, endpoint, URL, path-style, prefix, delete-local) are stored as an encrypted settings entry, so adding storage providers never changes the schema.
Create a bucket and access key
Before configuring the plugin, set up the bucket and credentials in your Wasabi console.1
Create a bucket
In the Wasabi console, open Buckets under the Data Access menu and click Create Bucket.
2
Name it and pick a region
Provide a unique Bucket Name and select your Region (e.g. 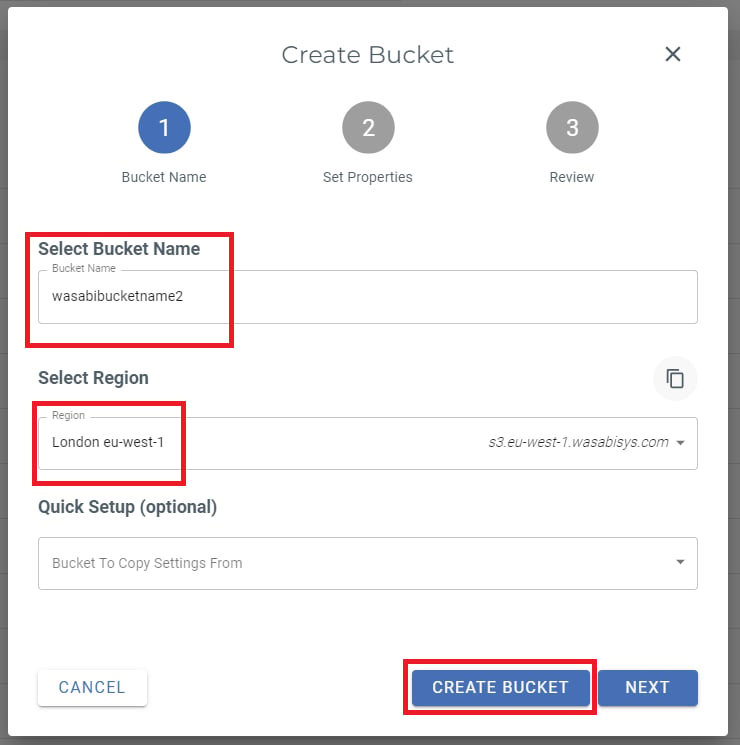
us-east-1, eu-central-1, ap-northeast-1), then click Create Bucket. Note both — you’ll enter them in the plugin config.3
Open the bucket settings
Select your bucket from the list and, under the Actions tab, click Settings.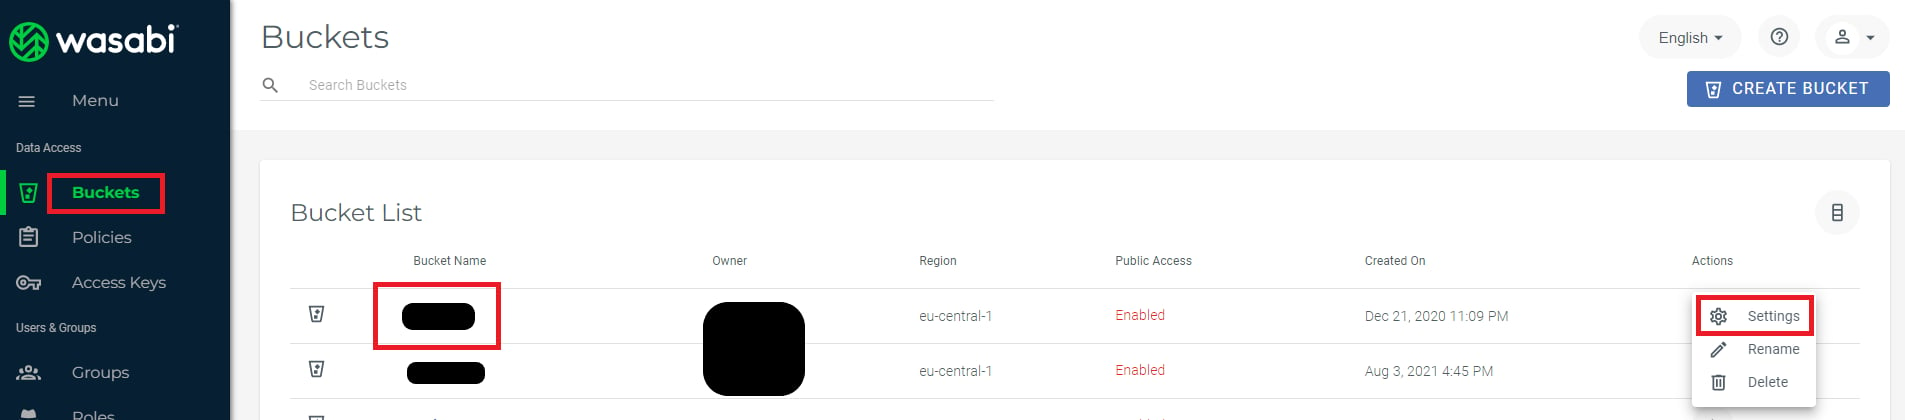
4
Enable public access
So generated results are viewable in the app, Enable Public Access for the bucket (or serve it through a CDN and set the plugin’s Public / CDN URL instead).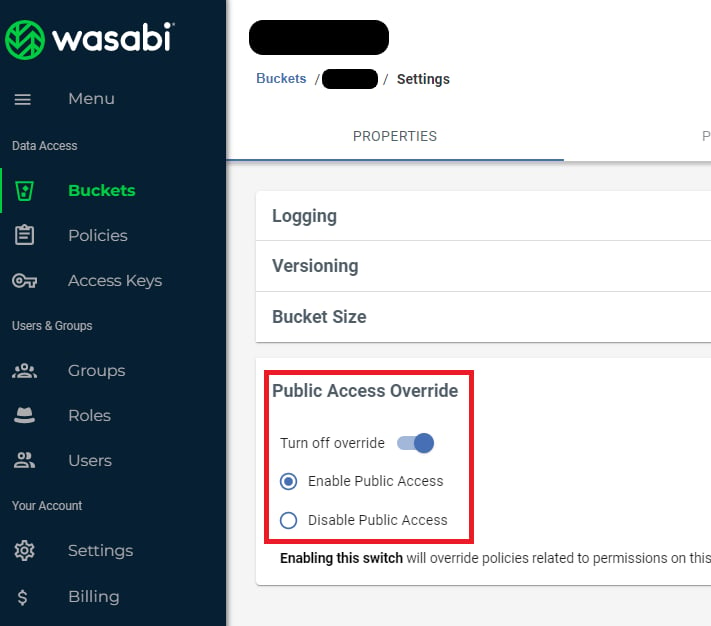
5
Create an access key
Go to Access Keys under the Data Access menu and click Create New Access Key.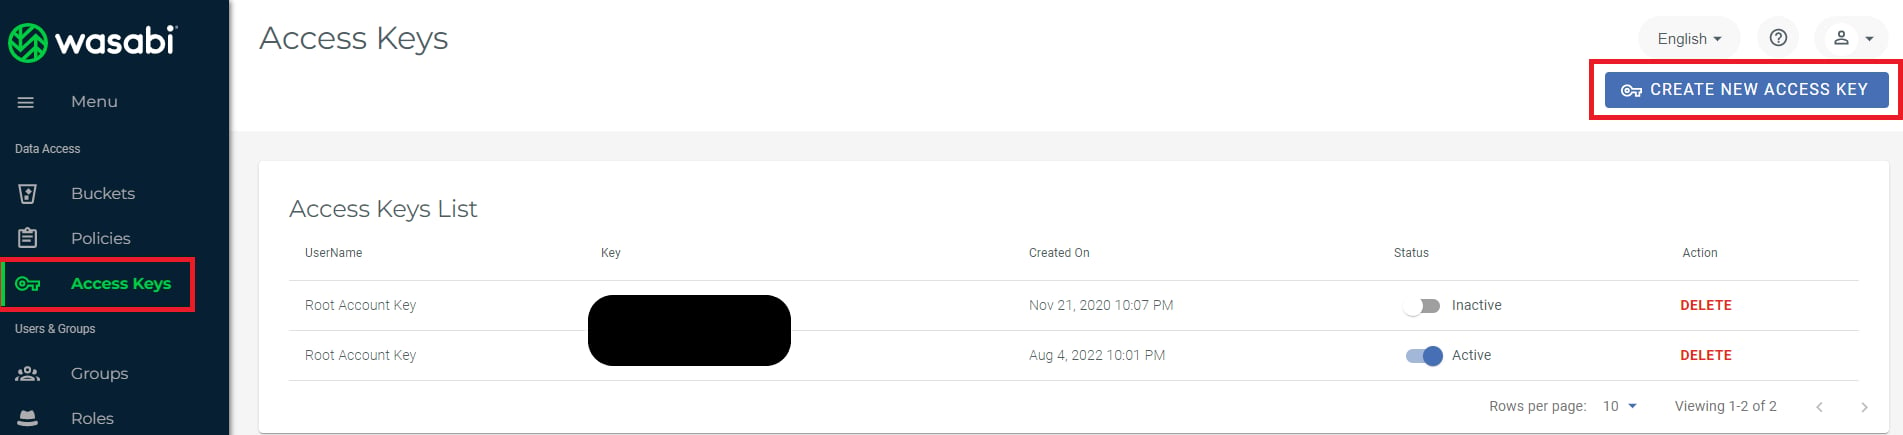
6
Copy the keys
Click Create, then Download or Copy your Access Key and Secret Key immediately — the secret is shown only once.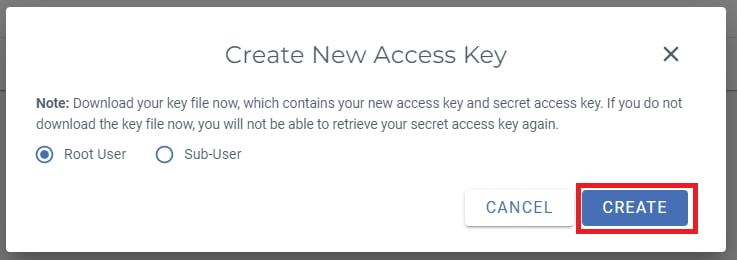
For least-privilege, attach a bucket policy that limits the key to read, write and delete objects in your bucket. The Access Key + Secret Key are S3-style credentials specific to Wasabi, and the secret is stored encrypted by the plugin once saved.
Configure Wasabi
Go to Admin → General Settings → Plugins → Wasabi Storage (/app/admin/general/plugins/wasabi). The screen has these sections.
General
Bucket Credentials
Advanced
To enable the provider you need at minimum the access key, secret, region and bucket — the endpoint is filled in for you from the region.
Connection
Click Test connection. The plugin saves your settings, then uploads, reads back and deletes a tiny probe object to confirm the bucket is reachable and writable. A green toast means Wasabi is ready; a red toast surfaces the exact error (bad credentials, wrong region/bucket, permissions). Click Save to persist everything.Make Wasabi the active storage
Enabling the provider only adds it to the selector. To actually store new results in Wasabi, set it as the platform’s Default Storage:1
Open General Settings
Go to Admin → General Settings → General.
2
Select Wasabi
Set Default Storage to Wasabi.
3
Save
Save the change. From that point, every newly finalized studio result is offloaded to Wasabi. Only enabled, fully-configured providers appear in this list, and “Local server (this machine)” is always the fallback.
How offloading works
The platform uses a single shared storage layer, so Wasabi behaves like the other storage plugins:- A studio finishes generating an image or video and stores it on the local
resultsdisk. - The platform checks which provider is active. If it’s Wasabi, the file is streamed up to your bucket under the same relative path it has locally (e.g.
images/gemini/uuid.png), with your key prefix prepended if set. - The creative is marked as living in Wasabi, so future reads, downloads and deletes resolve through Wasabi.
- If Delete local copy after upload is on, the local file is removed to reclaim space.
- Generation never breaks on storage errors. If an upload fails, the result simply stays on the local disk and serves from there — the failure is logged, not surfaced to the user.
- Local is the safe default. If Wasabi is later disabled, uninstalled, or misconfigured, the platform falls back to local storage for new results, and already-offloaded files keep serving from Wasabi.
Because offloaded objects are served from your bucket’s public URL (or the Public / CDN URL when set), features that hand a media URL to a third party (for example, publishing a creative through Social Media Studio) automatically use the Wasabi URL. If the bucket isn’t publicly readable and no CDN URL is set, those files won’t be reachable.
Go-live checklist
1
Install the plugin
Admin → General Settings → Plugins → Wasabi Storage → Install.
2
Create the bucket and access key
In Wasabi: create the bucket and an access key (with a bucket-scoped policy), and note the region.
3
Enter the credentials
Wasabi config → fill in Access Key, Secret Key, Region and Bucket.
4
Enable the provider
Turn on Enable Wasabi and Save.
5
Test the connection
Click Test connection and confirm the green success toast.
6
Set as Default Storage
General Settings → General → set Default Storage to Wasabi → Save.
7
Verify end-to-end
Generate a new result in Image or Video Studio, then confirm the file appears in your Wasabi bucket and still displays correctly in the app.
8
Decide on local cleanup
Once you trust the setup, optionally turn on Delete local copy after upload to reclaim server disk.
Once every step above is green, new studio results are stored in your Wasabi bucket.
Troubleshooting
The secret key is stored encrypted using your app
APP_KEY. Switching Default Storage back to local (or disabling the plugin) never deletes what’s already in your bucket — those files keep serving from Wasabi.