Turn a product into an editable, exportable landing page. The AI studies your photos, writes a creative brief with three design directions, then builds a complete, animated page.
This is a Paid plugin that you can purchase and install via the in-app Plugins marketplace.
Introduction
Landing Page Builder closes the gap between making an ad and having somewhere to send the click. A user adds product photos and a few details, the AI studies them and writes a creative brief with three design directions, then builds a complete, animated landing page. Every word is editable on the live page, and the finished page exports as plain HTML, CSS and JavaScript that runs on any host.This guide covers the full lifecycle: where to buy it, how to install it, how to connect the AI engines, how to configure pricing and limits, how to grant access by plan, and how users build, edit and publish a page.
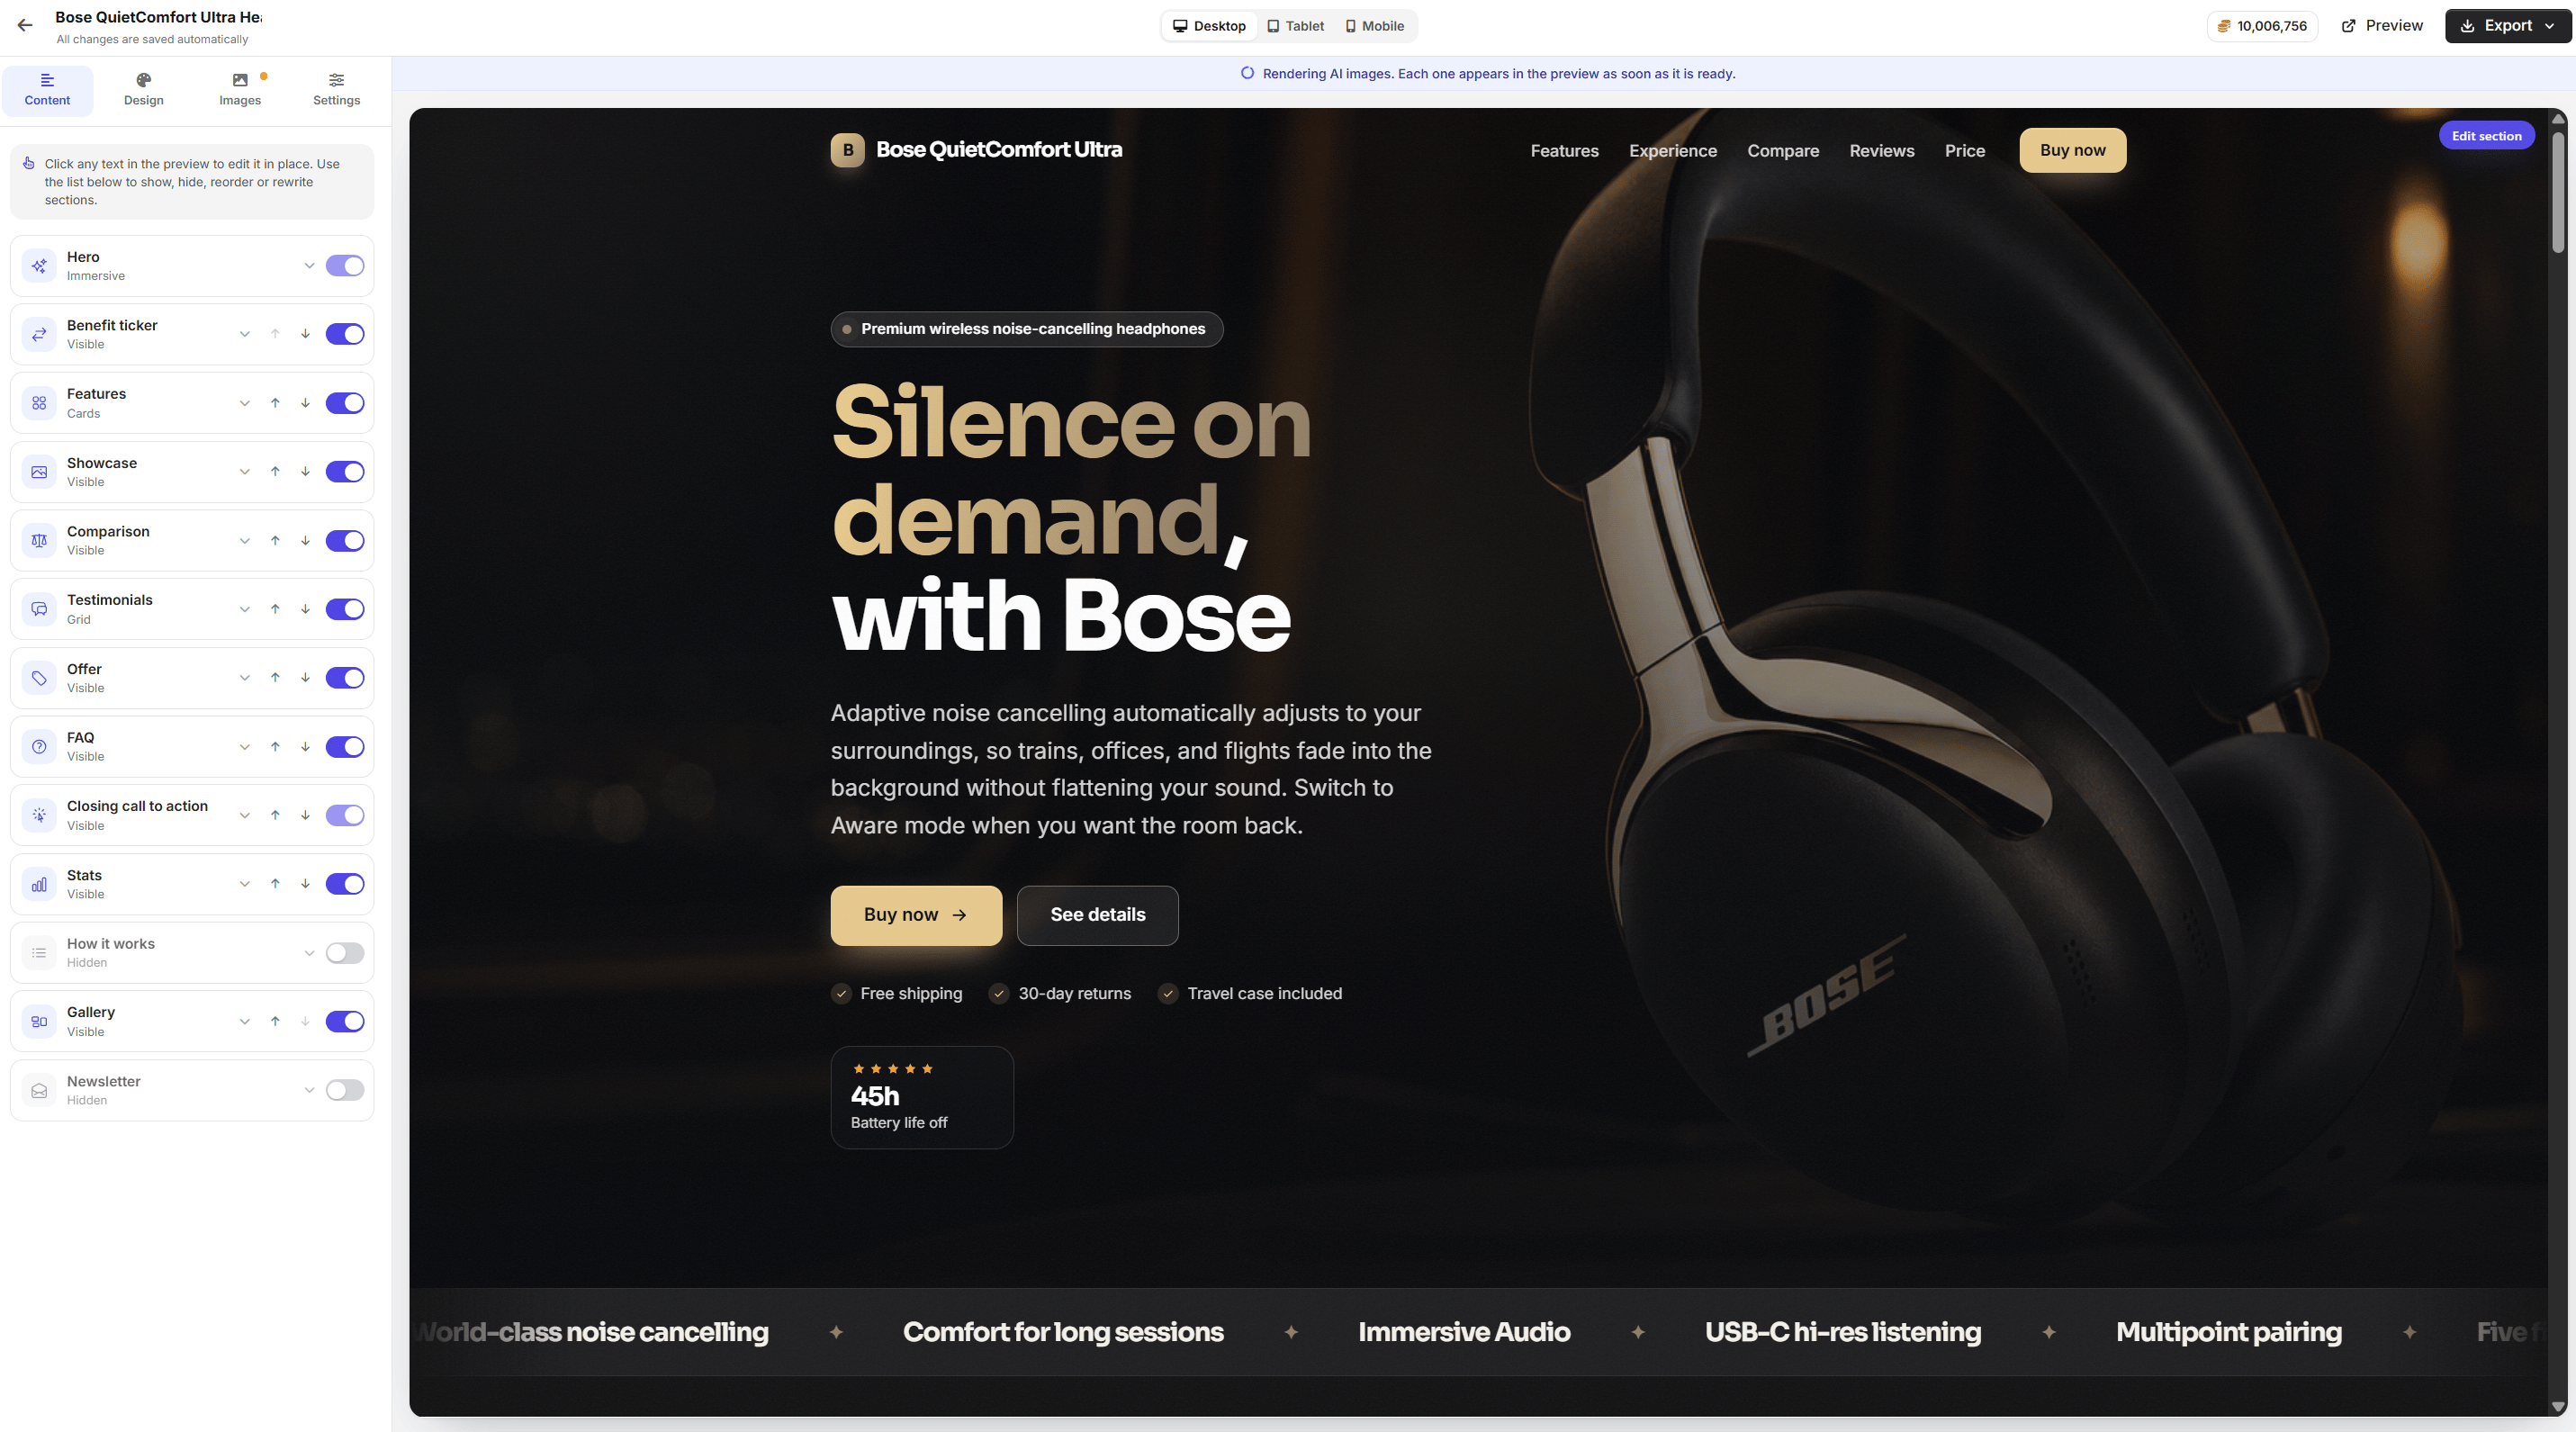
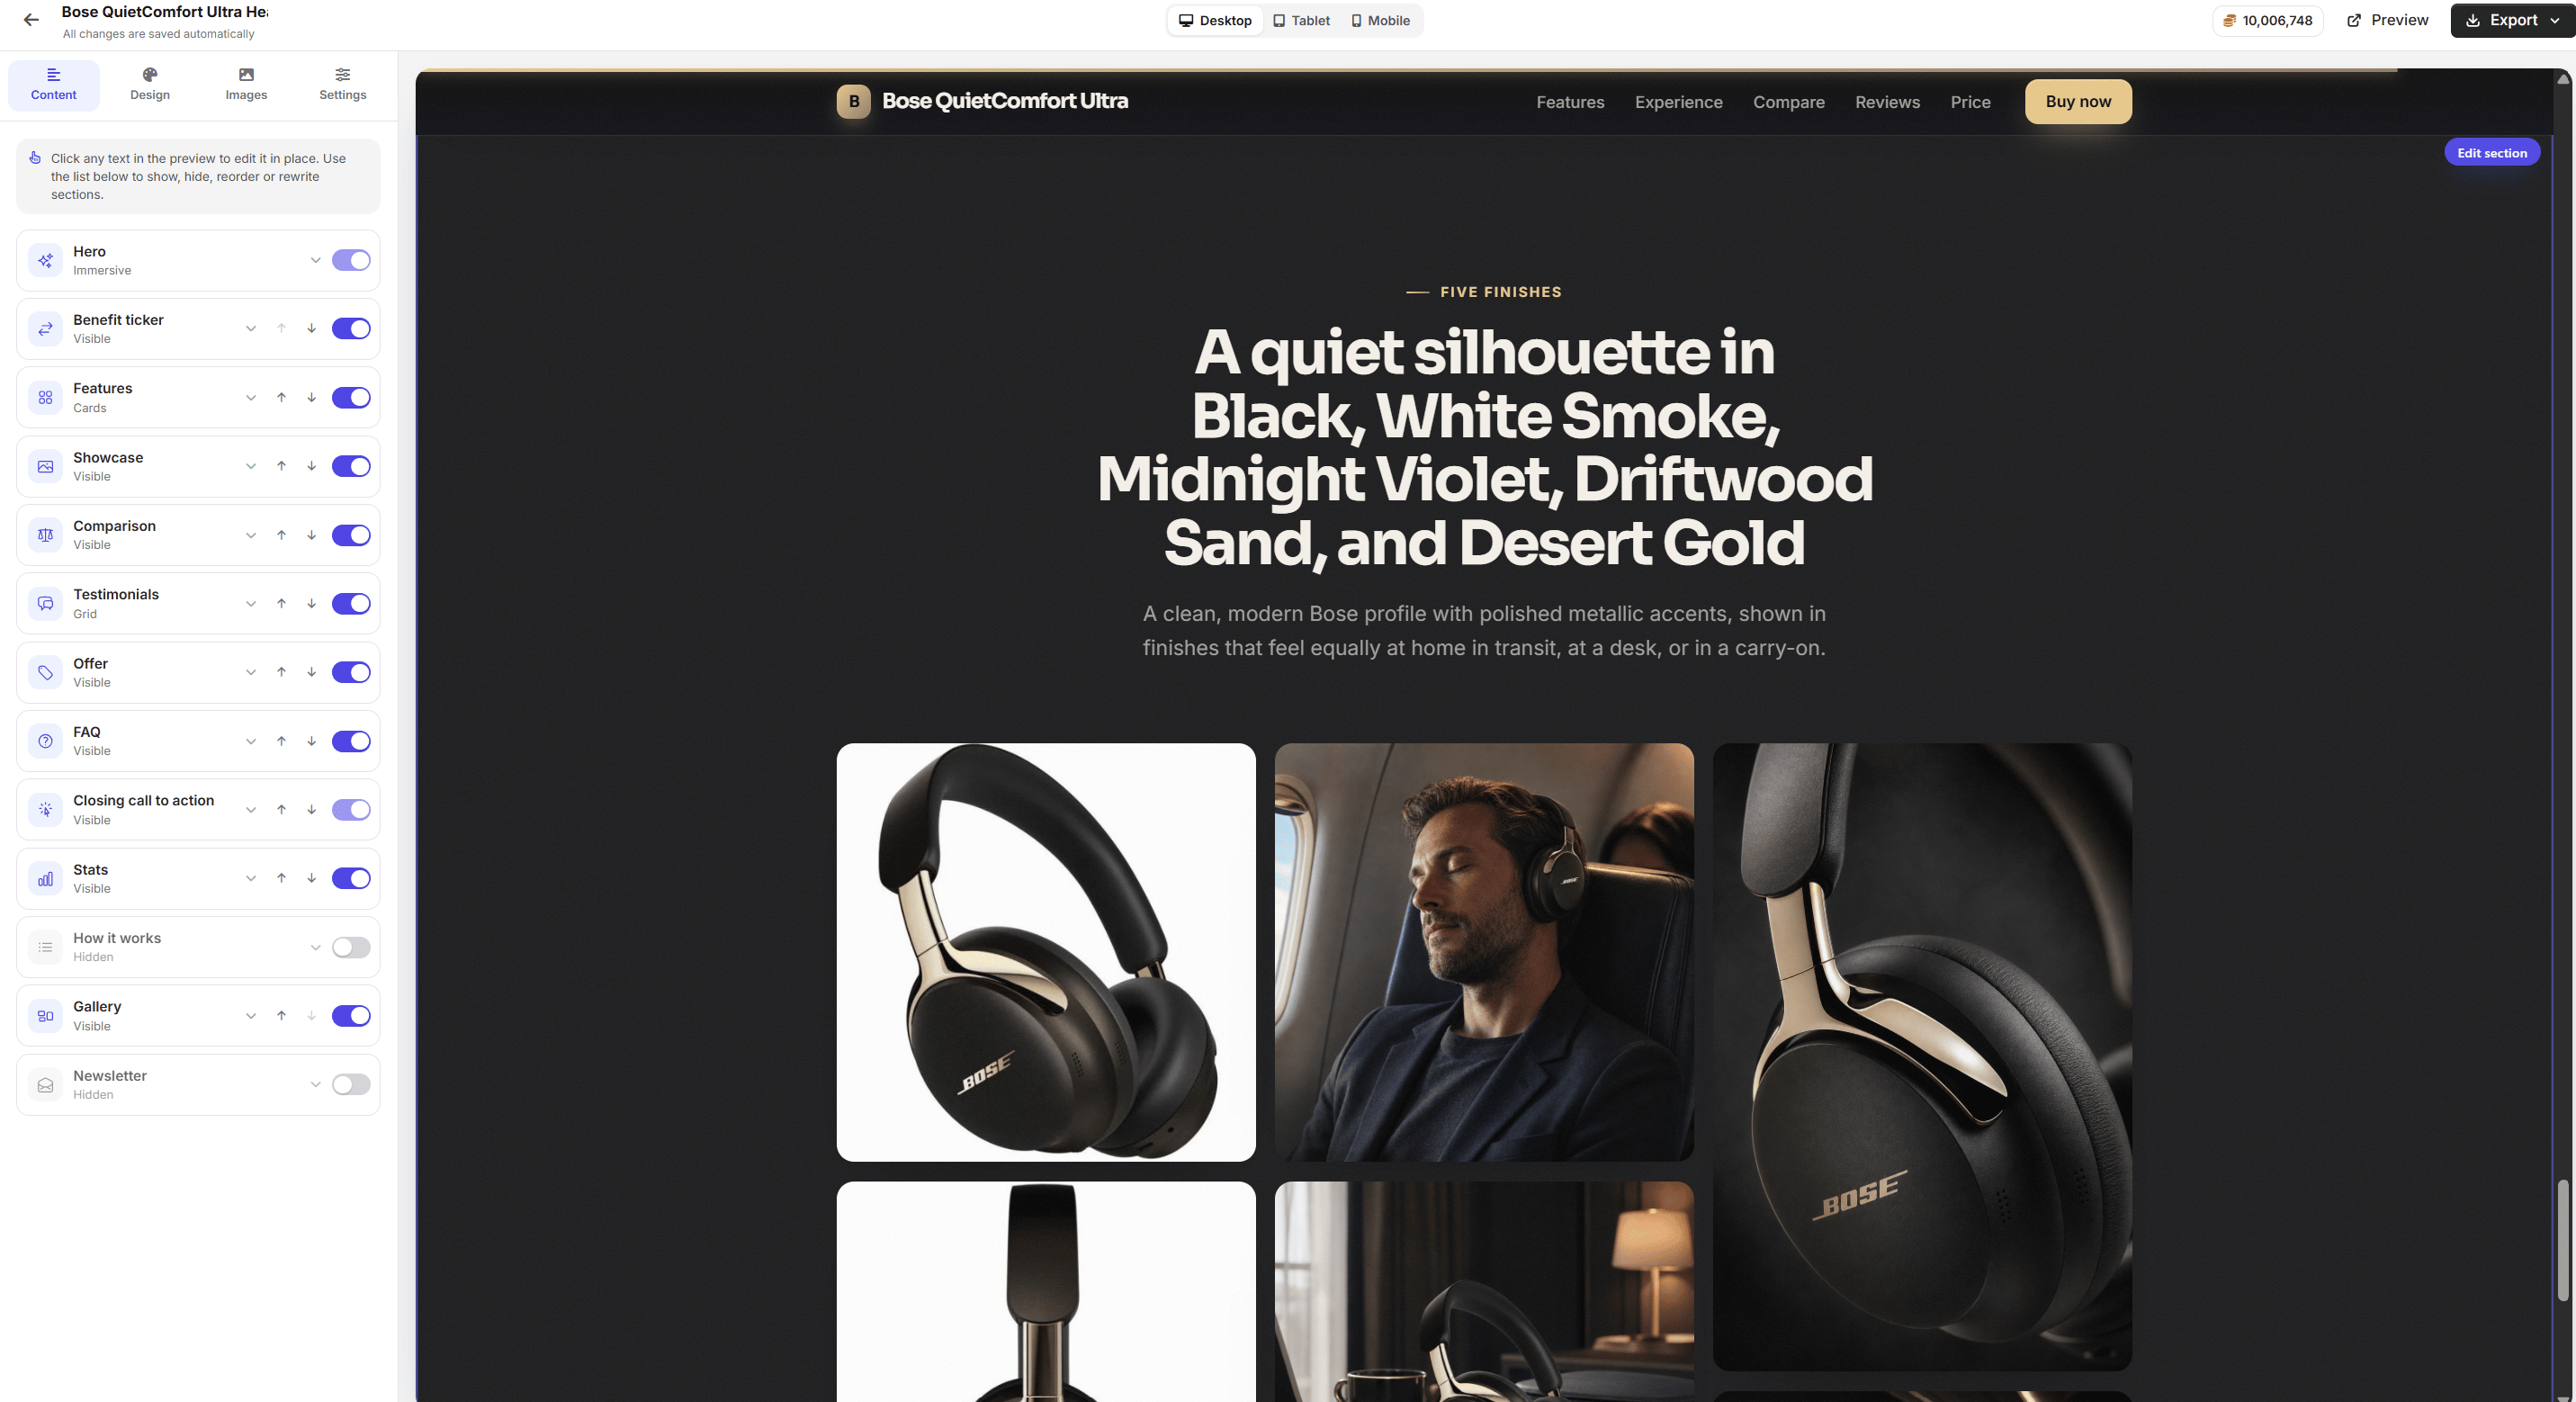
A finished landing page open in the Landing Page Builder.
Included Tools
My landing pages: library of every page a user has started. Search, rename, duplicate, delete, preview and export from one place
Setup wizard: three steps, Product (photos, description, goal), Strategy (confirm what the AI understood) and Design (look, sections and imagery)
Visual editor: the page itself, live. Click any text to edit it in place, with side panels for Content, Design, Images and Settings
AI section rewrites: rewrite or write a single section with an instruction such as “make it more persuasive”, without rebuilding the page
AI imagery: optional hero, lifestyle, detail and banner images rendered around the user’s real product
Export: a ZIP bundle (HTML, CSS, JavaScript, images and a README) or a single self-contained HTML file
Each page is built from up to 13 sections: Hero, Benefit ticker, Features, Showcase, Stats, How it works, Gallery, Testimonials, Comparison, Offer, FAQ, Closing call to action and Newsletter. Sections can be switched on or off, reordered, and some have alternate layouts.
AI engines
Landing Page Builder has no API key of its own. It uses the engines you already configure in AI Settings.
Engine
Writes the copy
Renders the images
OpenAI
GPT text model
GPT Image
Google Gemini
Gemini text model
Nano Banana
The admin picks a default engine and can let users choose between them. Everything runs on the admin’s keys, so users never bring their own.
Editing and exporting never use credits. Only the AI steps do: the product brief, the full page build, section rewrites and AI images. Credits are charged only after a step succeeds.
Purchase & Installation
Landing Page Builder is distributed through the in-app plugin marketplace. Purchasing and installation both happen inside your MagicAds admin, so there is no third-party download.
1
Open the Plugins marketplace
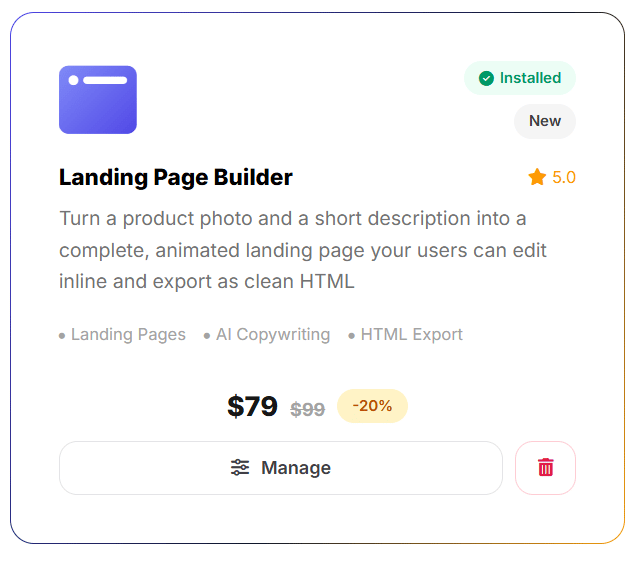
Sign in as an admin and go to Admin → Platform → Plugins (/app/admin/plugins). Find the Landing Page Builder card in the marketplace catalog.
The Landing Page Builder card in the plugin marketplace.
2
Purchase (if required)
The card button depends on your license and purchase state:
Buy Now → opens the plugin checkout to complete the purchase.
Install → shown once the plugin is purchased, or when it is free for your license.
3
Install / activate
Click Install on the Landing Page Builder card. The platform downloads the plugin archive, unpacks it and runs its migration. This creates:
Landing Page Builder’s settings columns on the shared extension settings record, with safe defaults (feature off, free tier off, automatic engine, up to 5 AI images and 6 photos per page, 10 MB upload cap).
A Landing Page Builder toggle on every pricing plan.
Installation only makes the routes and tables exist. The tool stays hidden from users until you enable the feature and connect an AI engine (next sections). On a fresh install everything is off by default.
To remove the plugin later, click the trash button on the same card.
Uninstalling removes the plugin’s files and hides the tool from everyone, but it does not delete the landing_page_builder_pages table. Existing pages stay in the database and are available again if you reinstall.
Configure API keys
Landing Page Builder needs two things from AI Settings, and it checks them separately for each engine.
Need
Used for
Where to set it
An API key and at least one enabled text (Copy Studio) model for the vendor
Writing the brief, the page copy and section rewrites. Without this the engine counts as Not configured.
Admin → AI Settings → the vendor
An API key and an active image model from the same vendor (GPT Image for OpenAI, Nano Banana for Gemini)
Optional AI images. Without this the engine still works, but only with the customer’s own photos.
Admin → AI Settings → the vendor
1
Open the vendor
Go to Admin → AI Settings (/app/admin/ai) and click the vendor card (OpenAI or Google Gemini). The vendor window opens.
2
Paste the key
Paste the key into API Key.
3
Enable the models
In the model list, switch on at least one Copy Studio model. If you want AI imagery, also switch on the vendor’s Image Studio model.
4
Save
Click Save Vendor. This saves both the key and the model switches.
Pick a strong text model. A full page is a long, structured answer, so very small or very fast models can run out of room or return unreadable output.
Configure Landing Page Builder
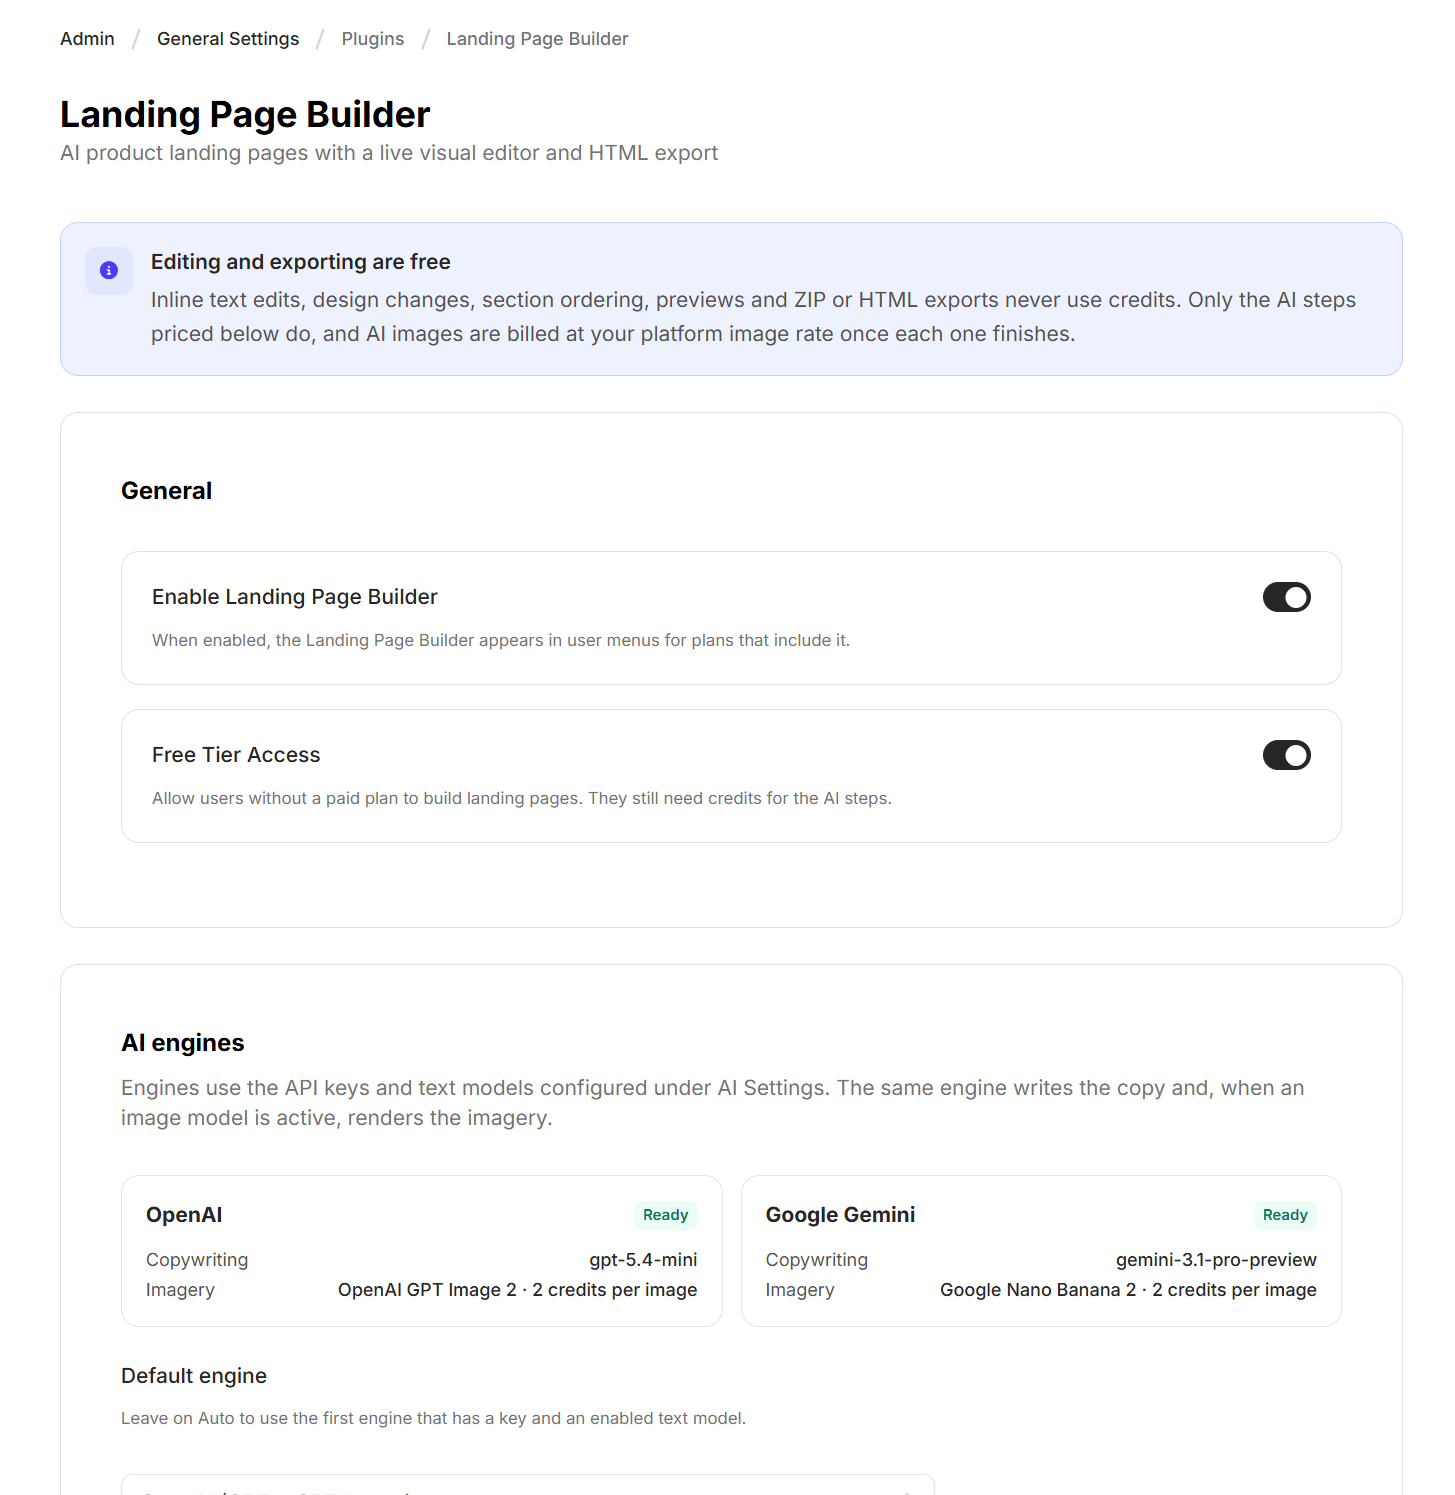
Go to Admin → General Settings → Plugins → Landing Page Builder (/app/admin/general/plugins/landing-page-builder). The screen has four sections.
The Landing Page Builder configuration screen.
General
Setting
Purpose
Enable Landing Page Builder
Master switch. When on, the tool appears in user menus for plans that include it. Off by default.
Free Tier Access
When on, users without a paid plan can build pages (they still need credits for the AI steps). When off, only users on a plan that includes the feature get access.
AI engines
One card per engine shows a Ready or Not configured badge, the text model it will use for copywriting, and the imagery model with its cost per image. If the engine has no image model, the card reads “Uses the customer’s photos”.
Setting
Purpose
Default engine
Auto uses the first engine that has a key and an enabled text model. Or pin OpenAI or Google Gemini.
Let users choose the engine
Shows an engine picker in the setup wizard when more than one engine is ready.
OpenAI text model / Gemini text model
The model used for copy. Leave on Default to use the first enabled model for that vendor.
Limits
Setting
Range
Purpose
AI images per page
0 to 5 (default 5)
Caps how many AI images a page can hold. Set 0 to use customer photos only.
Photos per page
1 to 12 (default 6)
How many uploaded photos or Ad Creatives a page can hold.
Max upload size (MB)
1 to 50 (default 10)
Per-photo cap. Keep it within your PHP upload limits.
Credit pricing
A per-step credit price. Each value is the number of credits a user spends when that step succeeds. Set 0 to make a step free.
Step
Default
Covers
AI product brief & design directions
1
The “Analyze my product” step.
Full landing page copy & layout
5
Building a page, and regenerating the whole page.
Section rewrite or new section
1
Rewriting or writing a single section.
AI images are not part of this grid. Each one is billed at your platform’s normal image rate for the engine’s image model (set per model in AI Settings), once the image finishes rendering.Credit rules:
A user is only charged on success. Failed, timed-out or cancelled steps cost nothing.
Before a build starts, the user needs enough credits for the page plus all the AI images it will queue. If not, the step is blocked with a message stating the amount required.
Click Save to persist all sections.
Grant access by plan
Access is gated in two layers:
Platform layer: the plugin must be installed and Enable Landing Page Builder must be on.
User layer: who actually gets the tool:
Subscribed users (on a plan): access is governed by the plan’s Landing Page Builder toggle. Edit each plan and enable it for the plans that should include it.
Non-subscribed users (no plan): access only when Free Tier Access is on.
When the tool is offered platform-wide but the user’s plan doesn’t include it, it appears in the sidebar as a locked, upgrade-to-unlock entry rather than disappearing.
To set it up:
Enable the master switch in the Landing Page Builder config.
Go to Admin → Finance → Pricing Plans, edit each plan and turn Landing Page Builder on for the plans that should include it.
Optionally enable Free Tier Access if you want plan-less users to try it.
Admin → AI Settings → add an OpenAI and/or Gemini key and enable at least one Copy Studio model. Enable the vendor’s image model if you want AI imagery.
3
Pick the engine
Landing Page Builder config → AI engines → confirm the card shows Ready, then choose the default engine and text model.
4
Set pricing & limits
Adjust the credit pricing, AI images per page, photos per page and upload size, then Save.
5
Enable the feature
Turn on Enable Landing Page Builder. Enable Free Tier Access if desired.
6
Grant plan access
Enable the Landing Page Builder toggle on the plans that should include it.
7
Verify as a user
Log in as a user on an eligible plan and build a page end to end: analyze a product, build the page, edit a line and export it.
Once every step above is green, Landing Page Builder is live. Proceed to the section below on how to use it.
How to Use
The tool lives under Creative Tools → Landing Page Builder in the user sidebar.
What each step costs
Action
Default cost
Charged when
Analyze my product
1 credit
The brief is ready.
Build my landing page
5 credits
The copy is written.
Each AI image
Your platform image rate
That image finishes rendering.
Rewrite or write a section
1 credit
The section is saved.
Regenerate the whole page
5 credits plus any missing AI images
The new copy is written.
Editing text, changing the design, reordering sections, previewing, duplicating, exporting
Free
Never charged.
Costs shown on the buttons always match the admin’s current pricing.
My landing pages
The library lists every page the user has started. Search by name, or click New landing page.
The My landing pages library.
Each card shows a mini preview, the page name, a status badge and the number of sections:
Status
Meaning
Draft
Product details saved, brief not generated yet.
Brief ready
The AI brief exists. Continue the setup to build the page.
Ready
The page is built and open in the builder.
Needs attention
The last build did not finish. The user was not charged.
The … menu on a card offers Open builder (or Continue setup), Preview in new tab, Download ZIP, Download single HTML file, Rename, Duplicate and Delete. Deleting removes the page and its uploaded photos. AI images stay in the user’s Ad Creatives.
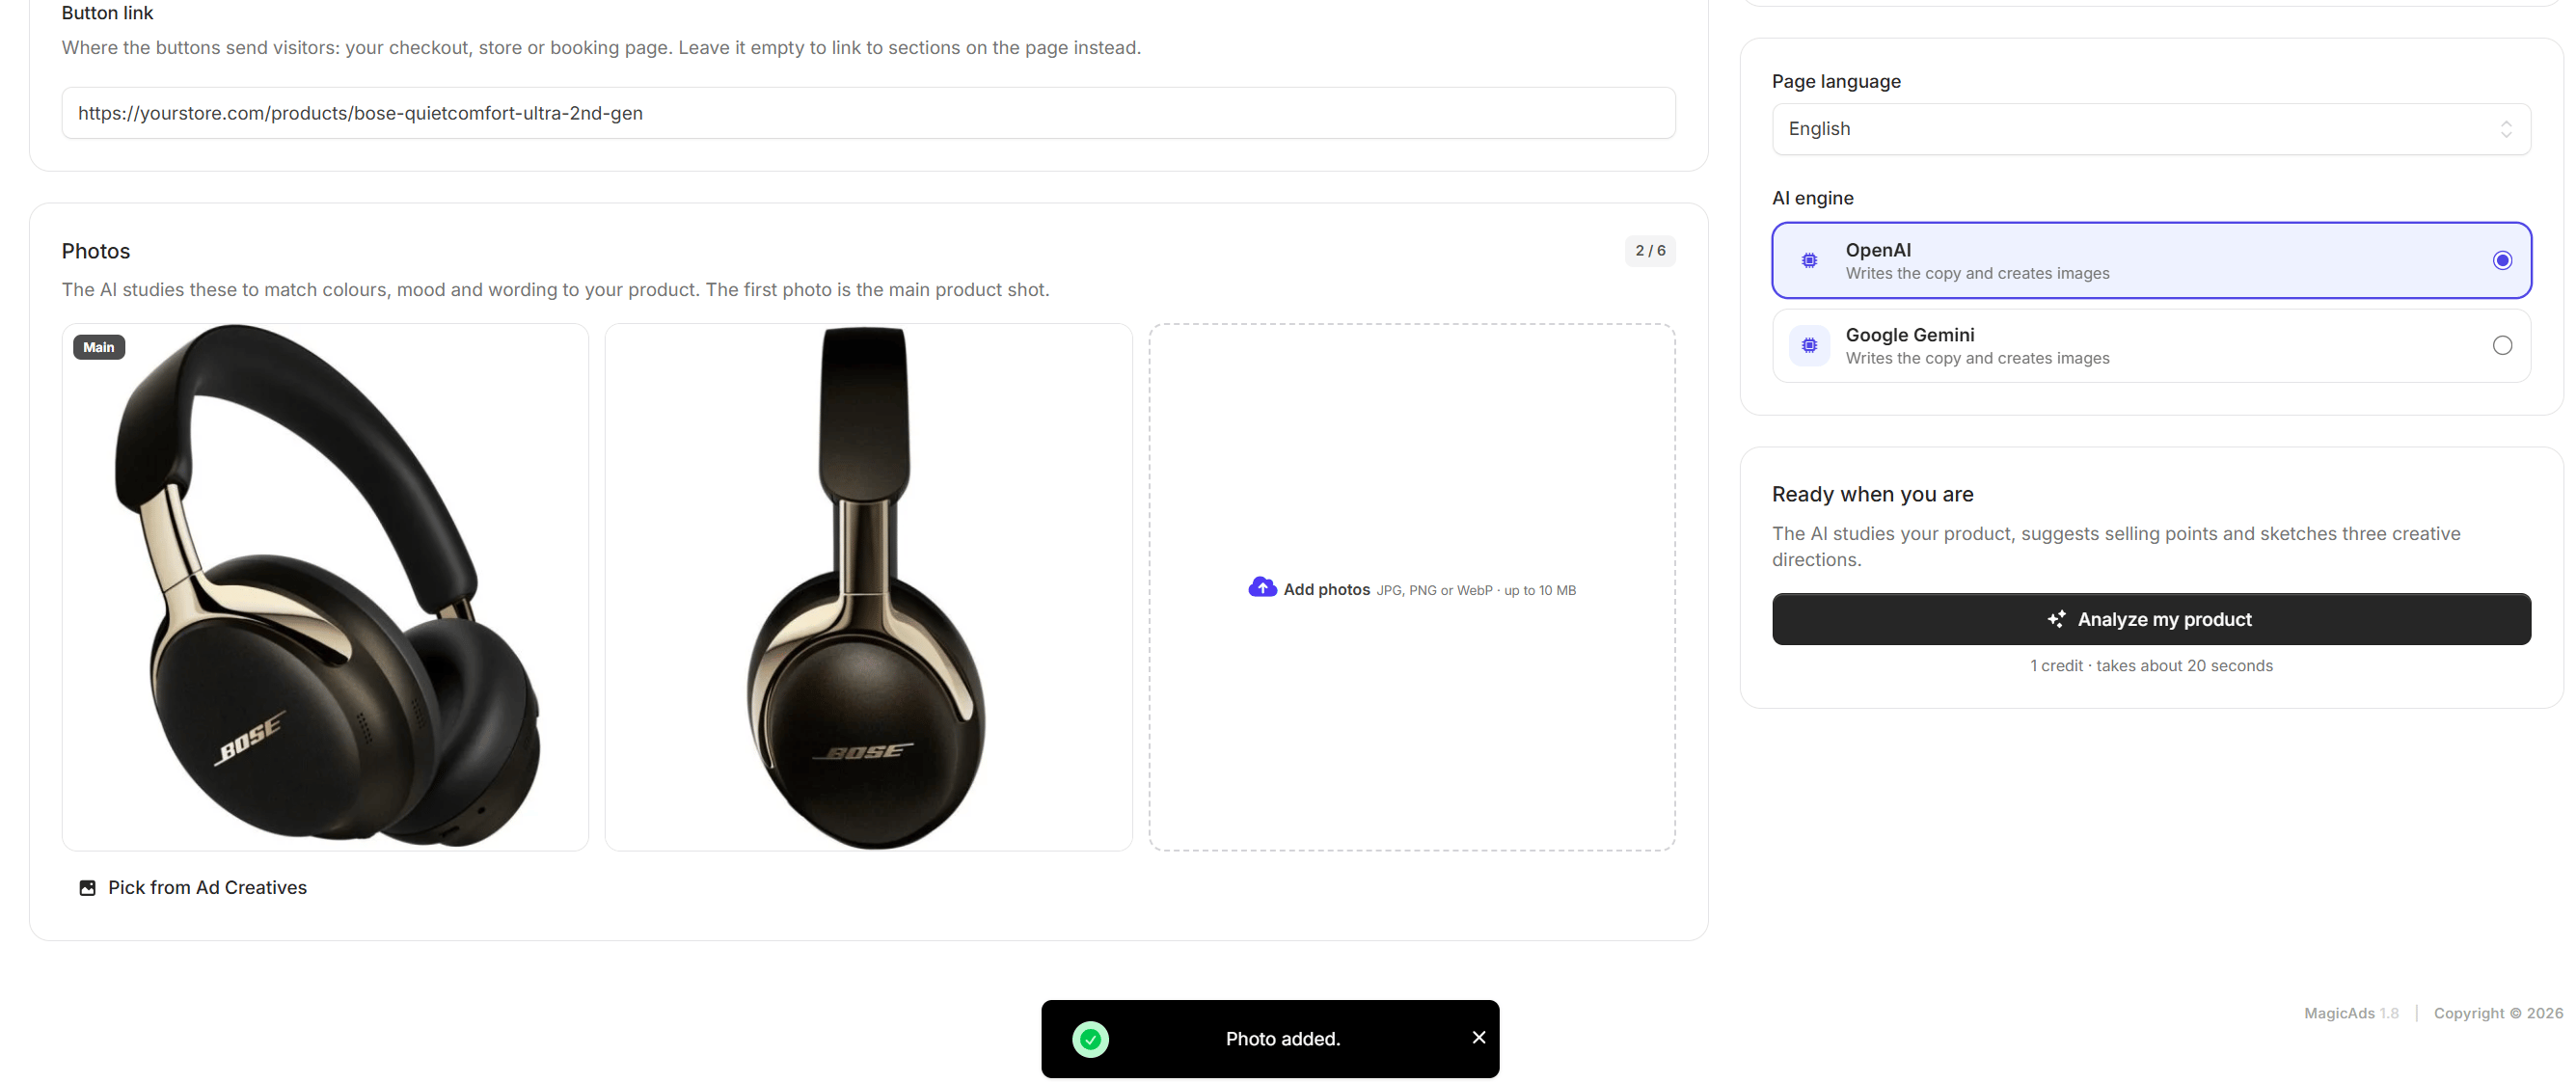
Step 1: Product
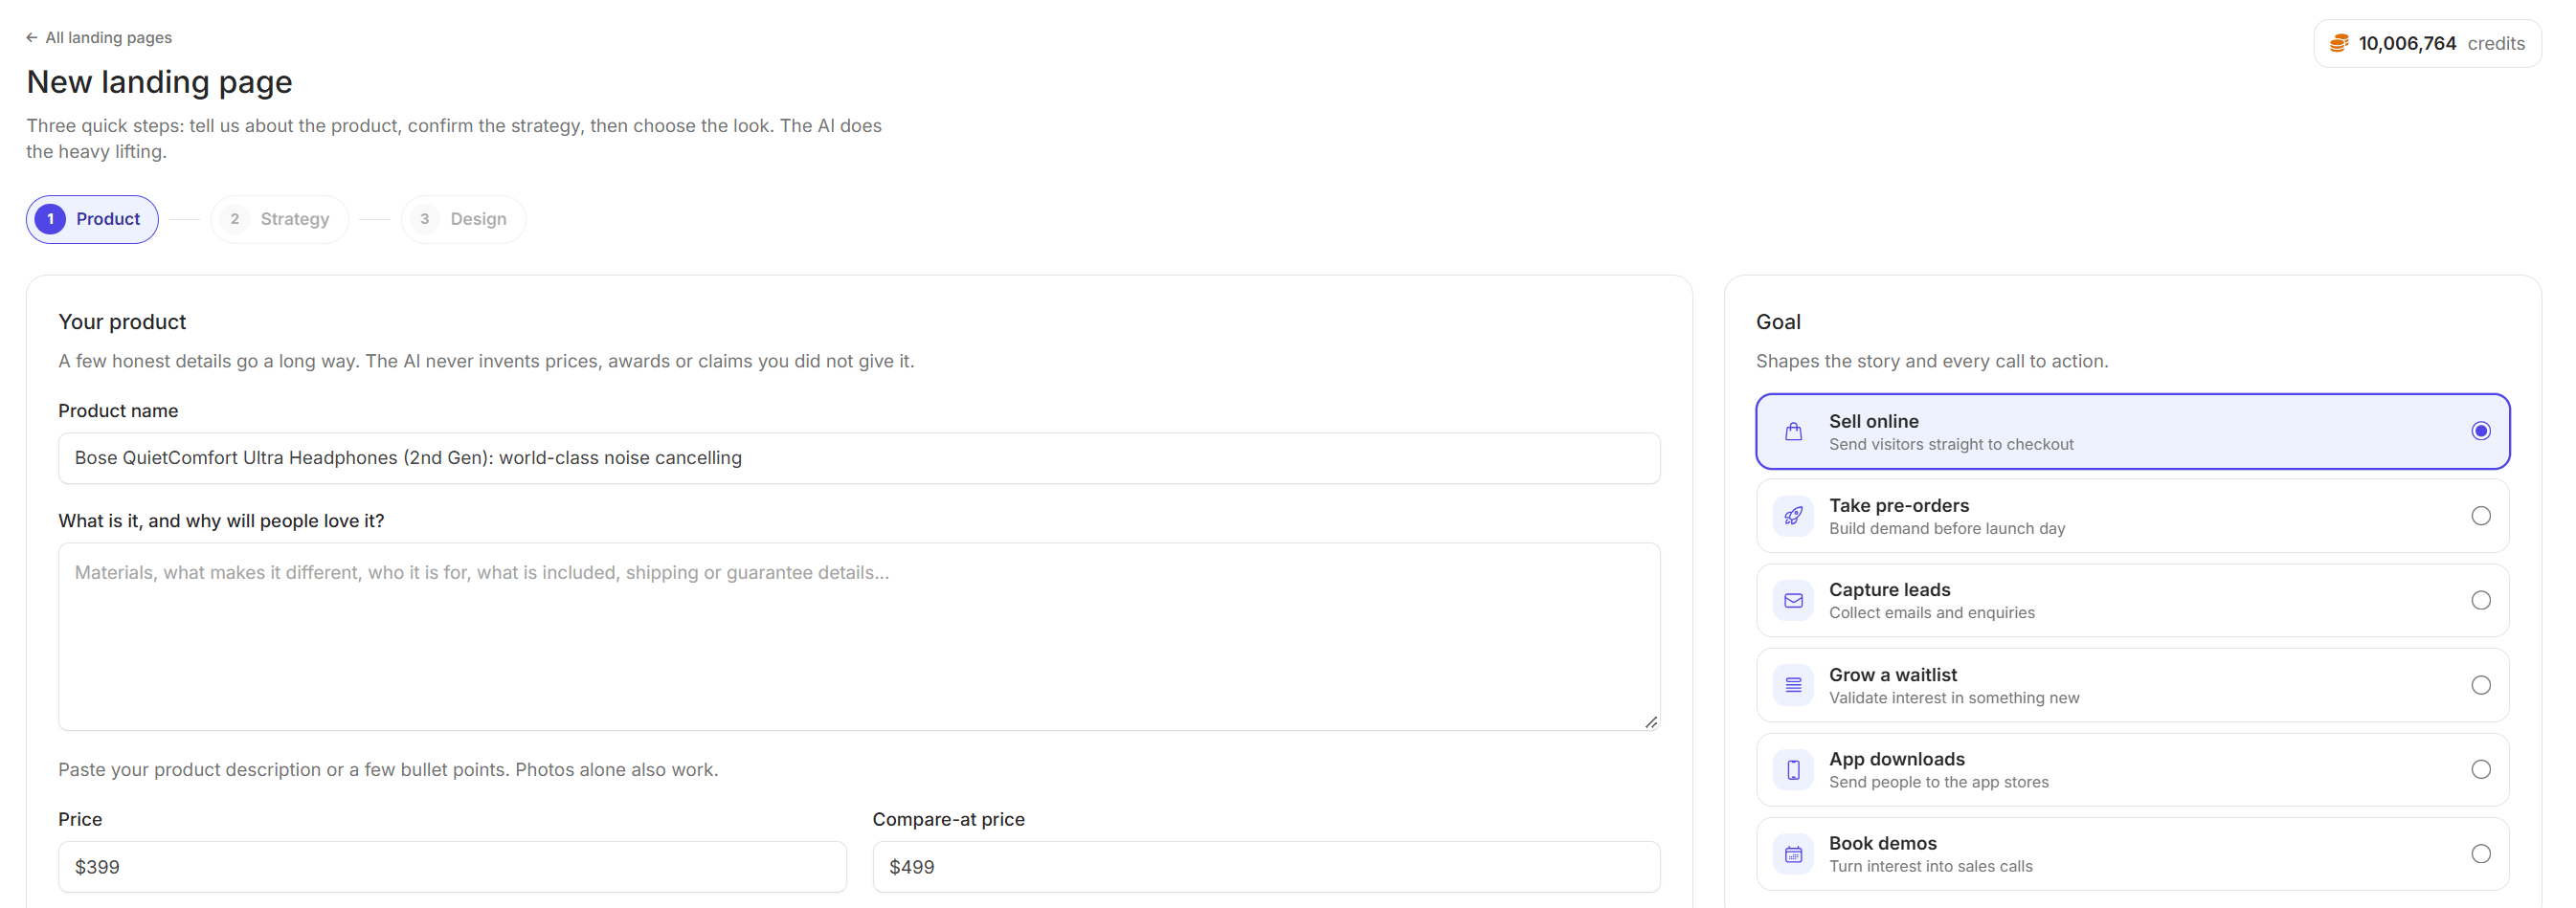
Tell the AI about the product. The AI never invents prices, awards or claims you didn’t give it.
Setup step 1: Product.
Field
Limit
Notes
Product name
120 characters
Becomes the page name.
What is it, and why will people love it?
3,000 characters
Paste the product description or a few bullet points. Photos alone also work.
Price and Compare-at price
24 characters each
Copied exactly onto the Offer section. Leave empty to show no price.
Button link
Full web address
Where the buttons send visitors: checkout, store or booking page. If empty, buttons link to sections on the page.
Photos
Up to the admin’s limit (default 6)
JPG, PNG or WebP. The AI studies them to match colours, mood and wording.
Photos: upload files, or click Pick from Ad Creatives to reuse images from the library. The first photo is the Main photo. Use the star button on another photo to make it the main one.Goal shapes the story and every call to action:
Goal
Default button wording
Sell online
Buy now
Take pre-orders
Pre-order now
Capture leads
Get in touch
Grow a waitlist
Join the waitlist
App downloads
Download the app
Book demos
Book a demo
Also choose the Page language (22 languages, including right-to-left Arabic and Hebrew), an optional Brand (adds your saved brand voice, colours and logo) and, when the admin allows it, the AI engine.Then click Analyze my product. The user needs a description or at least one photo. The AI reads the photos and text, which usually takes 15 to 40 seconds.
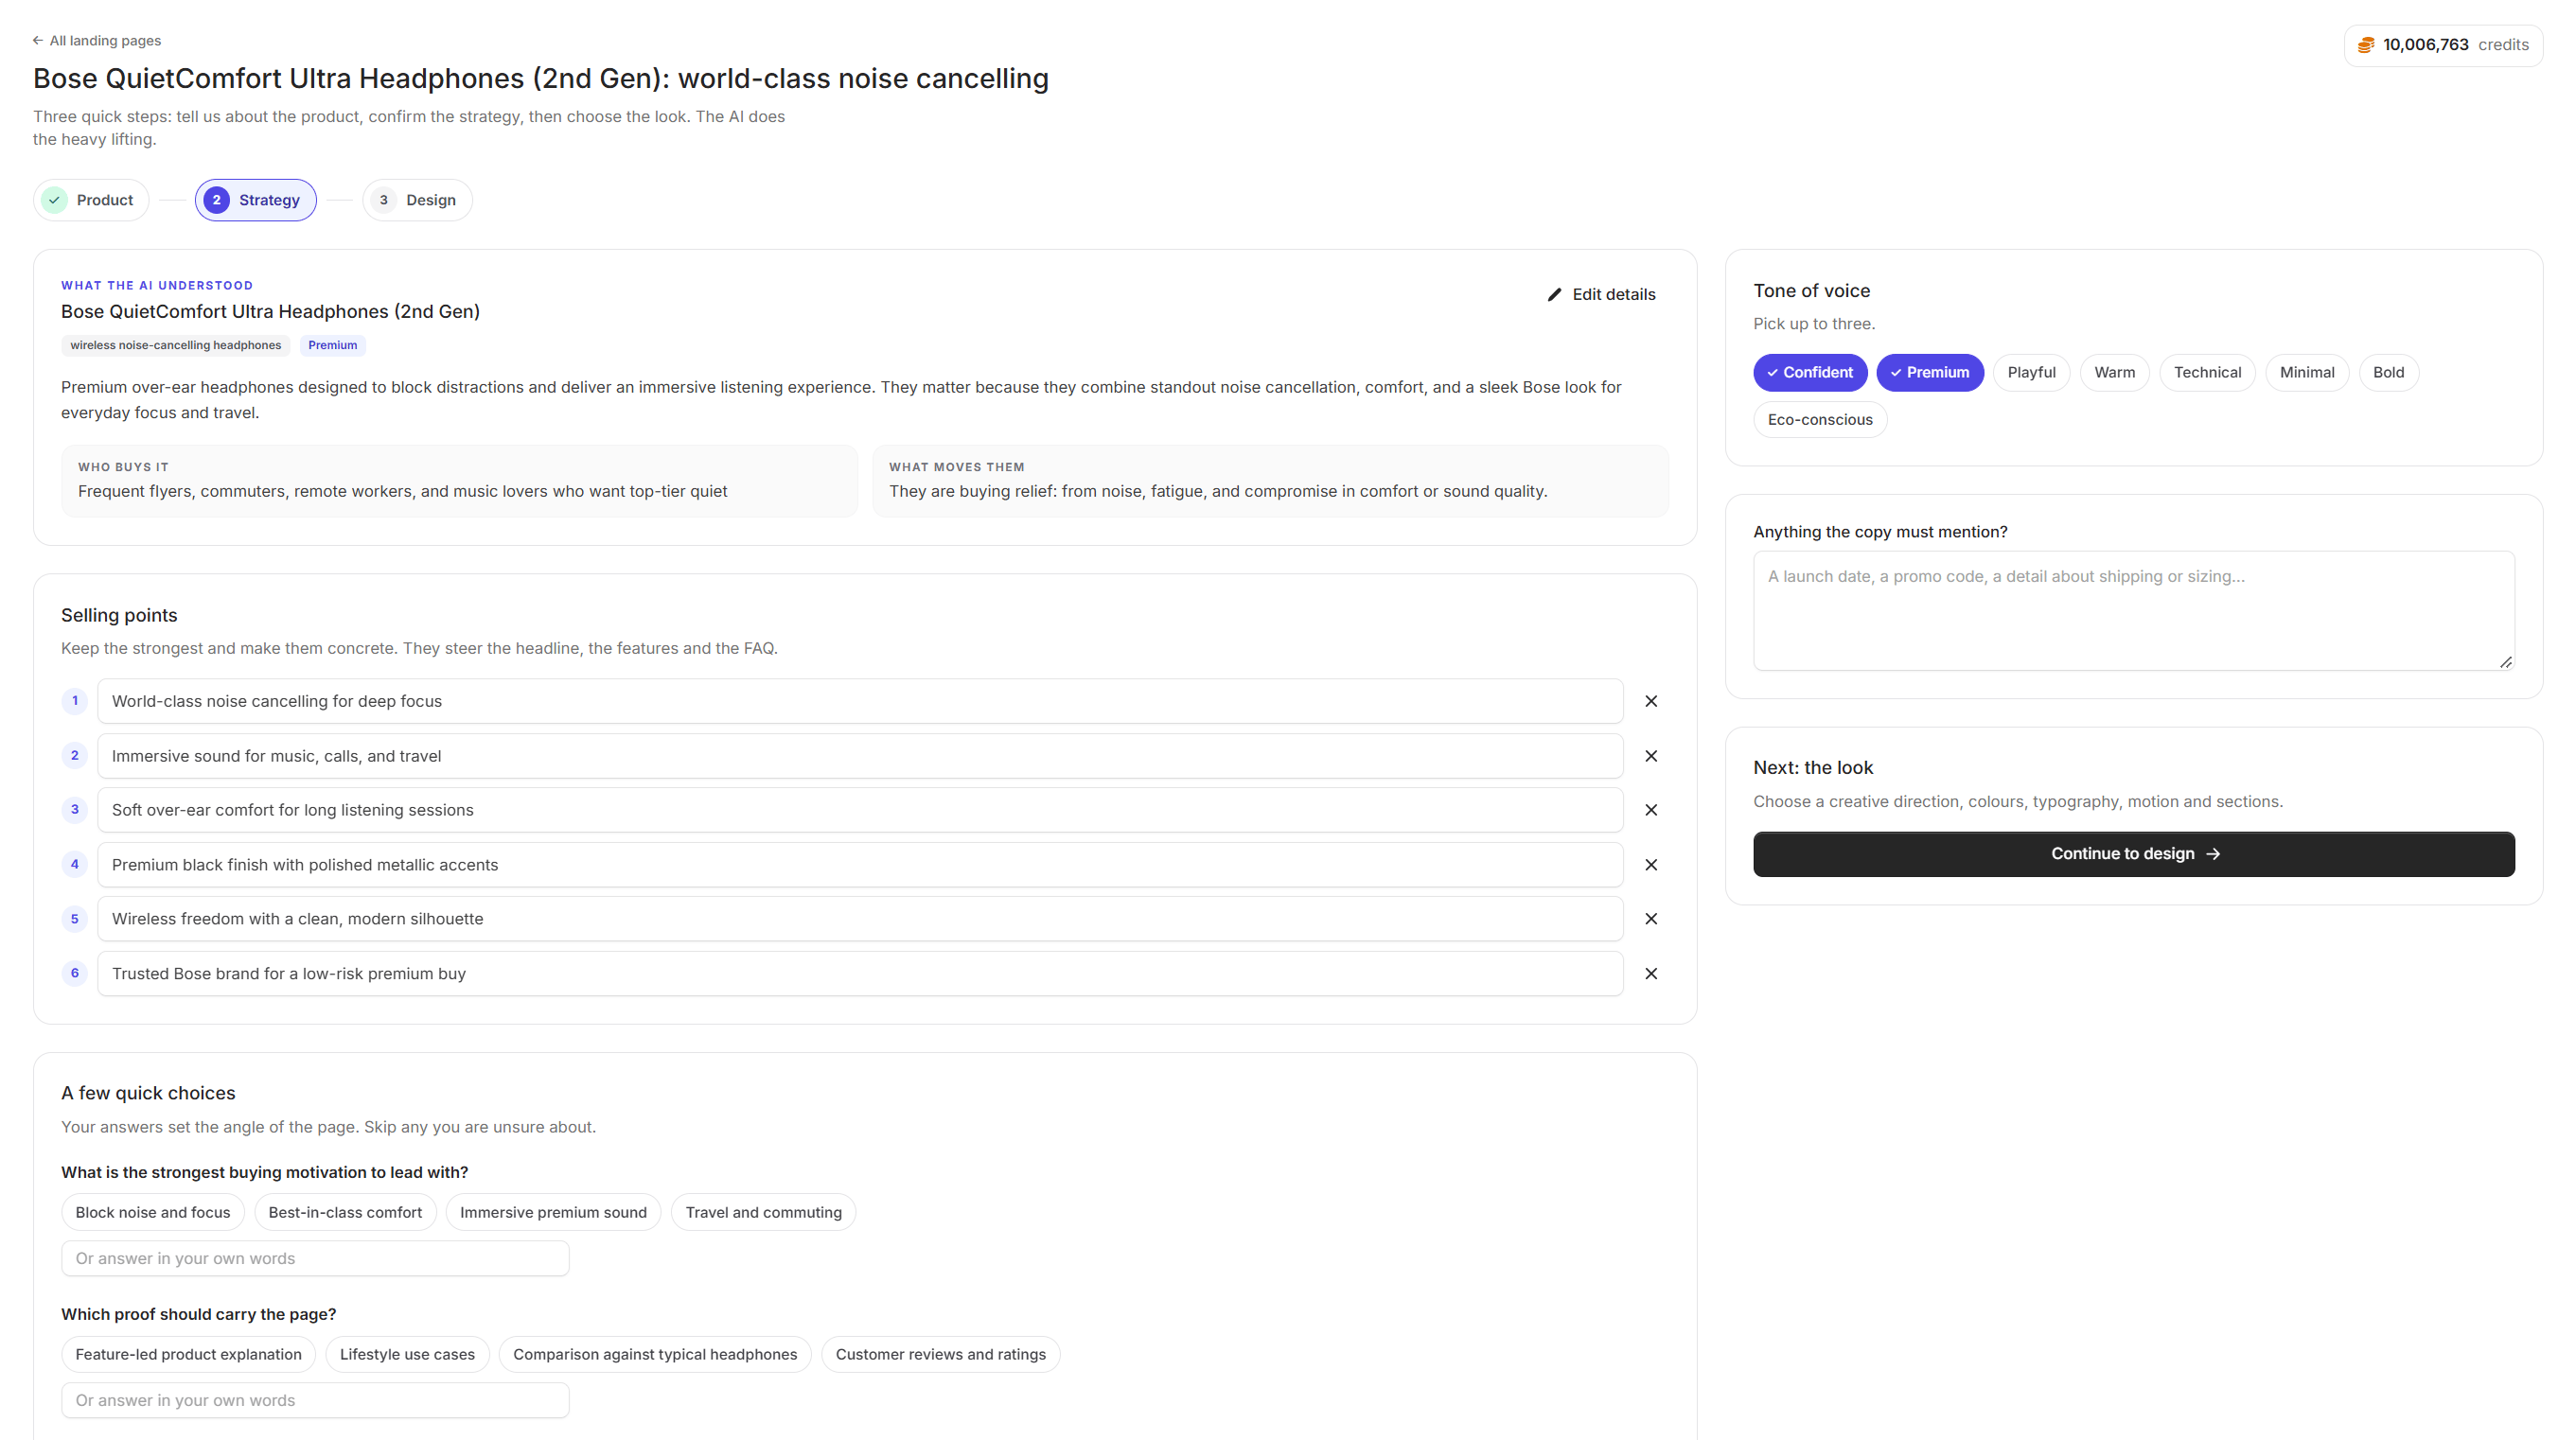
Step 2: Strategy
The AI returns a creative brief. The user confirms or adjusts it before any copy is written.
Setup step 2: Strategy.
What the AI understood: product name, category, positioning (Budget-friendly, Mid-range, Premium or Luxury), a summary, Who buys it and What moves them. Click Edit details to go back and change the inputs.
Selling points: up to 6, 80 characters each. Keep the strongest and make them concrete. They steer the headline, features and FAQ.
A few quick choices: two or three questions that change the angle of the page. Tap an option, type your own answer (120 characters), or skip.
Tone of voice: pick up to three from Confident, Premium, Playful, Warm, Technical, Minimal, Bold and Eco-conscious.
Anything the copy must mention?: 400 characters for a launch date, promo code or shipping detail.
Click Continue to design.
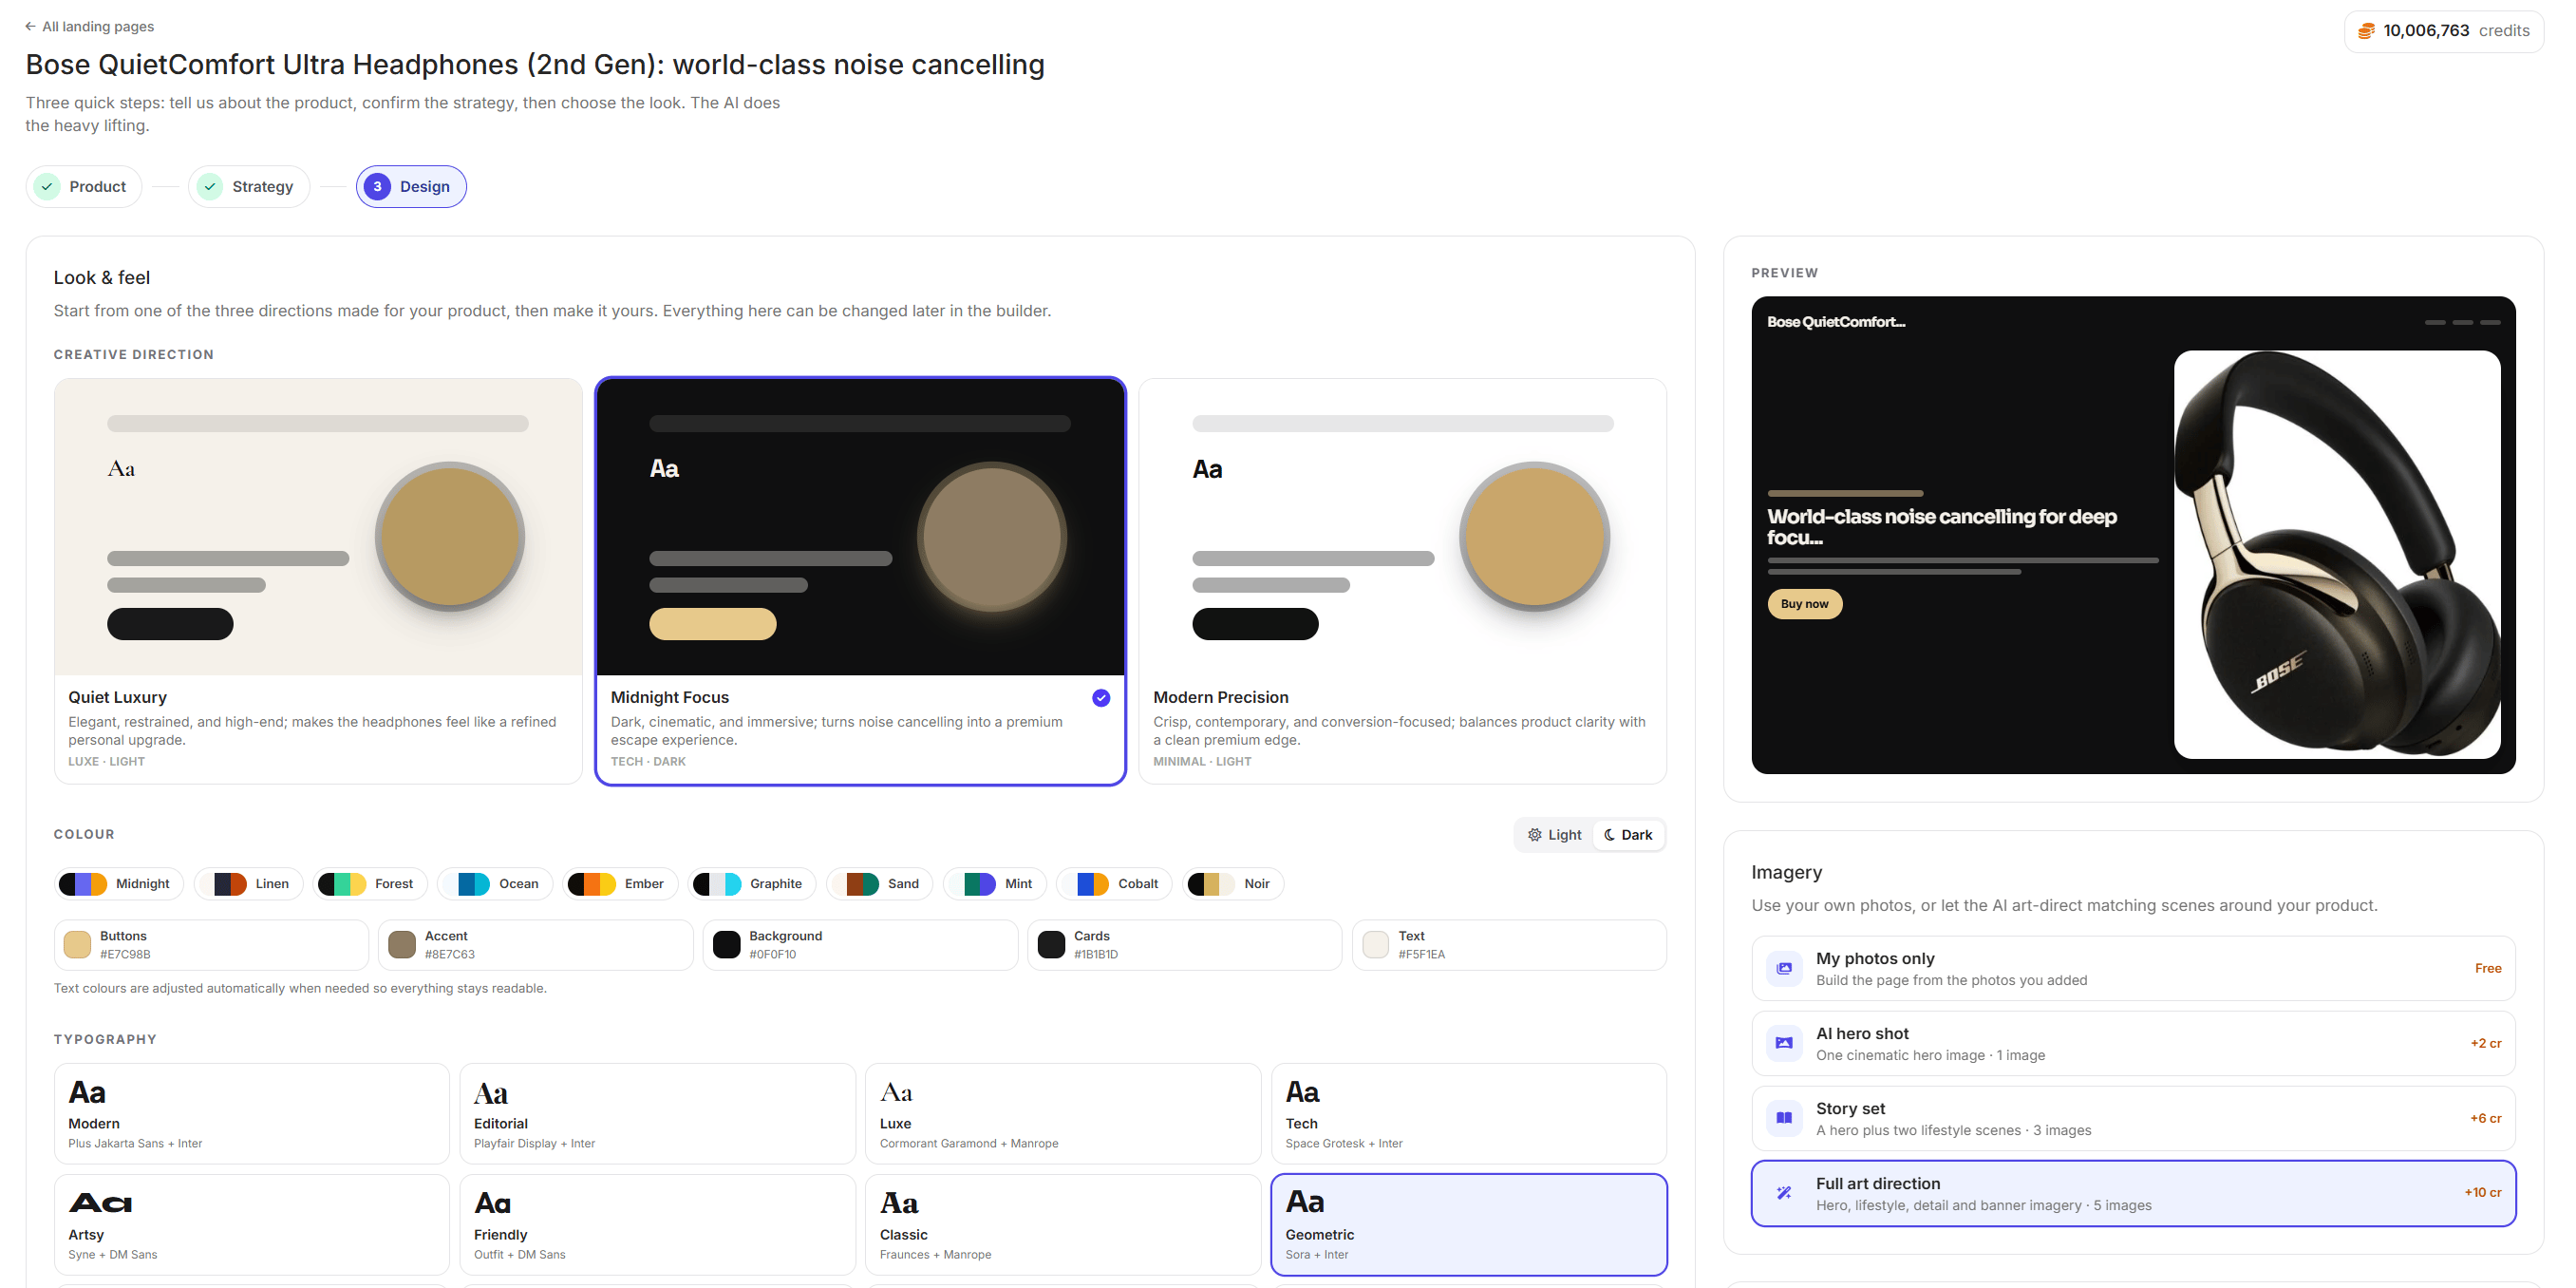
Step 3: Design
Choose how the page looks. Everything here can be changed later in the builder.
Setup step 3: Design.
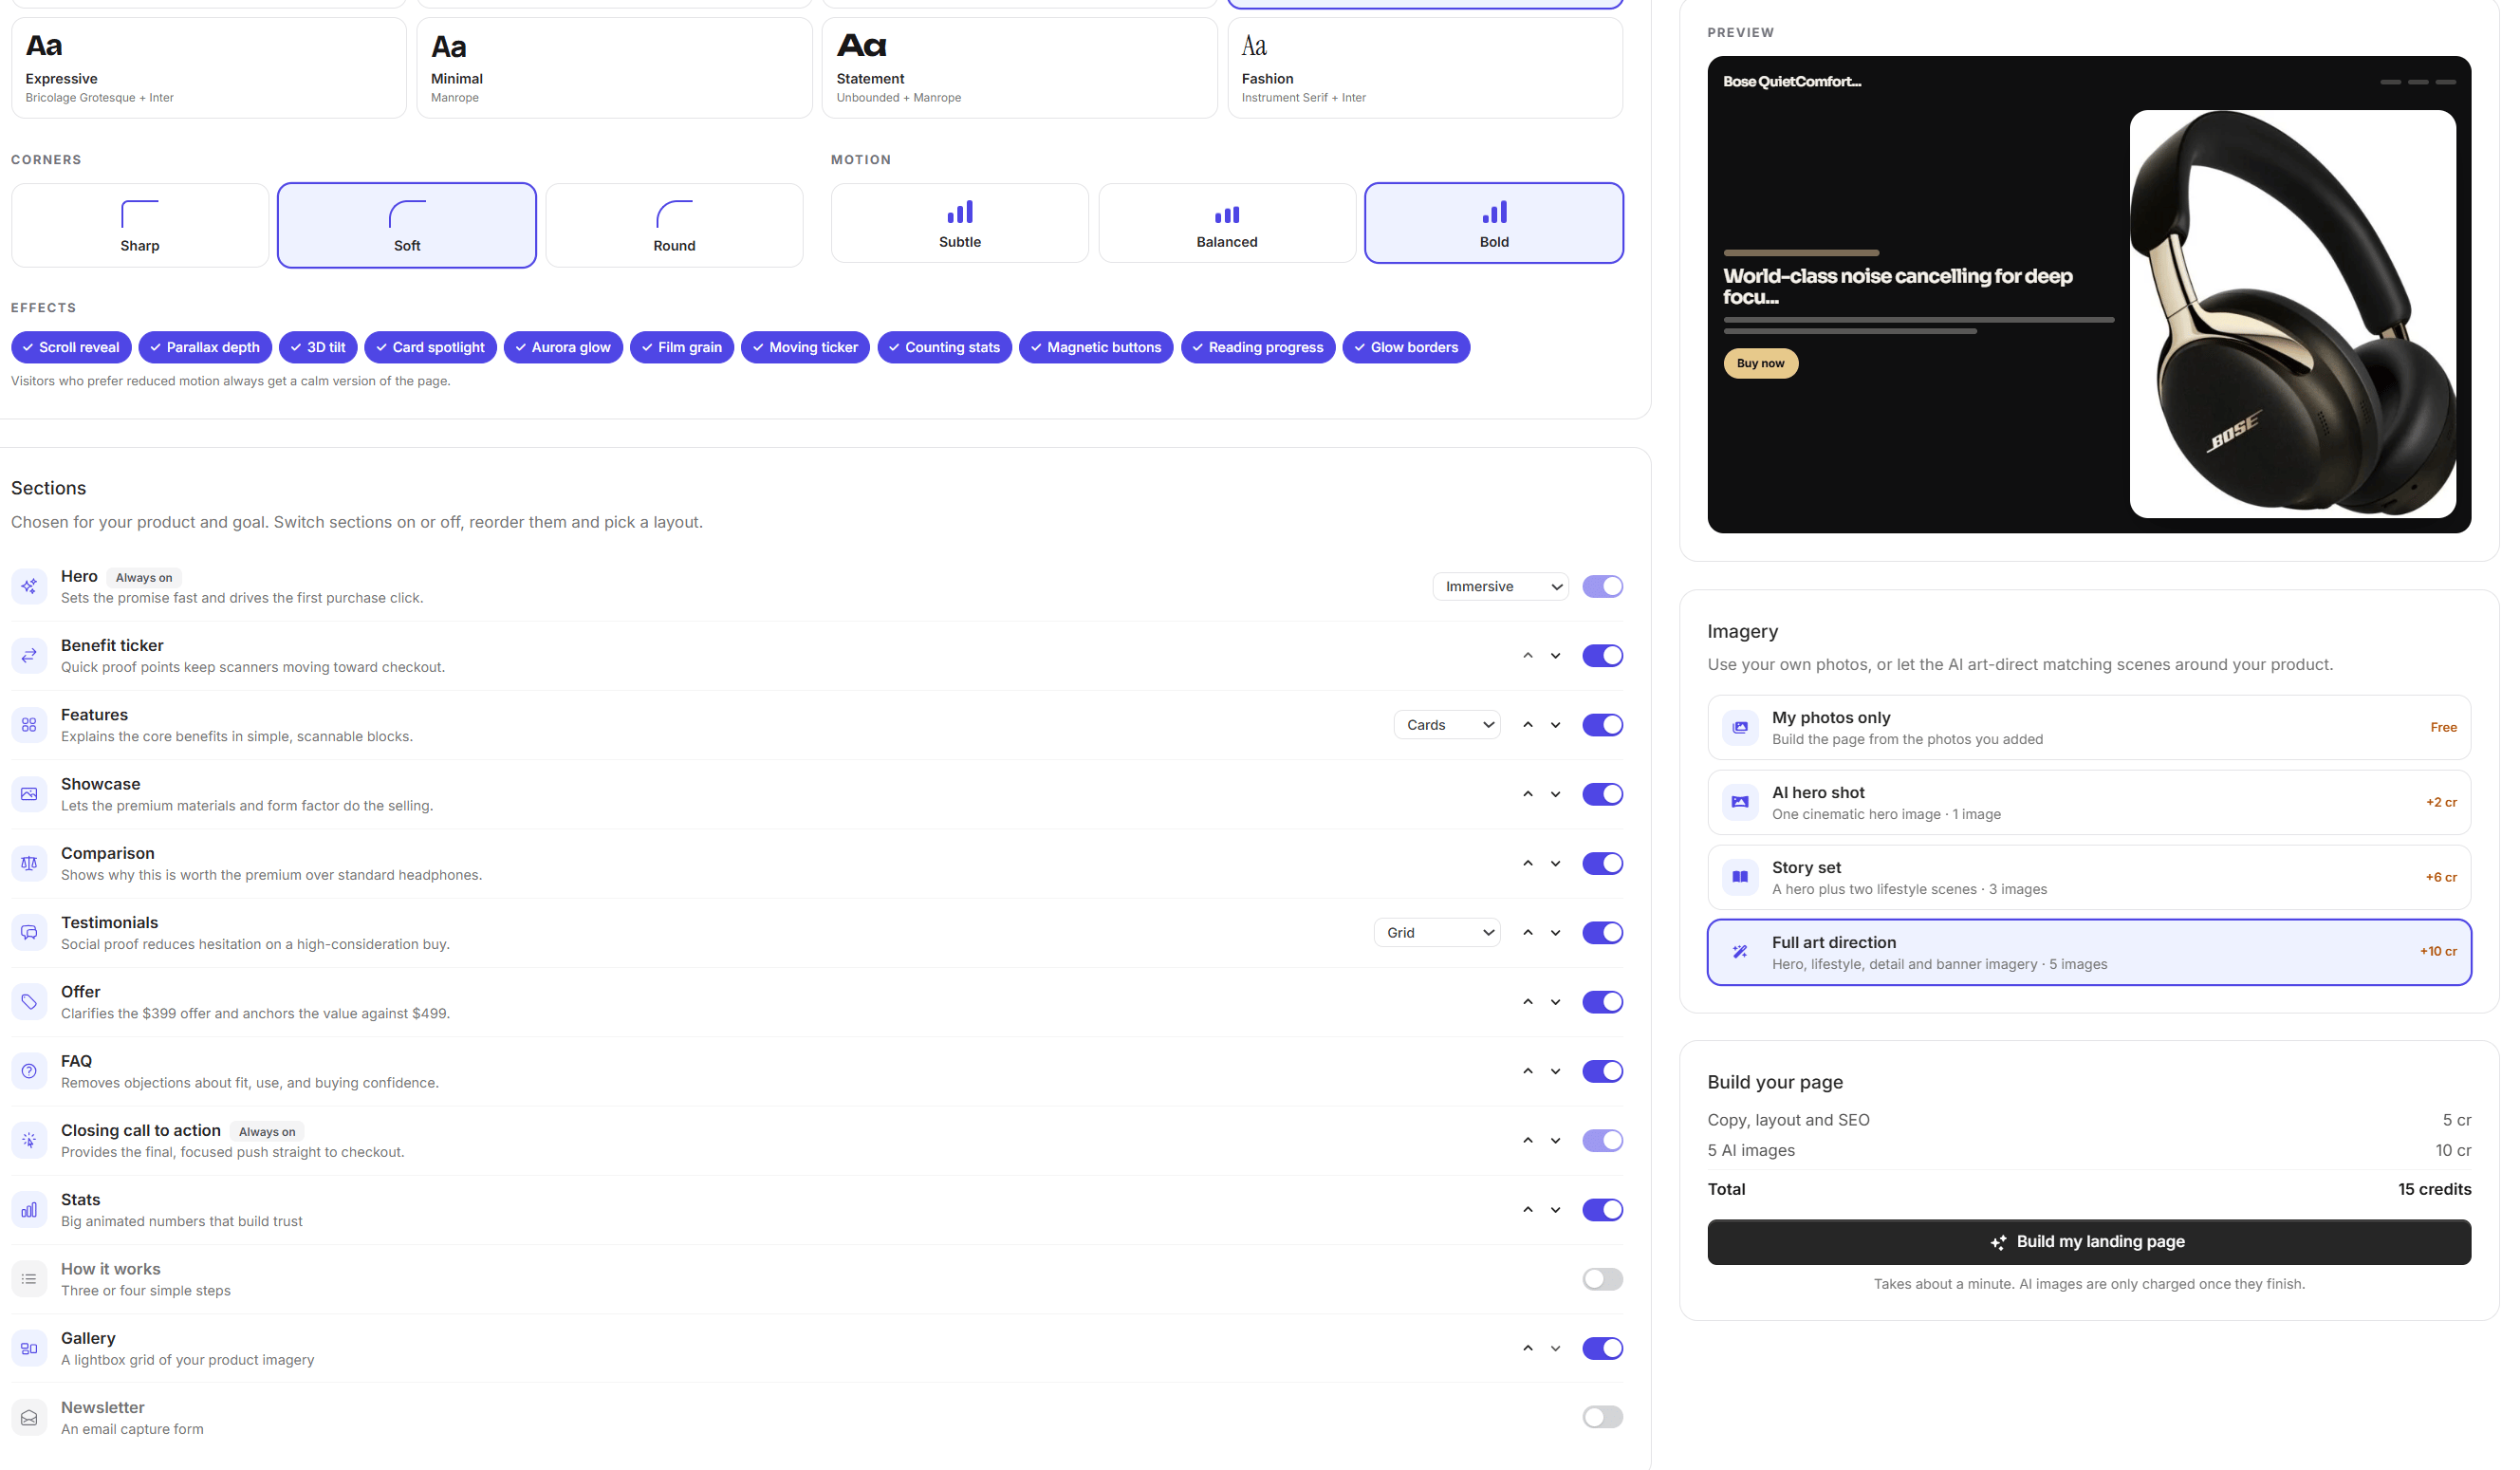
Setup step 3: Design.
Look & feel
Control
Options
Creative direction
Three complete art directions written for this product, each with its own palette, font pairing and theme.
Colour
Light or dark theme, 10 palettes (Midnight, Linen, Forest, Ocean, Ember, Graphite, Sand, Mint, Cobalt, Noir) and colour pickers for buttons, accent, background, cards and text. Text colours adjust automatically so everything stays readable.
Typography
12 font pairings, from Modern and Editorial to Luxe, Tech and Fashion.
Corners
Sharp, Soft or Round.
Motion
Subtle, Balanced or Bold intensity.
Effects
11 effects to switch on or off: scroll reveal, parallax depth, 3D tilt, card spotlight, aurora glow, film grain, moving ticker, counting stats, magnetic buttons, reading progress and glow borders.
Visitors who prefer reduced motion always get a calm version of the page.SectionsThe AI proposes sections for the product and goal, with a reason for each. Switch sections on or off, reorder them with the arrows and pick a layout where one exists (Hero: Split, Centered or Immersive. Features: Cards or Bento. Testimonials: Grid or Marquee). Hero and Closing call to action are always on.Imagery
Option
What it does
My photos only
Builds the page from the photos the user added. Free.
AI hero shot
One cinematic hero image.
Story set
A hero plus two lifestyle scenes.
Full art direction
Hero, lifestyle, detail and banner imagery.
The AI options are capped by the admin’s AI images per page limit, and they are unavailable (greyed out) when the engine has no image model.The Build your page panel lists the total cost: copy, layout and SEO, plus the cost of any AI images. Click Build my landing page. It takes about a minute, and AI images are only charged once they finish.
The page is being built.
Keep the tab open while the page builds. If a build fails, the user is not charged and can adjust anything and build again.
The visual editor
When the build finishes, the builder opens. The page you see is the real page. All changes are saved automatically.The top bar has the page name (click to rename), a Desktop / Tablet / Mobile preview switch, the credit balance, Preview (opens the page in a new tab) and Export.The side panel has four tabs.
Content
Click any headline, paragraph or button label in the preview to edit it in place. The section list below the hint gives structural control:
Show or hide a section with its switch, and move it up or down.
Open a section to pick its Layout, add, remove or reorder Entries (features, testimonials, FAQ items and so on), change a feature’s icon, set a testimonial’s star rating, or mark a comparison row as Us or Them.
Rewrite with AI: type an instruction (up to 400 characters) or tap a chip such as “Make it shorter and punchier”, “Make it more persuasive”, “Make it feel more premium” or “Add gentle urgency”, then click Rewrite section.
A section that is switched on but has no copy shows Needs copy. Open it and click Write section.
The Content panel with a section open and Rewrite with AI.
Testimonials and stats are written as realistic placeholders, because the AI never invents customer quotes or numbers. Replace them with real ones before you publish.
Design
The same controls as the setup Design step: creative direction, colour, typography, corners, motion and effects. Changes re-render the preview straight away. A Revisit the strategy link takes the user back to change the angle, audience or imagery set.
The Design panel.
Images
Your photos: add, remove or change the main photo.
Image placements: five slots, each of which can Use a photo the user uploaded, or Render with AI (with an optional scene note of up to 300 characters). Slots with no choice use the user’s photos automatically. Reset returns a slot to automatic.
Logo: upload a PNG, JPG or WebP logo for the navigation and footer. Without one, the brand name is shown as text.
Slot
Shape
Where it appears
Hero
16:9
Top of the page.
Lifestyle
Square
Showcase and gallery.
Scene
Square
Showcase and gallery.
Detail
4:5
Showcase and gallery.
Banner
16:9
Behind the closing call to action.
AI images render one at a time while the builder is open and appear in the preview as each one finishes. A counter shows how many of the page’s AI images are used.
The Images panel with image placements and the logo.
Settings
Setting
Purpose
Main button link
Where every buy or sign-up button goes. If empty, buttons scroll to the offer.
Secondary button link
Used by the softer hero button. Defaults to a section on the page.
Newsletter form address
The form action URL from Mailchimp, Kit, Formspree or similar, so the Newsletter section collects real sign-ups.
Page title
Up to 70 characters. Shown in the browser tab and search results.
Meta description
Up to 170 characters.
Links accept a full web address, an email link (mailto:) or a section link such as #pricing.Under Start fresh, Regenerate page rewrites every section from the brief (design, photos and finished images stay, but text edits are replaced), and Edit strategy and rebuild goes back to the Strategy step.
The Settings panel.
Export and publish
Landing Page Builder does not host pages. The Preview link works only while you are signed in and is not indexed, so it is not a public address. To share a page, export it.Click Export in the builder, or use the card menu in the library:
Format
What you get
ZIP bundle
A folder with index.html, assets/css/style.css, assets/js/main.js, assets/img/ (images optimised to a maximum of 2000 px) and a README.txt.
Single HTML file
One self-contained file with the images embedded.
The Export menu.
To publish, unzip the bundle and upload index.html together with the assets folder to any static host, such as Netlify, Vercel, GitHub Pages, Cloudflare Pages, cPanel/FTP or Amazon S3. You can also double-click index.html to preview it locally. There is no build step and no server-side code.Things to know about exported pages:
Fonts load from Google Fonts. To self-host them, download the families listed in the <link> tag of index.html.
Share image: the exported page has no og:image. Add one by hand if you want a preview image on social networks.
Newsletter form: without a Newsletter form address in Settings, the form only shows a thank-you message and collects nothing.
Button links come from Main button link. Search index.html for that address to change it later.
Tips for better pages
The AI writes from what it is given, so concrete input gives concrete copy.
Put facts in the description. Specs, materials, what’s in the box, shipping terms, the guarantee and any real numbers feed the Stats and Offer sections. The AI will not make them up.
Use a clean main photo. The first photo is treated as the product shot and fills the Offer section and the closing call to action when there is no banner image.
Keep selling points short and specific. “30-hour battery life” beats “great battery”.
Use the quick choices. They change the angle of the page more than any other input.
Rewrite one section, not the page. A section rewrite costs a fraction of a full regeneration and keeps everything else you edited.
An example of a good Product step:
Field
Example
Product name
Aurora ceramic pour-over set
Description
Hand-glazed stoneware dripper and server with two cups. Dishwasher safe. Brews 2 to 4 cups. Ships in 2 days. 30-day money-back guarantee.
Price
$49
Compare-at price
$69
Goal
Sell online
Troubleshooting
Symptom
Likely cause
Fix
Landing Page Builder doesn’t appear for a user
Plugin not installed, master switch off, plan lacks the feature, or free tier off for a plan-less user
Install the plugin; enable the master switch; enable the toggle on their plan; or turn on Free Tier Access.
It appears with a lock icon
The user’s plan doesn’t include the feature
Enable it on the plan, or the user upgrades.
”No AI engine is configured yet”
No engine has both a key and an enabled text model
Add a key and enable a Copy Studio model in Admin → AI Settings. The engine card shows Ready when fixed.
”You need N credits for this”
Balance is below the cost of the step
Top up credits or lower the price. A build needs credits for the page plus all its AI images.
AI imagery options are greyed out
The engine has no active image model or key, or AI images per page is 0
Enable the vendor’s image model in AI Settings, or raise the limit.
Images stay on “Waiting to render”
The builder tab was closed, or the background job is not running
Keep the builder open so it can render images one at a time. Make sure your scheduler/cron is running, since it finishes any deferred images.
An image says “Did not render”
The image model rejected or failed the request
Failed images cost nothing. Click New AI image, optionally with a different scene note.
”The AI took too long to respond”
The text model timed out
Try again. Choose a faster text model in the config if it keeps happening. No credits are charged.
”The AI ran out of room before finishing” or “response could not be read”
The text model is too small or returned malformed output
Pick a stronger text model, shorten the description and try again.
”The AI declined this request”
The vendor’s safety filter blocked the input
Reword the product description.
Photos are skipped or rejected
Wrong file type or over the size or count limit
Use JPG, PNG or WebP within the Max upload size and Photos per page limits.
ZIP export fails with “The PHP zip extension is required”
The server’s PHP zip extension is missing
Enable the zip extension. The single HTML export works without it.
Newsletter form shows a thank-you but collects nothing
No Newsletter form address is set
Paste the form action URL from your email provider in the Settings panel.
Exported images are not resized
The PHP gd extension is missing
Enable gd. Without it, photos are exported at their original size.
AI images are saved as ordinary Ad Creatives, so they stay in the user’s library even if the page is deleted. Credits are never deducted for failed or cancelled work.
Was this page helpful?
⌘I
{"docsConfig":{"theme":"maple","$schema":"https://mintlify.com/docs.json","name":"Magic Ads","colors":{"primary":"#0D9373","light":"#07C983","dark":"#0D9373"},"logo":{"light":"https://mintcdn.com/magicads/oPrLh9qB7egs5WXX/logo/light.png?fit=max\u0026auto=format\u0026n=oPrLh9qB7egs5WXX\u0026q=85\u0026s=402a35581450df33507f4f1b59bfe34f","dark":"https://mintcdn.com/magicads/oPrLh9qB7egs5WXX/logo/dark.png?fit=max\u0026auto=format\u0026n=oPrLh9qB7egs5WXX\u0026q=85\u0026s=e7c8443b111d4615825b78319b398643"},"favicon":"https://mintcdn.com/magicads/srGibq66qvweFJdz/logo/favicon.ico?fit=max\u0026auto=format\u0026n=srGibq66qvweFJdz\u0026q=85\u0026s=12b4b70af8b09dfeec45c2c67944e470","background":{"decoration":"gradient"},"navbar":{"links":[{"href":"https://support.berkine.dev/","label":"Support"}],"primary":{"type":"button","label":"Buy Magic Ads","href":"https://1.envato.market/gbM0b5"}},"footer":{"socials":{"x":"https://x.com/mintlify","youtube":"https://x.com/mintlify","linkedin":"https://linkedin.com/company/mintlify"}},"seo":{"indexing":"all"},"styling":{"latex":false},"navigation":{"global":{"anchors":[{"anchor":"Buy Magic Ads","icon":"box-open","href":"https://1.envato.market/gbM0b5"},{"anchor":"Support Tickets","icon":"square-info","href":"https://support.berkine.dev/"}]},"pages":[]}},"deployment":{"deploymentMetadataValue":{"subdomain":"magicads","hasAudioNarration":false,"actualSubdomain":"magicads","customDomains":[],"gitSource":{"type":"github","owner":"freefeniks","repo":"magicads-docs","deployBranch":"main","contentDirectory":"","isPrivate":false,"mountPath":"","label":""},"feedback":{"thumbs":true},"entitlements":{"AI_CHAT":{"status":"DISABLED"}},"buildId":"6af4918e1802c5262452ceab","clientVersion":"0.0.4270","searchFilterCounts":[{"language":"default","tag":"SaaS Features","count":18},{"language":"default","tag":"Plugins","count":16},{"language":"default","tag":"Integrations","count":13},{"language":"default","tag":"Payment Gateways","count":13},{"language":"default","tag":"AI Providers","count":9},{"language":"default","tag":"Advanced","count":5},{"language":"default","tag":"Get Started","count":4},{"language":"default","tag":"Social Logins","count":4},{"language":"default","tag":"Update","count":2},{"language":"default","tag":"Installation","count":1}]},"assistantConfig":{"enableAskAiButton":false,"enableStarterQuestions":false,"enableContextualStarterQuestions":false,"enableAskAiSearchBar":true},"basePath":"","hasChatPermissions":false,"hasWebMcpPermissions":false,"toggles":[{"name":"kill-isr","enabled":true,"variant":{"name":"disabled","enabled":false,"feature_enabled":true},"impressionData":false},{"name":"custom-rbac-roles","enabled":true,"variant":{"name":"disabled","enabled":false,"feature_enabled":true},"impressionData":false},{"name":"agent-mintlify-slack","enabled":true,"variant":{"name":"disabled","enabled":false,"feature_enabled":true},"impressionData":false},{"name":"agent-integrations-settings","enabled":true,"variant":{"name":"disabled","enabled":false,"feature_enabled":true},"impressionData":false},{"name":"rbac-expansion","enabled":true,"variant":{"name":"disabled","enabled":false,"feature_enabled":true},"impressionData":false},{"name":"automations-pr-grouping","enabled":true,"variant":{"name":"disabled","enabled":false,"feature_enabled":true},"impressionData":false},{"name":"custom-prefix","enabled":true,"variant":{"name":"disabled","enabled":false,"feature_enabled":true},"impressionData":false},{"name":"analytics-v7","enabled":true,"variant":{"name":"disabled","enabled":false,"feature_enabled":true},"impressionData":false},{"name":"user-flows-analytics","enabled":true,"variant":{"name":"disabled","enabled":false,"feature_enabled":true},"impressionData":false},{"name":"no-publish-flow","enabled":true,"variant":{"name":"disabled","enabled":false,"feature_enabled":true},"impressionData":false},{"name":"workos-onboarding","enabled":true,"variant":{"name":"disabled","enabled":false,"feature_enabled":true},"impressionData":false},{"name":"snapshot-serving-live","enabled":true,"variant":{"name":"disabled","enabled":false,"feature_enabled":true},"impressionData":false},{"name":"stripTemperatureMiddleware","enabled":true,"variant":{"name":"disabled","enabled":false,"feature_enabled":true},"impressionData":false},{"name":"support-platform-pylon-zendesk","enabled":true,"variant":{"name":"disabled","enabled":false,"feature_enabled":true},"impressionData":false},{"name":"snapshot-serving","enabled":true,"variant":{"name":"disabled","enabled":false,"feature_enabled":true},"impressionData":false},{"name":"instant-rollback","enabled":true,"variant":{"name":"disabled","enabled":false,"feature_enabled":true},"impressionData":false},{"name":"granular-notifications-server","enabled":true,"variant":{"name":"disabled","enabled":false,"feature_enabled":true},"impressionData":false},{"name":"granular-notifications","enabled":true,"variant":{"name":"disabled","enabled":false,"feature_enabled":true},"impressionData":false},{"name":"automations-fable","enabled":true,"variant":{"name":"disabled","enabled":false,"feature_enabled":true},"impressionData":false},{"name":"fixed-ai-action-pricing","enabled":true,"variant":{"name":"disabled","enabled":false,"feature_enabled":true},"impressionData":false},{"name":"site-roles","enabled":true,"variant":{"name":"disabled","enabled":false,"feature_enabled":true},"impressionData":false},{"name":"automation-resolve-merge-conflict","enabled":true,"variant":{"name":"disabled","enabled":false,"feature_enabled":true},"impressionData":false},{"name":"scoped-publishing","enabled":true,"variant":{"name":"disabled","enabled":false,"feature_enabled":true},"impressionData":false},{"name":"mintql","enabled":true,"variant":{"name":"disabled","enabled":false,"feature_enabled":true},"impressionData":false},{"name":"page-level-analytics","enabled":true,"variant":{"name":"disabled","enabled":false,"feature_enabled":true},"impressionData":false},{"name":"editor-version-history-v2","enabled":true,"variant":{"name":"disabled","enabled":false,"feature_enabled":true},"impressionData":false},{"name":"billing-page-v2","enabled":true,"variant":{"name":"disabled","enabled":false,"feature_enabled":true},"impressionData":false},{"name":"full-page-search","enabled":true,"variant":{"name":"disabled","enabled":false,"feature_enabled":true},"impressionData":false},{"name":"workspace-projects","enabled":true,"variant":{"name":"disabled","enabled":false,"feature_enabled":true},"impressionData":false},{"name":"assistant-v5","enabled":true,"variant":{"name":"disabled","enabled":false,"feature_enabled":true},"impressionData":false},{"name":"fork-pr-previews","enabled":true,"variant":{"name":"disabled","enabled":false,"feature_enabled":true},"impressionData":false},{"name":"revalidation-jwt","enabled":true,"variant":{"name":"disabled","enabled":false,"feature_enabled":true},"impressionData":false},{"name":"workos-sso-scim","enabled":true,"variant":{"name":"disabled","enabled":false,"feature_enabled":true},"impressionData":false},{"name":"hobby-abuse-scan","enabled":true,"variant":{"name":"disabled","enabled":false,"feature_enabled":true},"impressionData":false},{"name":"dashboard-inbox","enabled":true,"variant":{"name":"disabled","enabled":false,"feature_enabled":true},"impressionData":false},{"name":"workos-signup","enabled":true,"variant":{"name":"disabled","enabled":false,"feature_enabled":true},"impressionData":false},{"name":"turbopuffer-dual-write","enabled":true,"variant":{"name":"disabled","enabled":false,"feature_enabled":true},"impressionData":false},{"name":"workos-enabled","enabled":true,"variant":{"name":"disabled","enabled":false,"feature_enabled":true},"impressionData":false},{"name":"approve-review-flow","enabled":true,"variant":{"name":"disabled","enabled":false,"feature_enabled":true},"impressionData":false},{"name":"editor-metadata","enabled":true,"variant":{"name":"disabled","enabled":false,"feature_enabled":true},"impressionData":false},{"name":"sso-setup-deadline-banner","enabled":true,"variant":{"name":"disabled","enabled":false,"feature_enabled":true},"impressionData":false},{"name":"turbopuffer-serve","enabled":true,"variant":{"name":"disabled","enabled":false,"feature_enabled":true},"impressionData":false},{"name":"live-agents","enabled":true,"variant":{"name":"disabled","enabled":false,"feature_enabled":true},"impressionData":false},{"name":"starter-pricing","enabled":true,"variant":{"name":"treatment","enabled":true,"payload":{"type":"string","value":"treatment"},"feature_enabled":true},"impressionData":false},{"name":"llms-txt-v2","enabled":true,"variant":{"name":"disabled","enabled":false,"feature_enabled":true},"impressionData":false},{"name":"wildcard-email-auth","enabled":true,"variant":{"name":"disabled","enabled":false,"feature_enabled":true},"impressionData":false}],"googleFontsInlined":false},"customCss":[]}
{"page":{"pagePath":"plugins/landing-page-builder","slug":"/plugins/landing-page-builder","pageMetadata":{"title":"Landing Page Builder","icon":"window-maximize","description":"Turn a product into an editable, exportable landing page. The AI studies your photos, writes a creative brief with three design directions, then builds a complete, animated page.","href":"/plugins/landing-page-builder"},"description":{"compiledSource":"\"use strict\";\nconst {jsx: _jsx} = arguments[0];\nconst {useMDXComponents: _provideComponents} = arguments[0];\nfunction _createMdxContent(props) {\n const _components = {\n p: \"p\",\n ..._provideComponents(),\n ...props.components\n };\n return _jsx(_components.p, {\n children: \"Turn a product into an editable, exportable landing page. The AI studies your photos, writes a creative brief with three design directions, then builds a complete, animated page.\"\n });\n}\nfunction MDXContent(props = {}) {\n const {wrapper: MDXLayout} = {\n ..._provideComponents(),\n ...props.components\n };\n return MDXLayout ? _jsx(MDXLayout, {\n ...props,\n children: _jsx(_createMdxContent, {\n ...props\n })\n }) : _createMdxContent(props);\n}\nreturn {\n default: MDXContent\n};\n","frontmatter":{},"scope":{}},"pageType":"default","mdx":{"mdxSource":{"compiledSource":"\"use strict\";const{Fragment:_Fragment,jsx:_jsx,jsxs:_jsxs}=arguments[0];const{useMDXComponents:_provideComponents}=arguments[0];function _createMdxContent(props){const _components={a:`a`,code:`code`,li:`li`,ol:`ol`,p:`p`,strong:`strong`,tbody:`tbody`,td:`td`,th:`th`,thead:`thead`,tr:`tr`,ul:`ul`,..._provideComponents(),...props.components},{Card,Check,Frame,Heading,Note,OptimizedImage,Step,Steps,Table,Tip,Warning}=_components;if(!Card)_missingMdxReference(`Card`,true);if(!Check)_missingMdxReference(`Check`,true);if(!Frame)_missingMdxReference(`Frame`,true);if(!Heading)_missingMdxReference(`Heading`,true);if(!Note)_missingMdxReference(`Note`,true);if(!OptimizedImage)_missingMdxReference(`OptimizedImage`,true);if(!Step)_missingMdxReference(`Step`,true);if(!Steps)_missingMdxReference(`Steps`,true);if(!Table)_missingMdxReference(`Table`,true);if(!Tip)_missingMdxReference(`Tip`,true);if(!Warning)_missingMdxReference(`Warning`,true);return _jsxs(_Fragment,{children:[_jsxs(Warning,{children:[`This is a `,_jsx(_components.strong,{children:`Paid`}),` plugin that you can purchase and install via the in-app `,_jsx(_components.strong,{children:`Plugins`}),` marketplace.`]}),`\n`,_jsx(Heading,{level:`2`,id:`introduction`,children:`Introduction`}),`\n`,_jsxs(_components.p,{children:[_jsx(_components.strong,{children:`Landing Page Builder`}),` closes the gap between making an ad and having somewhere to send the click. A user adds product photos and a few details, the AI studies them and writes a creative brief with three design directions, then builds a complete, animated landing page. Every word is editable on the live page, and the finished page exports as plain HTML, CSS and JavaScript that runs on any host.`]}),`\n`,_jsx(_components.p,{children:`This guide covers the full lifecycle: where to buy it, how to install it, how to connect the AI engines, how to configure pricing and limits, how to grant access by plan, and how users build, edit and publish a page.`}),`\n`,_jsx(Frame,{caption:`A finished landing page open in the Landing Page Builder.`,children:_jsx(OptimizedImage,{src:`https://mintcdn.com/magicads/GDWBHF_8XJc8cVcS/images/extensions/landing-page-builder/builder-overview.png?fit=max\u0026auto=format\u0026n=GDWBHF_8XJc8cVcS\u0026q=85\u0026s=2204e58a5edeb17c358fd5e86dd7bc3c`,alt:`The Landing Page Builder editor showing the side panel and the live page preview`,\"data-og-width\":`2862`,width:`2862`,\"data-og-height\":`1591`,height:`1591`,\"data-path\":`images/extensions/landing-page-builder/builder-overview.png`,\"data-optimize\":`true`,\"data-opv\":`3`,srcset:`https://mintcdn.com/magicads/GDWBHF_8XJc8cVcS/images/extensions/landing-page-builder/builder-overview.png?w=280\u0026fit=max\u0026auto=format\u0026n=GDWBHF_8XJc8cVcS\u0026q=85\u0026s=7a0444ba58314ecbfe36224ea11fd3c6 280w, https://mintcdn.com/magicads/GDWBHF_8XJc8cVcS/images/extensions/landing-page-builder/builder-overview.png?w=560\u0026fit=max\u0026auto=format\u0026n=GDWBHF_8XJc8cVcS\u0026q=85\u0026s=09e36dcb8983a80411f053e28f45b22d 560w, https://mintcdn.com/magicads/GDWBHF_8XJc8cVcS/images/extensions/landing-page-builder/builder-overview.png?w=840\u0026fit=max\u0026auto=format\u0026n=GDWBHF_8XJc8cVcS\u0026q=85\u0026s=56f0a68b28b671e57b7f0290715ad8fc 840w, https://mintcdn.com/magicads/GDWBHF_8XJc8cVcS/images/extensions/landing-page-builder/builder-overview.png?w=1100\u0026fit=max\u0026auto=format\u0026n=GDWBHF_8XJc8cVcS\u0026q=85\u0026s=c550e6688793c474482aed96d4bf7f18 1100w, https://mintcdn.com/magicads/GDWBHF_8XJc8cVcS/images/extensions/landing-page-builder/builder-overview.png?w=1650\u0026fit=max\u0026auto=format\u0026n=GDWBHF_8XJc8cVcS\u0026q=85\u0026s=2659378fcaf07216f02e8afe41d20546 1650w, https://mintcdn.com/magicads/GDWBHF_8XJc8cVcS/images/extensions/landing-page-builder/builder-overview.png?w=2500\u0026fit=max\u0026auto=format\u0026n=GDWBHF_8XJc8cVcS\u0026q=85\u0026s=835de063163b189d4a97407ddb8470f9 2500w`})}),`\n`,_jsx(Card,{title:`Included Tools`,children:_jsxs(_components.ul,{children:[`\n`,_jsxs(_components.li,{children:[_jsx(_components.strong,{children:`My landing pages`}),`: library of every page a user has started. Search, rename, duplicate, delete, preview and export from one place`]}),`\n`,_jsxs(_components.li,{children:[_jsx(_components.strong,{children:`Setup wizard`}),`: three steps, `,_jsx(_components.strong,{children:`Product`}),` (photos, description, goal), `,_jsx(_components.strong,{children:`Strategy`}),` (confirm what the AI understood) and `,_jsx(_components.strong,{children:`Design`}),` (look, sections and imagery)`]}),`\n`,_jsxs(_components.li,{children:[_jsx(_components.strong,{children:`Visual editor`}),`: the page itself, live. Click any text to edit it in place, with side panels for `,_jsx(_components.strong,{children:`Content`}),`, `,_jsx(_components.strong,{children:`Design`}),`, `,_jsx(_components.strong,{children:`Images`}),` and `,_jsx(_components.strong,{children:`Settings`})]}),`\n`,_jsxs(_components.li,{children:[_jsx(_components.strong,{children:`AI section rewrites`}),`: rewrite or write a single section with an instruction such as “make it more persuasive”, without rebuilding the page`]}),`\n`,_jsxs(_components.li,{children:[_jsx(_components.strong,{children:`AI imagery`}),`: optional hero, lifestyle, detail and banner images rendered around the user’s real product`]}),`\n`,_jsxs(_components.li,{children:[_jsx(_components.strong,{children:`Export`}),`: a ZIP bundle (HTML, CSS, JavaScript, images and a README) or a single self-contained HTML file`]}),`\n`]})}),`\n`,_jsxs(_components.p,{children:[`Each page is built from up to `,_jsx(_components.strong,{children:`13 sections`}),`: Hero, Benefit ticker, Features, Showcase, Stats, How it works, Gallery, Testimonials, Comparison, Offer, FAQ, Closing call to action and Newsletter. Sections can be switched on or off, reordered, and some have alternate layouts.`]}),`\n`,_jsx(Heading,{level:`3`,id:`ai-engines`,children:`AI engines`}),`\n`,_jsxs(_components.p,{children:[`Landing Page Builder has no API key of its own. It uses the engines you already configure in `,_jsx(_components.strong,{children:`AI Settings`}),`.`]}),`\n`,_jsxs(Table,{children:[_jsx(_components.thead,{children:_jsxs(_components.tr,{children:[_jsx(_components.th,{children:`Engine`}),_jsx(_components.th,{children:`Writes the copy`}),_jsx(_components.th,{children:`Renders the images`})]})}),_jsxs(_components.tbody,{children:[_jsxs(_components.tr,{children:[_jsx(_components.td,{children:_jsx(_components.strong,{children:`OpenAI`})}),_jsx(_components.td,{children:`GPT text model`}),_jsx(_components.td,{children:`GPT Image`})]}),_jsxs(_components.tr,{children:[_jsx(_components.td,{children:_jsx(_components.strong,{children:`Google Gemini`})}),_jsx(_components.td,{children:`Gemini text model`}),_jsx(_components.td,{children:`Nano Banana`})]})]})]}),`\n`,_jsx(Note,{children:_jsx(_components.p,{children:`The admin picks a default engine and can let users choose between them. Everything runs on the admin’s keys, so users never bring their own.`})}),`\n`,_jsx(Note,{children:_jsx(_components.p,{children:`Editing and exporting never use credits. Only the AI steps do: the product brief, the full page build, section rewrites and AI images. Credits are charged only after a step succeeds.`})}),`\n`,_jsx(Heading,{level:`2`,id:`purchase-\u0026-installation`,children:`Purchase \u0026 Installation`}),`\n`,_jsx(_components.p,{children:`Landing Page Builder is distributed through the in-app plugin marketplace. Purchasing and installation both happen inside your MagicAds admin, so there is no third-party download.`}),`\n`,_jsxs(Steps,{children:[_jsxs(Step,{title:`Open the Plugins marketplace`,children:[_jsxs(_components.p,{children:[`Sign in as an `,_jsx(_components.strong,{children:`admin`}),` and go to `,_jsx(_components.strong,{children:`Admin → Platform → Plugins`}),` (`,_jsx(_components.code,{children:`/app/admin/plugins`}),`). Find the `,_jsx(_components.strong,{children:`Landing Page Builder`}),` card in the marketplace catalog.`]}),_jsx(Frame,{caption:`The Landing Page Builder card in the plugin marketplace.`,children:_jsx(OptimizedImage,{src:`https://mintcdn.com/magicads/GDWBHF_8XJc8cVcS/images/extensions/landing-page-builder/plugin.png?fit=max\u0026auto=format\u0026n=GDWBHF_8XJc8cVcS\u0026q=85\u0026s=502d1290bea22715da4510e40aebf6d0`,alt:`Landing Page Builder card in the Plugins marketplace with the Buy Now button`,\"data-og-width\":`634`,width:`634`,\"data-og-height\":`562`,height:`562`,\"data-path\":`images/extensions/landing-page-builder/plugin.png`,\"data-optimize\":`true`,\"data-opv\":`3`,srcset:`https://mintcdn.com/magicads/GDWBHF_8XJc8cVcS/images/extensions/landing-page-builder/plugin.png?w=280\u0026fit=max\u0026auto=format\u0026n=GDWBHF_8XJc8cVcS\u0026q=85\u0026s=252f10aa334dcb322669204f0d1d94f5 280w, https://mintcdn.com/magicads/GDWBHF_8XJc8cVcS/images/extensions/landing-page-builder/plugin.png?w=560\u0026fit=max\u0026auto=format\u0026n=GDWBHF_8XJc8cVcS\u0026q=85\u0026s=d44993ef113710f85fc4d0de628cda2d 560w, https://mintcdn.com/magicads/GDWBHF_8XJc8cVcS/images/extensions/landing-page-builder/plugin.png?w=840\u0026fit=max\u0026auto=format\u0026n=GDWBHF_8XJc8cVcS\u0026q=85\u0026s=ff4ed7d5d324ed5ac7b06c6df7b5d073 840w, https://mintcdn.com/magicads/GDWBHF_8XJc8cVcS/images/extensions/landing-page-builder/plugin.png?w=1100\u0026fit=max\u0026auto=format\u0026n=GDWBHF_8XJc8cVcS\u0026q=85\u0026s=873861291fb2fcb75ad6277bc5278da0 1100w, https://mintcdn.com/magicads/GDWBHF_8XJc8cVcS/images/extensions/landing-page-builder/plugin.png?w=1650\u0026fit=max\u0026auto=format\u0026n=GDWBHF_8XJc8cVcS\u0026q=85\u0026s=8da277d659be9235a0288e682ac486de 1650w, https://mintcdn.com/magicads/GDWBHF_8XJc8cVcS/images/extensions/landing-page-builder/plugin.png?w=2500\u0026fit=max\u0026auto=format\u0026n=GDWBHF_8XJc8cVcS\u0026q=85\u0026s=422efa4c85dbdc92addba01b778937e6 2500w`})})]}),_jsxs(Step,{title:`Purchase (if required)`,children:[_jsx(_components.p,{children:`The card button depends on your license and purchase state:`}),_jsxs(_components.ul,{children:[`\n`,_jsxs(_components.li,{children:[_jsx(_components.strong,{children:`Buy Now`}),` → opens the plugin checkout to complete the purchase.`]}),`\n`,_jsxs(_components.li,{children:[_jsx(_components.strong,{children:`Install`}),` → shown once the plugin is purchased, or when it is free for your license.`]}),`\n`]})]}),_jsxs(Step,{title:`Install / activate`,children:[_jsxs(_components.p,{children:[`Click `,_jsx(_components.strong,{children:`Install`}),` on the `,_jsx(_components.strong,{children:`Landing Page Builder`}),` card. The platform downloads the plugin archive, unpacks it and runs its migration. This creates:`]}),_jsxs(_components.ul,{children:[`\n`,_jsx(_components.li,{children:`Landing Page Builder’s settings columns on the shared extension settings record, with safe defaults (feature off, free tier off, automatic engine, up to 5 AI images and 6 photos per page, 10 MB upload cap).`}),`\n`,_jsxs(_components.li,{children:[`A `,_jsx(_components.strong,{children:`Landing Page Builder`}),` toggle on every pricing plan.`]}),`\n`]}),_jsx(Warning,{children:_jsxs(_components.p,{children:[`Installation only makes the routes and tables exist. The tool stays hidden from users until you `,_jsx(_components.strong,{children:`enable the feature`}),` and `,_jsx(_components.strong,{children:`connect an AI engine`}),` (next sections). On a fresh install everything is off by default.`]})})]})]}),`\n`,_jsx(_components.p,{children:`To remove the plugin later, click the trash button on the same card.`}),`\n`,_jsx(Note,{children:_jsxs(_components.p,{children:[`Uninstalling removes the plugin’s files and hides the tool from everyone, but it does not delete the `,_jsx(_components.code,{children:`landing_page_builder_pages`}),` table. Existing pages stay in the database and are available again if you reinstall.`]})}),`\n`,_jsx(Heading,{level:`2`,id:`configure-api-keys`,children:`Configure API keys`}),`\n`,_jsxs(_components.p,{children:[`Landing Page Builder needs two things from `,_jsx(_components.strong,{children:`AI Settings`}),`, and it checks them separately for each engine.`]}),`\n`,_jsxs(Table,{children:[_jsx(_components.thead,{children:_jsxs(_components.tr,{children:[_jsx(_components.th,{children:`Need`}),_jsx(_components.th,{children:`Used for`}),_jsx(_components.th,{children:`Where to set it`})]})}),_jsxs(_components.tbody,{children:[_jsxs(_components.tr,{children:[_jsxs(_components.td,{children:[`An API key `,_jsx(_components.strong,{children:`and at least one enabled text (Copy Studio) model`}),` for the vendor`]}),_jsxs(_components.td,{children:[`Writing the brief, the page copy and section rewrites. Without this the engine counts as `,_jsx(_components.strong,{children:`Not configured`}),`.`]}),_jsx(_components.td,{children:`Admin → AI Settings → the vendor`})]}),_jsxs(_components.tr,{children:[_jsxs(_components.td,{children:[`An API key and an `,_jsx(_components.strong,{children:`active image model`}),` from the same vendor (GPT Image for OpenAI, Nano Banana for Gemini)`]}),_jsx(_components.td,{children:`Optional AI images. Without this the engine still works, but only with the customer’s own photos.`}),_jsx(_components.td,{children:`Admin → AI Settings → the vendor`})]})]})]}),`\n`,_jsxs(Steps,{children:[_jsx(Step,{title:`Open the vendor`,children:_jsxs(_components.p,{children:[`Go to `,_jsx(_components.strong,{children:`Admin → AI Settings`}),` (`,_jsx(_components.code,{children:`/app/admin/ai`}),`) and click the vendor card (`,_jsx(_components.strong,{children:`OpenAI`}),` or `,_jsx(_components.strong,{children:`Google Gemini`}),`). The vendor window opens.`]})}),_jsx(Step,{title:`Paste the key`,children:_jsxs(_components.p,{children:[`Paste the key into `,_jsx(_components.strong,{children:`API Key`}),`.`]})}),_jsx(Step,{title:`Enable the models`,children:_jsxs(_components.p,{children:[`In the model list, switch on at least one `,_jsx(_components.strong,{children:`Copy Studio`}),` model. If you want AI imagery, also switch on the vendor’s `,_jsx(_components.strong,{children:`Image Studio`}),` model.`]})}),_jsx(Step,{title:`Save`,children:_jsxs(_components.p,{children:[`Click `,_jsx(_components.strong,{children:`Save Vendor`}),`. This saves both the key and the model switches.`]})})]}),`\n`,_jsx(Heading,{level:`3`,id:`where-to-get-each-key`,children:`Where to get each key`}),`\n`,_jsxs(_components.ul,{children:[`\n`,_jsxs(_components.li,{children:[_jsx(_components.strong,{children:`Google Gemini`}),`: create an API key in `,_jsx(_components.a,{href:`https://aistudio.google.com/apikey`,children:`Google AI Studio`}),`.`]}),`\n`,_jsxs(_components.li,{children:[_jsx(_components.strong,{children:`OpenAI`}),`: create a secret key at `,_jsx(_components.a,{href:`https://platform.openai.com/api-keys`,children:`platform.openai.com/api-keys`}),`. Your account needs a funded billing balance.`]}),`\n`]}),`\n`,_jsx(Tip,{children:_jsx(_components.p,{children:`Pick a strong text model. A full page is a long, structured answer, so very small or very fast models can run out of room or return unreadable output.`})}),`\n`,_jsx(Heading,{level:`2`,id:`configure-landing-page-builder`,children:`Configure Landing Page Builder`}),`\n`,_jsxs(_components.p,{children:[`Go to `,_jsx(_components.strong,{children:`Admin → General Settings → Plugins → Landing Page Builder`}),` (`,_jsx(_components.code,{children:`/app/admin/general/plugins/landing-page-builder`}),`). The screen has four sections.`]}),`\n`,_jsx(Frame,{caption:`The Landing Page Builder configuration screen.`,children:_jsx(OptimizedImage,{src:`https://mintcdn.com/magicads/GDWBHF_8XJc8cVcS/images/extensions/landing-page-builder/config.png?fit=max\u0026auto=format\u0026n=GDWBHF_8XJc8cVcS\u0026q=85\u0026s=89ce09971c6c02f2eb458eef53a73c49`,alt:`Landing Page Builder admin configuration with General and AI engines sections`,\"data-og-width\":`1455`,width:`1455`,\"data-og-height\":`1495`,height:`1495`,\"data-path\":`images/extensions/landing-page-builder/config.png`,\"data-optimize\":`true`,\"data-opv\":`3`,srcset:`https://mintcdn.com/magicads/GDWBHF_8XJc8cVcS/images/extensions/landing-page-builder/config.png?w=280\u0026fit=max\u0026auto=format\u0026n=GDWBHF_8XJc8cVcS\u0026q=85\u0026s=a43ff636bc2996798f18d36e0b0b5893 280w, https://mintcdn.com/magicads/GDWBHF_8XJc8cVcS/images/extensions/landing-page-builder/config.png?w=560\u0026fit=max\u0026auto=format\u0026n=GDWBHF_8XJc8cVcS\u0026q=85\u0026s=0cf884d01e9a28d273f9a2b2082aeb70 560w, https://mintcdn.com/magicads/GDWBHF_8XJc8cVcS/images/extensions/landing-page-builder/config.png?w=840\u0026fit=max\u0026auto=format\u0026n=GDWBHF_8XJc8cVcS\u0026q=85\u0026s=af9201dec8e8f088f4e55b3240db9545 840w, https://mintcdn.com/magicads/GDWBHF_8XJc8cVcS/images/extensions/landing-page-builder/config.png?w=1100\u0026fit=max\u0026auto=format\u0026n=GDWBHF_8XJc8cVcS\u0026q=85\u0026s=3b9fc415a7110b318e92cd17ffa99040 1100w, https://mintcdn.com/magicads/GDWBHF_8XJc8cVcS/images/extensions/landing-page-builder/config.png?w=1650\u0026fit=max\u0026auto=format\u0026n=GDWBHF_8XJc8cVcS\u0026q=85\u0026s=db49749c5dc583d8325b1f65d7d45251 1650w, https://mintcdn.com/magicads/GDWBHF_8XJc8cVcS/images/extensions/landing-page-builder/config.png?w=2500\u0026fit=max\u0026auto=format\u0026n=GDWBHF_8XJc8cVcS\u0026q=85\u0026s=2cdc58fa85a9a8e9ecd200c8be2ceaaf 2500w`})}),`\n`,_jsx(Heading,{level:`3`,id:`general`,children:`General`}),`\n`,_jsxs(Table,{children:[_jsx(_components.thead,{children:_jsxs(_components.tr,{children:[_jsx(_components.th,{children:`Setting`}),_jsx(_components.th,{children:`Purpose`})]})}),_jsxs(_components.tbody,{children:[_jsxs(_components.tr,{children:[_jsx(_components.td,{children:_jsx(_components.strong,{children:`Enable Landing Page Builder`})}),_jsx(_components.td,{children:`Master switch. When on, the tool appears in user menus for plans that include it. Off by default.`})]}),_jsxs(_components.tr,{children:[_jsx(_components.td,{children:_jsx(_components.strong,{children:`Free Tier Access`})}),_jsxs(_components.td,{children:[`When on, users `,_jsx(_components.strong,{children:`without`}),` a paid plan can build pages (they still need credits for the AI steps). When off, only users on a plan that includes the feature get access.`]})]})]})]}),`\n`,_jsx(Heading,{level:`3`,id:`ai-engines-2`,children:`AI engines`}),`\n`,_jsxs(_components.p,{children:[`One card per engine shows a `,_jsx(_components.strong,{children:`Ready`}),` or `,_jsx(_components.strong,{children:`Not configured`}),` badge, the text model it will use for copywriting, and the imagery model with its cost per image. If the engine has no image model, the card reads “Uses the customer’s photos”.`]}),`\n`,_jsxs(Table,{children:[_jsx(_components.thead,{children:_jsxs(_components.tr,{children:[_jsx(_components.th,{children:`Setting`}),_jsx(_components.th,{children:`Purpose`})]})}),_jsxs(_components.tbody,{children:[_jsxs(_components.tr,{children:[_jsx(_components.td,{children:_jsx(_components.strong,{children:`Default engine`})}),_jsxs(_components.td,{children:[_jsx(_components.strong,{children:`Auto`}),` uses the first engine that has a key and an enabled text model. Or pin `,_jsx(_components.strong,{children:`OpenAI`}),` or `,_jsx(_components.strong,{children:`Google Gemini`}),`.`]})]}),_jsxs(_components.tr,{children:[_jsx(_components.td,{children:_jsx(_components.strong,{children:`Let users choose the engine`})}),_jsx(_components.td,{children:`Shows an engine picker in the setup wizard when more than one engine is ready.`})]}),_jsxs(_components.tr,{children:[_jsxs(_components.td,{children:[_jsx(_components.strong,{children:`OpenAI text model`}),` / `,_jsx(_components.strong,{children:`Gemini text model`})]}),_jsxs(_components.td,{children:[`The model used for copy. Leave on `,_jsx(_components.strong,{children:`Default`}),` to use the first enabled model for that vendor.`]})]})]})]}),`\n`,_jsx(Heading,{level:`3`,id:`limits`,children:`Limits`}),`\n`,_jsxs(Table,{children:[_jsx(_components.thead,{children:_jsxs(_components.tr,{children:[_jsx(_components.th,{children:`Setting`}),_jsx(_components.th,{children:`Range`}),_jsx(_components.th,{children:`Purpose`})]})}),_jsxs(_components.tbody,{children:[_jsxs(_components.tr,{children:[_jsx(_components.td,{children:_jsx(_components.strong,{children:`AI images per page`})}),_jsx(_components.td,{children:`0 to 5 (default 5)`}),_jsxs(_components.td,{children:[`Caps how many AI images a page can hold. Set `,_jsx(_components.code,{children:`0`}),` to use customer photos only.`]})]}),_jsxs(_components.tr,{children:[_jsx(_components.td,{children:_jsx(_components.strong,{children:`Photos per page`})}),_jsx(_components.td,{children:`1 to 12 (default 6)`}),_jsx(_components.td,{children:`How many uploaded photos or Ad Creatives a page can hold.`})]}),_jsxs(_components.tr,{children:[_jsx(_components.td,{children:_jsx(_components.strong,{children:`Max upload size (MB)`})}),_jsx(_components.td,{children:`1 to 50 (default 10)`}),_jsx(_components.td,{children:`Per-photo cap. Keep it within your PHP upload limits.`})]})]})]}),`\n`,_jsx(Heading,{level:`3`,id:`credit-pricing`,children:`Credit pricing`}),`\n`,_jsxs(_components.p,{children:[`A per-step credit price. Each value is the number of credits a user spends when that step `,_jsx(_components.strong,{children:`succeeds`}),`. Set `,_jsx(_components.code,{children:`0`}),` to make a step free.`]}),`\n`,_jsxs(Table,{children:[_jsx(_components.thead,{children:_jsxs(_components.tr,{children:[_jsx(_components.th,{children:`Step`}),_jsx(_components.th,{children:`Default`}),_jsx(_components.th,{children:`Covers`})]})}),_jsxs(_components.tbody,{children:[_jsxs(_components.tr,{children:[_jsx(_components.td,{children:_jsx(_components.strong,{children:`AI product brief \u0026 design directions`})}),_jsx(_components.td,{\"data-numeric\":`true`,children:`1`}),_jsx(_components.td,{children:`The “Analyze my product” step.`})]}),_jsxs(_components.tr,{children:[_jsx(_components.td,{children:_jsx(_components.strong,{children:`Full landing page copy \u0026 layout`})}),_jsx(_components.td,{\"data-numeric\":`true`,children:`5`}),_jsx(_components.td,{children:`Building a page, and regenerating the whole page.`})]}),_jsxs(_components.tr,{children:[_jsx(_components.td,{children:_jsx(_components.strong,{children:`Section rewrite or new section`})}),_jsx(_components.td,{\"data-numeric\":`true`,children:`1`}),_jsx(_components.td,{children:`Rewriting or writing a single section.`})]})]})]}),`\n`,_jsx(_components.p,{children:`AI images are not part of this grid. Each one is billed at your platform’s normal image rate for the engine’s image model (set per model in AI Settings), once the image finishes rendering.`}),`\n`,_jsx(_components.p,{children:`Credit rules:`}),`\n`,_jsxs(_components.ul,{children:[`\n`,_jsxs(_components.li,{children:[`A user is `,_jsx(_components.strong,{children:`only charged on success`}),`. Failed, timed-out or cancelled steps cost nothing.`]}),`\n`,_jsxs(_components.li,{children:[`Before a build starts, the user needs enough credits for the page `,_jsx(_components.strong,{children:`plus`}),` all the AI images it will queue. If not, the step is blocked with a message stating the amount required.`]}),`\n`]}),`\n`,_jsxs(_components.p,{children:[`Click `,_jsx(_components.strong,{children:`Save`}),` to persist all sections.`]}),`\n`,_jsx(Heading,{level:`2`,id:`grant-access-by-plan`,children:`Grant access by plan`}),`\n`,_jsx(_components.p,{children:`Access is gated in two layers:`}),`\n`,_jsxs(_components.ol,{children:[`\n`,_jsxs(_components.li,{children:[_jsx(_components.strong,{children:`Platform layer`}),`: the plugin must be installed and `,_jsx(_components.strong,{children:`Enable Landing Page Builder`}),` must be on.`]}),`\n`,_jsxs(_components.li,{children:[_jsx(_components.strong,{children:`User layer`}),`: who actually gets the tool:`,`\n`,_jsxs(_components.ul,{children:[`\n`,_jsxs(_components.li,{children:[_jsx(_components.strong,{children:`Subscribed users`}),` (on a plan): access is governed by the plan’s `,_jsx(_components.strong,{children:`Landing Page Builder`}),` toggle. Edit each plan and enable it for the plans that should include it.`]}),`\n`,_jsxs(_components.li,{children:[_jsx(_components.strong,{children:`Non-subscribed users`}),` (no plan): access only when `,_jsx(_components.strong,{children:`Free Tier Access`}),` is on.`]}),`\n`]}),`\n`]}),`\n`]}),`\n`,_jsx(Note,{children:_jsxs(_components.p,{children:[`When the tool is offered platform-wide but the user’s plan doesn’t include it, it appears in the sidebar as a `,_jsx(_components.strong,{children:`locked, upgrade-to-unlock`}),` entry rather than disappearing.`]})}),`\n`,_jsx(_components.p,{children:`To set it up:`}),`\n`,_jsxs(_components.ol,{children:[`\n`,_jsx(_components.li,{children:`Enable the master switch in the Landing Page Builder config.`}),`\n`,_jsxs(_components.li,{children:[`Go to `,_jsx(_components.strong,{children:`Admin → Finance → Pricing Plans`}),`, edit each plan and turn `,_jsx(_components.strong,{children:`Landing Page Builder`}),` on for the plans that should include it.`]}),`\n`,_jsxs(_components.li,{children:[`Optionally enable `,_jsx(_components.strong,{children:`Free Tier Access`}),` if you want plan-less users to try it.`]}),`\n`]}),`\n`,_jsx(Heading,{level:`2`,id:`go-live-checklist`,children:`Go-live checklist`}),`\n`,_jsxs(Steps,{children:[_jsx(Step,{title:`Install the plugin`,children:_jsxs(_components.p,{children:[`Admin → Platform → Plugins → Landing Page Builder → `,_jsx(_components.strong,{children:`Install`}),`.`]})}),_jsx(Step,{title:`Connect an AI engine`,children:_jsxs(_components.p,{children:[`Admin → AI Settings → add an `,_jsx(_components.strong,{children:`OpenAI`}),` and/or `,_jsx(_components.strong,{children:`Gemini`}),` key and enable at least one Copy Studio model. Enable the vendor’s image model if you want AI imagery.`]})}),_jsx(Step,{title:`Pick the engine`,children:_jsxs(_components.p,{children:[`Landing Page Builder config → `,_jsx(_components.strong,{children:`AI engines`}),` → confirm the card shows `,_jsx(_components.strong,{children:`Ready`}),`, then choose the default engine and text model.`]})}),_jsx(Step,{title:`Set pricing \u0026 limits`,children:_jsxs(_components.p,{children:[`Adjust the credit pricing, AI images per page, photos per page and upload size, then `,_jsx(_components.strong,{children:`Save`}),`.`]})}),_jsx(Step,{title:`Enable the feature`,children:_jsxs(_components.p,{children:[`Turn on `,_jsx(_components.strong,{children:`Enable Landing Page Builder`}),`. Enable `,_jsx(_components.strong,{children:`Free Tier Access`}),` if desired.`]})}),_jsx(Step,{title:`Grant plan access`,children:_jsx(_components.p,{children:`Enable the Landing Page Builder toggle on the plans that should include it.`})}),_jsx(Step,{title:`Verify as a user`,children:_jsx(_components.p,{children:`Log in as a user on an eligible plan and build a page end to end: analyze a product, build the page, edit a line and export it.`})})]}),`\n`,_jsx(Check,{children:_jsx(_components.p,{children:`Once every step above is green, Landing Page Builder is live. Proceed to the section below on how to use it.`})}),`\n`,_jsx(Heading,{level:`2`,id:`how-to-use`,children:`How to Use`}),`\n`,_jsxs(_components.p,{children:[`The tool lives under `,_jsx(_components.strong,{children:`Creative Tools → Landing Page Builder`}),` in the user sidebar.`]}),`\n`,_jsx(Heading,{level:`3`,id:`what-each-step-costs`,children:`What each step costs`}),`\n`,_jsxs(Table,{children:[_jsx(_components.thead,{children:_jsxs(_components.tr,{children:[_jsx(_components.th,{children:`Action`}),_jsx(_components.th,{children:`Default cost`}),_jsx(_components.th,{children:`Charged when`})]})}),_jsxs(_components.tbody,{children:[_jsxs(_components.tr,{children:[_jsx(_components.td,{children:`Analyze my product`}),_jsx(_components.td,{children:`1 credit`}),_jsx(_components.td,{children:`The brief is ready.`})]}),_jsxs(_components.tr,{children:[_jsx(_components.td,{children:`Build my landing page`}),_jsx(_components.td,{children:`5 credits`}),_jsx(_components.td,{children:`The copy is written.`})]}),_jsxs(_components.tr,{children:[_jsx(_components.td,{children:`Each AI image`}),_jsx(_components.td,{children:`Your platform image rate`}),_jsx(_components.td,{children:`That image finishes rendering.`})]}),_jsxs(_components.tr,{children:[_jsx(_components.td,{children:`Rewrite or write a section`}),_jsx(_components.td,{children:`1 credit`}),_jsx(_components.td,{children:`The section is saved.`})]}),_jsxs(_components.tr,{children:[_jsx(_components.td,{children:`Regenerate the whole page`}),_jsx(_components.td,{children:`5 credits plus any missing AI images`}),_jsx(_components.td,{children:`The new copy is written.`})]}),_jsxs(_components.tr,{children:[_jsx(_components.td,{children:`Editing text, changing the design, reordering sections, previewing, duplicating, exporting`}),_jsx(_components.td,{children:`Free`}),_jsx(_components.td,{children:`Never charged.`})]})]})]}),`\n`,_jsx(_components.p,{children:`Costs shown on the buttons always match the admin’s current pricing.`}),`\n`,_jsx(Heading,{level:`3`,id:`my-landing-pages`,children:`My landing pages`}),`\n`,_jsxs(_components.p,{children:[`The library lists every page the user has started. Search by name, or click `,_jsx(_components.strong,{children:`New landing page`}),`.`]}),`\n`,_jsx(Frame,{caption:`The My landing pages library.`,children:_jsx(OptimizedImage,{src:`https://mintcdn.com/magicads/GDWBHF_8XJc8cVcS/images/extensions/landing-page-builder/newlandingpage.png?fit=max\u0026auto=format\u0026n=GDWBHF_8XJc8cVcS\u0026q=85\u0026s=f1a5569e2c948ea79fd4eeb3f9bc7e4e`,alt:`Landing page library showing page cards with status badges`,\"data-og-width\":`2691`,width:`2691`,\"data-og-height\":`949`,height:`949`,\"data-path\":`images/extensions/landing-page-builder/newlandingpage.png`,\"data-optimize\":`true`,\"data-opv\":`3`,srcset:`https://mintcdn.com/magicads/GDWBHF_8XJc8cVcS/images/extensions/landing-page-builder/newlandingpage.png?w=280\u0026fit=max\u0026auto=format\u0026n=GDWBHF_8XJc8cVcS\u0026q=85\u0026s=79a04eb4ca92339e295d116534f34f75 280w, https://mintcdn.com/magicads/GDWBHF_8XJc8cVcS/images/extensions/landing-page-builder/newlandingpage.png?w=560\u0026fit=max\u0026auto=format\u0026n=GDWBHF_8XJc8cVcS\u0026q=85\u0026s=f47de8edbb129dc8857c890534240b7c 560w, https://mintcdn.com/magicads/GDWBHF_8XJc8cVcS/images/extensions/landing-page-builder/newlandingpage.png?w=840\u0026fit=max\u0026auto=format\u0026n=GDWBHF_8XJc8cVcS\u0026q=85\u0026s=46cea676cb5208fb6568a5357206ddad 840w, https://mintcdn.com/magicads/GDWBHF_8XJc8cVcS/images/extensions/landing-page-builder/newlandingpage.png?w=1100\u0026fit=max\u0026auto=format\u0026n=GDWBHF_8XJc8cVcS\u0026q=85\u0026s=c756b7a7e29610ff764521d01c0ba340 1100w, https://mintcdn.com/magicads/GDWBHF_8XJc8cVcS/images/extensions/landing-page-builder/newlandingpage.png?w=1650\u0026fit=max\u0026auto=format\u0026n=GDWBHF_8XJc8cVcS\u0026q=85\u0026s=e28c5e1bb88d1db7fee04867b5d9b401 1650w, https://mintcdn.com/magicads/GDWBHF_8XJc8cVcS/images/extensions/landing-page-builder/newlandingpage.png?w=2500\u0026fit=max\u0026auto=format\u0026n=GDWBHF_8XJc8cVcS\u0026q=85\u0026s=9f3101166b251e0f2c1da4a2b9c9a648 2500w`})}),`\n`,_jsx(_components.p,{children:`Each card shows a mini preview, the page name, a status badge and the number of sections:`}),`\n`,_jsxs(Table,{children:[_jsx(_components.thead,{children:_jsxs(_components.tr,{children:[_jsx(_components.th,{children:`Status`}),_jsx(_components.th,{children:`Meaning`})]})}),_jsxs(_components.tbody,{children:[_jsxs(_components.tr,{children:[_jsx(_components.td,{children:_jsx(_components.strong,{children:`Draft`})}),_jsx(_components.td,{children:`Product details saved, brief not generated yet.`})]}),_jsxs(_components.tr,{children:[_jsx(_components.td,{children:_jsx(_components.strong,{children:`Brief ready`})}),_jsx(_components.td,{children:`The AI brief exists. Continue the setup to build the page.`})]}),_jsxs(_components.tr,{children:[_jsx(_components.td,{children:_jsx(_components.strong,{children:`Ready`})}),_jsx(_components.td,{children:`The page is built and open in the builder.`})]}),_jsxs(_components.tr,{children:[_jsx(_components.td,{children:_jsx(_components.strong,{children:`Needs attention`})}),_jsx(_components.td,{children:`The last build did not finish. The user was not charged.`})]})]})]}),`\n`,_jsxs(_components.p,{children:[`The `,_jsx(_components.strong,{children:`…`}),` menu on a card offers `,_jsx(_components.strong,{children:`Open builder`}),` (or `,_jsx(_components.strong,{children:`Continue setup`}),`), `,_jsx(_components.strong,{children:`Preview in new tab`}),`, `,_jsx(_components.strong,{children:`Download ZIP`}),`, `,_jsx(_components.strong,{children:`Download single HTML file`}),`, `,_jsx(_components.strong,{children:`Rename`}),`, `,_jsx(_components.strong,{children:`Duplicate`}),` and `,_jsx(_components.strong,{children:`Delete`}),`. Deleting removes the page and its uploaded photos. AI images stay in the user’s Ad Creatives.`]}),`\n`,_jsx(Heading,{level:`3`,id:`step-1-product`,children:`Step 1: Product`}),`\n`,_jsx(_components.p,{children:`Tell the AI about the product. The AI never invents prices, awards or claims you didn’t give it.`}),`\n`,_jsx(Frame,{caption:`Setup step 1: Product.`,children:_jsx(OptimizedImage,{src:`https://mintcdn.com/magicads/GDWBHF_8XJc8cVcS/images/extensions/landing-page-builder/productdetails.png?fit=max\u0026auto=format\u0026n=GDWBHF_8XJc8cVcS\u0026q=85\u0026s=d33bca75d5da9479d0e826a0c96552ae`,alt:`Product step with name, description, price, button link and photo uploader`,\"data-og-width\":`2671`,width:`2671`,\"data-og-height\":`1122`,height:`1122`,\"data-path\":`images/extensions/landing-page-builder/productdetails.png`,\"data-optimize\":`true`,\"data-opv\":`3`,srcset:`https://mintcdn.com/magicads/GDWBHF_8XJc8cVcS/images/extensions/landing-page-builder/productdetails.png?w=280\u0026fit=max\u0026auto=format\u0026n=GDWBHF_8XJc8cVcS\u0026q=85\u0026s=25969bc9faa1c56e1fdb80ed3bcedff4 280w, https://mintcdn.com/magicads/GDWBHF_8XJc8cVcS/images/extensions/landing-page-builder/productdetails.png?w=560\u0026fit=max\u0026auto=format\u0026n=GDWBHF_8XJc8cVcS\u0026q=85\u0026s=a449ee97296a48c89907f74f12ad3aa3 560w, https://mintcdn.com/magicads/GDWBHF_8XJc8cVcS/images/extensions/landing-page-builder/productdetails.png?w=840\u0026fit=max\u0026auto=format\u0026n=GDWBHF_8XJc8cVcS\u0026q=85\u0026s=2df27b5754a321f57642f0ed5ba0854e 840w, https://mintcdn.com/magicads/GDWBHF_8XJc8cVcS/images/extensions/landing-page-builder/productdetails.png?w=1100\u0026fit=max\u0026auto=format\u0026n=GDWBHF_8XJc8cVcS\u0026q=85\u0026s=304e0af8e7ecb981b30ab8a5e914e013 1100w, https://mintcdn.com/magicads/GDWBHF_8XJc8cVcS/images/extensions/landing-page-builder/productdetails.png?w=1650\u0026fit=max\u0026auto=format\u0026n=GDWBHF_8XJc8cVcS\u0026q=85\u0026s=5eff106bbd880394768f8d8fbad56c7f 1650w, https://mintcdn.com/magicads/GDWBHF_8XJc8cVcS/images/extensions/landing-page-builder/productdetails.png?w=2500\u0026fit=max\u0026auto=format\u0026n=GDWBHF_8XJc8cVcS\u0026q=85\u0026s=6fdbdf49ec40315c660ed0dfb2c2b4a9 2500w`})}),`\n`,_jsxs(Table,{children:[_jsx(_components.thead,{children:_jsxs(_components.tr,{children:[_jsx(_components.th,{children:`Field`}),_jsx(_components.th,{children:`Limit`}),_jsx(_components.th,{children:`Notes`})]})}),_jsxs(_components.tbody,{children:[_jsxs(_components.tr,{children:[_jsx(_components.td,{children:_jsx(_components.strong,{children:`Product name`})}),_jsx(_components.td,{children:`120 characters`}),_jsx(_components.td,{children:`Becomes the page name.`})]}),_jsxs(_components.tr,{children:[_jsx(_components.td,{children:_jsx(_components.strong,{children:`What is it, and why will people love it?`})}),_jsx(_components.td,{children:`3,000 characters`}),_jsx(_components.td,{children:`Paste the product description or a few bullet points. Photos alone also work.`})]}),_jsxs(_components.tr,{children:[_jsxs(_components.td,{children:[_jsx(_components.strong,{children:`Price`}),` and `,_jsx(_components.strong,{children:`Compare-at price`})]}),_jsx(_components.td,{children:`24 characters each`}),_jsx(_components.td,{children:`Copied exactly onto the Offer section. Leave empty to show no price.`})]}),_jsxs(_components.tr,{children:[_jsx(_components.td,{children:_jsx(_components.strong,{children:`Button link`})}),_jsx(_components.td,{children:`Full web address`}),_jsx(_components.td,{children:`Where the buttons send visitors: checkout, store or booking page. If empty, buttons link to sections on the page.`})]}),_jsxs(_components.tr,{children:[_jsx(_components.td,{children:_jsx(_components.strong,{children:`Photos`})}),_jsx(_components.td,{children:`Up to the admin’s limit (default 6)`}),_jsx(_components.td,{children:`JPG, PNG or WebP. The AI studies them to match colours, mood and wording.`})]})]})]}),`\n`,_jsxs(_components.p,{children:[_jsx(_components.strong,{children:`Photos`}),`: upload files, or click `,_jsx(_components.strong,{children:`Pick from Ad Creatives`}),` to reuse images from the library. The first photo is the `,_jsx(_components.strong,{children:`Main`}),` photo. Use the star button on another photo to make it the main one.`]}),`\n`,_jsxs(_components.p,{children:[_jsx(_components.strong,{children:`Goal`}),` shapes the story and every call to action:`]}),`\n`,_jsxs(Table,{children:[_jsx(_components.thead,{children:_jsxs(_components.tr,{children:[_jsx(_components.th,{children:`Goal`}),_jsx(_components.th,{children:`Default button wording`})]})}),_jsxs(_components.tbody,{children:[_jsxs(_components.tr,{children:[_jsx(_components.td,{children:_jsx(_components.strong,{children:`Sell online`})}),_jsx(_components.td,{children:`Buy now`})]}),_jsxs(_components.tr,{children:[_jsx(_components.td,{children:_jsx(_components.strong,{children:`Take pre-orders`})}),_jsx(_components.td,{children:`Pre-order now`})]}),_jsxs(_components.tr,{children:[_jsx(_components.td,{children:_jsx(_components.strong,{children:`Capture leads`})}),_jsx(_components.td,{children:`Get in touch`})]}),_jsxs(_components.tr,{children:[_jsx(_components.td,{children:_jsx(_components.strong,{children:`Grow a waitlist`})}),_jsx(_components.td,{children:`Join the waitlist`})]}),_jsxs(_components.tr,{children:[_jsx(_components.td,{children:_jsx(_components.strong,{children:`App downloads`})}),_jsx(_components.td,{children:`Download the app`})]}),_jsxs(_components.tr,{children:[_jsx(_components.td,{children:_jsx(_components.strong,{children:`Book demos`})}),_jsx(_components.td,{children:`Book a demo`})]})]})]}),`\n`,_jsxs(_components.p,{children:[`Also choose the `,_jsx(_components.strong,{children:`Page language`}),` (22 languages, including right-to-left Arabic and Hebrew), an optional `,_jsx(_components.strong,{children:`Brand`}),` (adds your saved brand voice, colours and logo) and, when the admin allows it, the `,_jsx(_components.strong,{children:`AI engine`}),`.`]}),`\n`,_jsxs(_components.p,{children:[`Then click `,_jsx(_components.strong,{children:`Analyze my product`}),`. The user needs a description or at least one photo. The AI reads the photos and text, which usually takes 15 to 40 seconds.`]}),`\n`,_jsx(Heading,{level:`3`,id:`step-2-strategy`,children:`Step 2: Strategy`}),`\n`,_jsx(_components.p,{children:`The AI returns a creative brief. The user confirms or adjusts it before any copy is written.`}),`\n`,_jsx(Frame,{caption:`Setup step 2: Strategy.`,children:_jsx(OptimizedImage,{src:`https://mintcdn.com/magicads/GDWBHF_8XJc8cVcS/images/extensions/landing-page-builder/strategy.png?fit=max\u0026auto=format\u0026n=GDWBHF_8XJc8cVcS\u0026q=85\u0026s=41a09463ba2583a5590c1b283b8ae377`,alt:`Strategy step showing what the AI understood, selling points and tone of voice`,\"data-og-width\":`2722`,width:`2722`,\"data-og-height\":`1522`,height:`1522`,\"data-path\":`images/extensions/landing-page-builder/strategy.png`,\"data-optimize\":`true`,\"data-opv\":`3`,srcset:`https://mintcdn.com/magicads/GDWBHF_8XJc8cVcS/images/extensions/landing-page-builder/strategy.png?w=280\u0026fit=max\u0026auto=format\u0026n=GDWBHF_8XJc8cVcS\u0026q=85\u0026s=7bdc76e4d8a7b6d14be7502869f78c2f 280w, https://mintcdn.com/magicads/GDWBHF_8XJc8cVcS/images/extensions/landing-page-builder/strategy.png?w=560\u0026fit=max\u0026auto=format\u0026n=GDWBHF_8XJc8cVcS\u0026q=85\u0026s=992452ef25edc6e51715b87064b10d99 560w, https://mintcdn.com/magicads/GDWBHF_8XJc8cVcS/images/extensions/landing-page-builder/strategy.png?w=840\u0026fit=max\u0026auto=format\u0026n=GDWBHF_8XJc8cVcS\u0026q=85\u0026s=1de20a7c58367f3ec87e3ed3681ef0b1 840w, https://mintcdn.com/magicads/GDWBHF_8XJc8cVcS/images/extensions/landing-page-builder/strategy.png?w=1100\u0026fit=max\u0026auto=format\u0026n=GDWBHF_8XJc8cVcS\u0026q=85\u0026s=7bd42c982f1d8fc5775242f26ae530f2 1100w, https://mintcdn.com/magicads/GDWBHF_8XJc8cVcS/images/extensions/landing-page-builder/strategy.png?w=1650\u0026fit=max\u0026auto=format\u0026n=GDWBHF_8XJc8cVcS\u0026q=85\u0026s=16366924b0765c62dbc10bea9e7ce575 1650w, https://mintcdn.com/magicads/GDWBHF_8XJc8cVcS/images/extensions/landing-page-builder/strategy.png?w=2500\u0026fit=max\u0026auto=format\u0026n=GDWBHF_8XJc8cVcS\u0026q=85\u0026s=6ed82b883b7d0ffb406d01e24ae4471a 2500w`})}),`\n`,_jsxs(_components.ul,{children:[`\n`,_jsxs(_components.li,{children:[_jsx(_components.strong,{children:`What the AI understood`}),`: product name, category, positioning (Budget-friendly, Mid-range, Premium or Luxury), a summary, `,_jsx(_components.strong,{children:`Who buys it`}),` and `,_jsx(_components.strong,{children:`What moves them`}),`. Click `,_jsx(_components.strong,{children:`Edit details`}),` to go back and change the inputs.`]}),`\n`,_jsxs(_components.li,{children:[_jsx(_components.strong,{children:`Selling points`}),`: up to 6, 80 characters each. Keep the strongest and make them concrete. They steer the headline, features and FAQ.`]}),`\n`,_jsxs(_components.li,{children:[_jsx(_components.strong,{children:`A few quick choices`}),`: two or three questions that change the angle of the page. Tap an option, type your own answer (120 characters), or skip.`]}),`\n`,_jsxs(_components.li,{children:[_jsx(_components.strong,{children:`Tone of voice`}),`: pick up to three from Confident, Premium, Playful, Warm, Technical, Minimal, Bold and Eco-conscious.`]}),`\n`,_jsxs(_components.li,{children:[_jsx(_components.strong,{children:`Anything the copy must mention?`}),`: 400 characters for a launch date, promo code or shipping detail.`]}),`\n`]}),`\n`,_jsxs(_components.p,{children:[`Click `,_jsx(_components.strong,{children:`Continue to design`}),`.`]}),`\n`,_jsx(Heading,{level:`3`,id:`step-3-design`,children:`Step 3: Design`}),`\n`,_jsx(_components.p,{children:`Choose how the page looks. Everything here can be changed later in the builder.`}),`\n`,_jsx(Frame,{caption:`Setup step 3: Design.`,children:_jsx(OptimizedImage,{src:`https://mintcdn.com/magicads/GDWBHF_8XJc8cVcS/images/extensions/landing-page-builder/design.png?fit=max\u0026auto=format\u0026n=GDWBHF_8XJc8cVcS\u0026q=85\u0026s=3ebc5692ee594122a0eab7e8a562cb78`,alt:`Design step with creative directions, colour palettes, typography and the Build your page panel`,\"data-og-width\":`2713`,width:`2713`,\"data-og-height\":`1356`,height:`1356`,\"data-path\":`images/extensions/landing-page-builder/design.png`,\"data-optimize\":`true`,\"data-opv\":`3`,srcset:`https://mintcdn.com/magicads/GDWBHF_8XJc8cVcS/images/extensions/landing-page-builder/design.png?w=280\u0026fit=max\u0026auto=format\u0026n=GDWBHF_8XJc8cVcS\u0026q=85\u0026s=69c4e740ead5aba120c5507081c6ea36 280w, https://mintcdn.com/magicads/GDWBHF_8XJc8cVcS/images/extensions/landing-page-builder/design.png?w=560\u0026fit=max\u0026auto=format\u0026n=GDWBHF_8XJc8cVcS\u0026q=85\u0026s=83100a529d13ec6637e92c15ce947a69 560w, https://mintcdn.com/magicads/GDWBHF_8XJc8cVcS/images/extensions/landing-page-builder/design.png?w=840\u0026fit=max\u0026auto=format\u0026n=GDWBHF_8XJc8cVcS\u0026q=85\u0026s=475e6a121b066f9189ce9f7d5c489f2e 840w, https://mintcdn.com/magicads/GDWBHF_8XJc8cVcS/images/extensions/landing-page-builder/design.png?w=1100\u0026fit=max\u0026auto=format\u0026n=GDWBHF_8XJc8cVcS\u0026q=85\u0026s=61c9a10e5eef5aeb572187df9a6180e2 1100w, https://mintcdn.com/magicads/GDWBHF_8XJc8cVcS/images/extensions/landing-page-builder/design.png?w=1650\u0026fit=max\u0026auto=format\u0026n=GDWBHF_8XJc8cVcS\u0026q=85\u0026s=7828a145c060490d9444387ba0b53ee5 1650w, https://mintcdn.com/magicads/GDWBHF_8XJc8cVcS/images/extensions/landing-page-builder/design.png?w=2500\u0026fit=max\u0026auto=format\u0026n=GDWBHF_8XJc8cVcS\u0026q=85\u0026s=6ecc272e233b295f8c414556137c1ac6 2500w`})}),`\n`,_jsx(Frame,{caption:`Setup step 3: Design.`,children:_jsx(OptimizedImage,{src:`https://mintcdn.com/magicads/GDWBHF_8XJc8cVcS/images/extensions/landing-page-builder/design2.png?fit=max\u0026auto=format\u0026n=GDWBHF_8XJc8cVcS\u0026q=85\u0026s=b409e21aa922efa57dffa225778f5306`,alt:`Design step with creative directions, colour palettes, typography and the Build your page panel`,\"data-og-width\":`2656`,width:`2656`,\"data-og-height\":`1549`,height:`1549`,\"data-path\":`images/extensions/landing-page-builder/design2.png`,\"data-optimize\":`true`,\"data-opv\":`3`,srcset:`https://mintcdn.com/magicads/GDWBHF_8XJc8cVcS/images/extensions/landing-page-builder/design2.png?w=280\u0026fit=max\u0026auto=format\u0026n=GDWBHF_8XJc8cVcS\u0026q=85\u0026s=5d7ef9d0383c68ea3bd8246448f139b4 280w, https://mintcdn.com/magicads/GDWBHF_8XJc8cVcS/images/extensions/landing-page-builder/design2.png?w=560\u0026fit=max\u0026auto=format\u0026n=GDWBHF_8XJc8cVcS\u0026q=85\u0026s=7c914c084ac5d1c04b8260e4a3f4b2d8 560w, https://mintcdn.com/magicads/GDWBHF_8XJc8cVcS/images/extensions/landing-page-builder/design2.png?w=840\u0026fit=max\u0026auto=format\u0026n=GDWBHF_8XJc8cVcS\u0026q=85\u0026s=8aa03787eb03787471ef82fea48e8c99 840w, https://mintcdn.com/magicads/GDWBHF_8XJc8cVcS/images/extensions/landing-page-builder/design2.png?w=1100\u0026fit=max\u0026auto=format\u0026n=GDWBHF_8XJc8cVcS\u0026q=85\u0026s=0deeca3d31bb4465e72420040e60c4d5 1100w, https://mintcdn.com/magicads/GDWBHF_8XJc8cVcS/images/extensions/landing-page-builder/design2.png?w=1650\u0026fit=max\u0026auto=format\u0026n=GDWBHF_8XJc8cVcS\u0026q=85\u0026s=6b4be6246eaa0a1c68b0a2351a5ac90c 1650w, https://mintcdn.com/magicads/GDWBHF_8XJc8cVcS/images/extensions/landing-page-builder/design2.png?w=2500\u0026fit=max\u0026auto=format\u0026n=GDWBHF_8XJc8cVcS\u0026q=85\u0026s=d137e3cba4b00bd108017d6537b9ce16 2500w`})}),`\n`,_jsx(_components.p,{children:_jsx(_components.strong,{children:`Look \u0026 feel`})}),`\n`,_jsxs(Table,{children:[_jsx(_components.thead,{children:_jsxs(_components.tr,{children:[_jsx(_components.th,{children:`Control`}),_jsx(_components.th,{children:`Options`})]})}),_jsxs(_components.tbody,{children:[_jsxs(_components.tr,{children:[_jsx(_components.td,{children:_jsx(_components.strong,{children:`Creative direction`})}),_jsx(_components.td,{children:`Three complete art directions written for this product, each with its own palette, font pairing and theme.`})]}),_jsxs(_components.tr,{children:[_jsx(_components.td,{children:_jsx(_components.strong,{children:`Colour`})}),_jsx(_components.td,{children:`Light or dark theme, 10 palettes (Midnight, Linen, Forest, Ocean, Ember, Graphite, Sand, Mint, Cobalt, Noir) and colour pickers for buttons, accent, background, cards and text. Text colours adjust automatically so everything stays readable.`})]}),_jsxs(_components.tr,{children:[_jsx(_components.td,{children:_jsx(_components.strong,{children:`Typography`})}),_jsx(_components.td,{children:`12 font pairings, from Modern and Editorial to Luxe, Tech and Fashion.`})]}),_jsxs(_components.tr,{children:[_jsx(_components.td,{children:_jsx(_components.strong,{children:`Corners`})}),_jsx(_components.td,{children:`Sharp, Soft or Round.`})]}),_jsxs(_components.tr,{children:[_jsx(_components.td,{children:_jsx(_components.strong,{children:`Motion`})}),_jsx(_components.td,{children:`Subtle, Balanced or Bold intensity.`})]}),_jsxs(_components.tr,{children:[_jsx(_components.td,{children:_jsx(_components.strong,{children:`Effects`})}),_jsx(_components.td,{children:`11 effects to switch on or off: scroll reveal, parallax depth, 3D tilt, card spotlight, aurora glow, film grain, moving ticker, counting stats, magnetic buttons, reading progress and glow borders.`})]})]})]}),`\n`,_jsx(_components.p,{children:`Visitors who prefer reduced motion always get a calm version of the page.`}),`\n`,_jsx(_components.p,{children:_jsx(_components.strong,{children:`Sections`})}),`\n`,_jsxs(_components.p,{children:[`The AI proposes sections for the product and goal, with a reason for each. Switch sections on or off, reorder them with the arrows and pick a layout where one exists (Hero: Split, Centered or Immersive. Features: Cards or Bento. Testimonials: Grid or Marquee). `,_jsx(_components.strong,{children:`Hero`}),` and `,_jsx(_components.strong,{children:`Closing call to action`}),` are always on.`]}),`\n`,_jsx(_components.p,{children:_jsx(_components.strong,{children:`Imagery`})}),`\n`,_jsxs(Table,{children:[_jsx(_components.thead,{children:_jsxs(_components.tr,{children:[_jsx(_components.th,{children:`Option`}),_jsx(_components.th,{children:`What it does`})]})}),_jsxs(_components.tbody,{children:[_jsxs(_components.tr,{children:[_jsx(_components.td,{children:_jsx(_components.strong,{children:`My photos only`})}),_jsx(_components.td,{children:`Builds the page from the photos the user added. Free.`})]}),_jsxs(_components.tr,{children:[_jsx(_components.td,{children:_jsx(_components.strong,{children:`AI hero shot`})}),_jsx(_components.td,{children:`One cinematic hero image.`})]}),_jsxs(_components.tr,{children:[_jsx(_components.td,{children:_jsx(_components.strong,{children:`Story set`})}),_jsx(_components.td,{children:`A hero plus two lifestyle scenes.`})]}),_jsxs(_components.tr,{children:[_jsx(_components.td,{children:_jsx(_components.strong,{children:`Full art direction`})}),_jsx(_components.td,{children:`Hero, lifestyle, detail and banner imagery.`})]})]})]}),`\n`,_jsxs(_components.p,{children:[`The AI options are capped by the admin’s `,_jsx(_components.strong,{children:`AI images per page`}),` limit, and they are unavailable (greyed out) when the engine has no image model.`]}),`\n`,_jsxs(_components.p,{children:[`The `,_jsx(_components.strong,{children:`Build your page`}),` panel lists the total cost: copy, layout and SEO, plus the cost of any AI images. Click `,_jsx(_components.strong,{children:`Build my landing page`}),`. It takes about a minute, and AI images are only charged once they finish.`]}),`\n`,_jsx(Frame,{caption:`The page is being built.`,children:_jsx(OptimizedImage,{src:`https://mintcdn.com/magicads/GDWBHF_8XJc8cVcS/images/extensions/landing-page-builder/builder-overview.png?fit=max\u0026auto=format\u0026n=GDWBHF_8XJc8cVcS\u0026q=85\u0026s=2204e58a5edeb17c358fd5e86dd7bc3c`,alt:`Progress screen showing the steps the AI is working through`,\"data-og-width\":`2862`,width:`2862`,\"data-og-height\":`1591`,height:`1591`,\"data-path\":`images/extensions/landing-page-builder/builder-overview.png`,\"data-optimize\":`true`,\"data-opv\":`3`,srcset:`https://mintcdn.com/magicads/GDWBHF_8XJc8cVcS/images/extensions/landing-page-builder/builder-overview.png?w=280\u0026fit=max\u0026auto=format\u0026n=GDWBHF_8XJc8cVcS\u0026q=85\u0026s=7a0444ba58314ecbfe36224ea11fd3c6 280w, https://mintcdn.com/magicads/GDWBHF_8XJc8cVcS/images/extensions/landing-page-builder/builder-overview.png?w=560\u0026fit=max\u0026auto=format\u0026n=GDWBHF_8XJc8cVcS\u0026q=85\u0026s=09e36dcb8983a80411f053e28f45b22d 560w, https://mintcdn.com/magicads/GDWBHF_8XJc8cVcS/images/extensions/landing-page-builder/builder-overview.png?w=840\u0026fit=max\u0026auto=format\u0026n=GDWBHF_8XJc8cVcS\u0026q=85\u0026s=56f0a68b28b671e57b7f0290715ad8fc 840w, https://mintcdn.com/magicads/GDWBHF_8XJc8cVcS/images/extensions/landing-page-builder/builder-overview.png?w=1100\u0026fit=max\u0026auto=format\u0026n=GDWBHF_8XJc8cVcS\u0026q=85\u0026s=c550e6688793c474482aed96d4bf7f18 1100w, https://mintcdn.com/magicads/GDWBHF_8XJc8cVcS/images/extensions/landing-page-builder/builder-overview.png?w=1650\u0026fit=max\u0026auto=format\u0026n=GDWBHF_8XJc8cVcS\u0026q=85\u0026s=2659378fcaf07216f02e8afe41d20546 1650w, https://mintcdn.com/magicads/GDWBHF_8XJc8cVcS/images/extensions/landing-page-builder/builder-overview.png?w=2500\u0026fit=max\u0026auto=format\u0026n=GDWBHF_8XJc8cVcS\u0026q=85\u0026s=835de063163b189d4a97407ddb8470f9 2500w`})}),`\n`,_jsx(Note,{children:_jsx(_components.p,{children:`Keep the tab open while the page builds. If a build fails, the user is not charged and can adjust anything and build again.`})}),`\n`,_jsx(Heading,{level:`3`,id:`the-visual-editor`,children:`The visual editor`}),`\n`,_jsx(_components.p,{children:`When the build finishes, the builder opens. The page you see is the real page. All changes are saved automatically.`}),`\n`,_jsxs(_components.p,{children:[`The top bar has the `,_jsx(_components.strong,{children:`page name`}),` (click to rename), a `,_jsx(_components.strong,{children:`Desktop / Tablet / Mobile`}),` preview switch, the credit balance, `,_jsx(_components.strong,{children:`Preview`}),` (opens the page in a new tab) and `,_jsx(_components.strong,{children:`Export`}),`.`]}),`\n`,_jsx(_components.p,{children:`The side panel has four tabs.`}),`\n`,_jsx(Heading,{level:`4`,id:`content`,children:`Content`}),`\n`,_jsx(_components.p,{children:`Click any headline, paragraph or button label in the preview to edit it in place. The section list below the hint gives structural control:`}),`\n`,_jsxs(_components.ul,{children:[`\n`,_jsxs(_components.li,{children:[_jsx(_components.strong,{children:`Show or hide`}),` a section with its switch, and `,_jsx(_components.strong,{children:`move`}),` it up or down.`]}),`\n`,_jsxs(_components.li,{children:[`Open a section to pick its `,_jsx(_components.strong,{children:`Layout`}),`, add, remove or reorder `,_jsx(_components.strong,{children:`Entries`}),` (features, testimonials, FAQ items and so on), change a feature’s icon, set a testimonial’s star rating, or mark a comparison row as `,_jsx(_components.strong,{children:`Us`}),` or `,_jsx(_components.strong,{children:`Them`}),`.`]}),`\n`,_jsxs(_components.li,{children:[_jsx(_components.strong,{children:`Rewrite with AI`}),`: type an instruction (up to 400 characters) or tap a chip such as “Make it shorter and punchier”, “Make it more persuasive”, “Make it feel more premium” or “Add gentle urgency”, then click `,_jsx(_components.strong,{children:`Rewrite section`}),`.`]}),`\n`,_jsxs(_components.li,{children:[`A section that is switched on but has no copy shows `,_jsx(_components.strong,{children:`Needs copy`}),`. Open it and click `,_jsx(_components.strong,{children:`Write section`}),`.`]}),`\n`]}),`\n`,_jsx(Frame,{caption:`The Content panel with a section open and Rewrite with AI.`,children:_jsx(OptimizedImage,{src:`https://mintcdn.com/magicads/GDWBHF_8XJc8cVcS/images/extensions/landing-page-builder/final.png?fit=max\u0026auto=format\u0026n=GDWBHF_8XJc8cVcS\u0026q=85\u0026s=7d35cbd9ec51e83351cc4a91d6eff7b3`,alt:`Content panel with the Features section expanded and the Rewrite with AI box`,\"data-og-width\":`2863`,width:`2863`,\"data-og-height\":`1558`,height:`1558`,\"data-path\":`images/extensions/landing-page-builder/final.png`,\"data-optimize\":`true`,\"data-opv\":`3`,srcset:`https://mintcdn.com/magicads/GDWBHF_8XJc8cVcS/images/extensions/landing-page-builder/final.png?w=280\u0026fit=max\u0026auto=format\u0026n=GDWBHF_8XJc8cVcS\u0026q=85\u0026s=0d04f89ca7f4a1d554469fab14b8edc3 280w, https://mintcdn.com/magicads/GDWBHF_8XJc8cVcS/images/extensions/landing-page-builder/final.png?w=560\u0026fit=max\u0026auto=format\u0026n=GDWBHF_8XJc8cVcS\u0026q=85\u0026s=ff845d8ea1112ad84c25305f87b40996 560w, https://mintcdn.com/magicads/GDWBHF_8XJc8cVcS/images/extensions/landing-page-builder/final.png?w=840\u0026fit=max\u0026auto=format\u0026n=GDWBHF_8XJc8cVcS\u0026q=85\u0026s=d542fd83bc0033863a59222762d6fb14 840w, https://mintcdn.com/magicads/GDWBHF_8XJc8cVcS/images/extensions/landing-page-builder/final.png?w=1100\u0026fit=max\u0026auto=format\u0026n=GDWBHF_8XJc8cVcS\u0026q=85\u0026s=418ca462f920dddd7988b8e99f5f1f2e 1100w, https://mintcdn.com/magicads/GDWBHF_8XJc8cVcS/images/extensions/landing-page-builder/final.png?w=1650\u0026fit=max\u0026auto=format\u0026n=GDWBHF_8XJc8cVcS\u0026q=85\u0026s=e438914efa9077c5d8dc76de69d582a9 1650w, https://mintcdn.com/magicads/GDWBHF_8XJc8cVcS/images/extensions/landing-page-builder/final.png?w=2500\u0026fit=max\u0026auto=format\u0026n=GDWBHF_8XJc8cVcS\u0026q=85\u0026s=f4457f5830b791a7e36e718084f3b9a8 2500w`})}),`\n`,_jsx(Warning,{children:_jsx(_components.p,{children:`Testimonials and stats are written as realistic placeholders, because the AI never invents customer quotes or numbers. Replace them with real ones before you publish.`})}),`\n`,_jsx(Heading,{level:`4`,id:`design`,children:`Design`}),`\n`,_jsxs(_components.p,{children:[`The same controls as the setup Design step: creative direction, colour, typography, corners, motion and effects. Changes re-render the preview straight away. A `,_jsx(_components.strong,{children:`Revisit the strategy`}),` link takes the user back to change the angle, audience or imagery set.`]}),`\n`,_jsx(Frame,{caption:`The Design panel.`,children:_jsx(OptimizedImage,{src:`https://mintlify.s3.us-west-1.amazonaws.com/magicads/images/landing-page-builder/panel-design.png`,alt:`Design panel with palettes, typography and motion options`})}),`\n`,_jsx(Heading,{level:`4`,id:`images`,children:`Images`}),`\n`,_jsxs(_components.ul,{children:[`\n`,_jsxs(_components.li,{children:[_jsx(_components.strong,{children:`Your photos`}),`: add, remove or change the main photo.`]}),`\n`,_jsxs(_components.li,{children:[_jsx(_components.strong,{children:`Image placements`}),`: five slots, each of which can `,_jsx(_components.strong,{children:`Use a photo`}),` the user uploaded, or `,_jsx(_components.strong,{children:`Render with AI`}),` (with an optional scene note of up to 300 characters). Slots with no choice use the user’s photos automatically. `,_jsx(_components.strong,{children:`Reset`}),` returns a slot to automatic.`]}),`\n`,_jsxs(_components.li,{children:[_jsx(_components.strong,{children:`Logo`}),`: upload a PNG, JPG or WebP logo for the navigation and footer. Without one, the brand name is shown as text.`]}),`\n`]}),`\n`,_jsxs(Table,{children:[_jsx(_components.thead,{children:_jsxs(_components.tr,{children:[_jsx(_components.th,{children:`Slot`}),_jsx(_components.th,{children:`Shape`}),_jsx(_components.th,{children:`Where it appears`})]})}),_jsxs(_components.tbody,{children:[_jsxs(_components.tr,{children:[_jsx(_components.td,{children:_jsx(_components.strong,{children:`Hero`})}),_jsx(_components.td,{\"data-numeric\":`true`,children:`16:9`}),_jsx(_components.td,{children:`Top of the page.`})]}),_jsxs(_components.tr,{children:[_jsx(_components.td,{children:_jsx(_components.strong,{children:`Lifestyle`})}),_jsx(_components.td,{children:`Square`}),_jsx(_components.td,{children:`Showcase and gallery.`})]}),_jsxs(_components.tr,{children:[_jsx(_components.td,{children:_jsx(_components.strong,{children:`Scene`})}),_jsx(_components.td,{children:`Square`}),_jsx(_components.td,{children:`Showcase and gallery.`})]}),_jsxs(_components.tr,{children:[_jsx(_components.td,{children:_jsx(_components.strong,{children:`Detail`})}),_jsx(_components.td,{\"data-numeric\":`true`,children:`4:5`}),_jsx(_components.td,{children:`Showcase and gallery.`})]}),_jsxs(_components.tr,{children:[_jsx(_components.td,{children:_jsx(_components.strong,{children:`Banner`})}),_jsx(_components.td,{\"data-numeric\":`true`,children:`16:9`}),_jsx(_components.td,{children:`Behind the closing call to action.`})]})]})]}),`\n`,_jsx(_components.p,{children:`AI images render one at a time while the builder is open and appear in the preview as each one finishes. A counter shows how many of the page’s AI images are used.`}),`\n`,_jsx(Frame,{caption:`The Images panel with image placements and the logo.`,children:_jsx(OptimizedImage,{src:`https://mintlify.s3.us-west-1.amazonaws.com/magicads/images/landing-page-builder/panel-images.png`,alt:`Images panel with photo grid, image placements and logo upload`})}),`\n`,_jsx(Heading,{level:`4`,id:`settings`,children:`Settings`}),`\n`,_jsxs(Table,{children:[_jsx(_components.thead,{children:_jsxs(_components.tr,{children:[_jsx(_components.th,{children:`Setting`}),_jsx(_components.th,{children:`Purpose`})]})}),_jsxs(_components.tbody,{children:[_jsxs(_components.tr,{children:[_jsx(_components.td,{children:_jsx(_components.strong,{children:`Main button link`})}),_jsx(_components.td,{children:`Where every buy or sign-up button goes. If empty, buttons scroll to the offer.`})]}),_jsxs(_components.tr,{children:[_jsx(_components.td,{children:_jsx(_components.strong,{children:`Secondary button link`})}),_jsx(_components.td,{children:`Used by the softer hero button. Defaults to a section on the page.`})]}),_jsxs(_components.tr,{children:[_jsx(_components.td,{children:_jsx(_components.strong,{children:`Newsletter form address`})}),_jsx(_components.td,{children:`The form action URL from Mailchimp, Kit, Formspree or similar, so the Newsletter section collects real sign-ups.`})]}),_jsxs(_components.tr,{children:[_jsx(_components.td,{children:_jsx(_components.strong,{children:`Page title`})}),_jsx(_components.td,{children:`Up to 70 characters. Shown in the browser tab and search results.`})]}),_jsxs(_components.tr,{children:[_jsx(_components.td,{children:_jsx(_components.strong,{children:`Meta description`})}),_jsx(_components.td,{children:`Up to 170 characters.`})]})]})]}),`\n`,_jsxs(_components.p,{children:[`Links accept a full web address, an email link (`,_jsx(_components.code,{children:`mailto:`}),`) or a section link such as `,_jsx(_components.code,{children:`#pricing`}),`.`]}),`\n`,_jsxs(_components.p,{children:[`Under `,_jsx(_components.strong,{children:`Start fresh`}),`, `,_jsx(_components.strong,{children:`Regenerate page`}),` rewrites every section from the brief (design, photos and finished images stay, but text edits are replaced), and `,_jsx(_components.strong,{children:`Edit strategy and rebuild`}),` goes back to the Strategy step.`]}),`\n`,_jsx(Frame,{caption:`The Settings panel.`,children:_jsx(OptimizedImage,{src:`https://mintlify.s3.us-west-1.amazonaws.com/magicads/images/landing-page-builder/panel-settings.png`,alt:`Settings panel with link fields, SEO fields and the Start fresh actions`})}),`\n`,_jsx(Heading,{level:`3`,id:`export-and-publish`,children:`Export and publish`}),`\n`,_jsxs(_components.p,{children:[`Landing Page Builder does not host pages. The `,_jsx(_components.strong,{children:`Preview`}),` link works only while you are signed in and is not indexed, so it is not a public address. To share a page, export it.`]}),`\n`,_jsxs(_components.p,{children:[`Click `,_jsx(_components.strong,{children:`Export`}),` in the builder, or use the card menu in the library:`]}),`\n`,_jsxs(Table,{children:[_jsx(_components.thead,{children:_jsxs(_components.tr,{children:[_jsx(_components.th,{children:`Format`}),_jsx(_components.th,{children:`What you get`})]})}),_jsxs(_components.tbody,{children:[_jsxs(_components.tr,{children:[_jsx(_components.td,{children:_jsx(_components.strong,{children:`ZIP bundle`})}),_jsxs(_components.td,{children:[`A folder with `,_jsx(_components.code,{children:`index.html`}),`, `,_jsx(_components.code,{children:`assets/css/style.css`}),`, `,_jsx(_components.code,{children:`assets/js/main.js`}),`, `,_jsx(_components.code,{children:`assets/img/`}),` (images optimised to a maximum of 2000 px) and a `,_jsx(_components.code,{children:`README.txt`}),`.`]})]}),_jsxs(_components.tr,{children:[_jsx(_components.td,{children:_jsx(_components.strong,{children:`Single HTML file`})}),_jsx(_components.td,{children:`One self-contained file with the images embedded.`})]})]})]}),`\n`,_jsx(Frame,{caption:`The Export menu.`,children:_jsx(OptimizedImage,{src:`https://mintlify.s3.us-west-1.amazonaws.com/magicads/images/landing-page-builder/export-menu.png`,alt:`Export menu offering a ZIP bundle and a single HTML file`})}),`\n`,_jsxs(_components.p,{children:[`To publish, unzip the bundle and upload `,_jsx(_components.code,{children:`index.html`}),` together with the `,_jsx(_components.code,{children:`assets`}),` folder to any static host, such as Netlify, Vercel, GitHub Pages, Cloudflare Pages, cPanel/FTP or Amazon S3. You can also double-click `,_jsx(_components.code,{children:`index.html`}),` to preview it locally. There is no build step and no server-side code.`]}),`\n`,_jsx(_components.p,{children:`Things to know about exported pages:`}),`\n`,_jsxs(_components.ul,{children:[`\n`,_jsxs(_components.li,{children:[_jsx(_components.strong,{children:`Fonts`}),` load from Google Fonts. To self-host them, download the families listed in the `,_jsx(_components.code,{children:`\u003clink>`}),` tag of `,_jsx(_components.code,{children:`index.html`}),`.`]}),`\n`,_jsxs(_components.li,{children:[_jsx(_components.strong,{children:`Share image`}),`: the exported page has no `,_jsx(_components.code,{children:`og:image`}),`. Add one by hand if you want a preview image on social networks.`]}),`\n`,_jsxs(_components.li,{children:[_jsx(_components.strong,{children:`Newsletter form`}),`: without a `,_jsx(_components.strong,{children:`Newsletter form address`}),` in Settings, the form only shows a thank-you message and collects nothing.`]}),`\n`,_jsxs(_components.li,{children:[_jsx(_components.strong,{children:`Button links`}),` come from `,_jsx(_components.strong,{children:`Main button link`}),`. Search `,_jsx(_components.code,{children:`index.html`}),` for that address to change it later.`]}),`\n`]}),`\n`,_jsx(Heading,{level:`2`,id:`tips-for-better-pages`,children:`Tips for better pages`}),`\n`,_jsx(_components.p,{children:`The AI writes from what it is given, so concrete input gives concrete copy.`}),`\n`,_jsxs(_components.ul,{children:[`\n`,_jsxs(_components.li,{children:[_jsx(_components.strong,{children:`Put facts in the description.`}),` Specs, materials, what’s in the box, shipping terms, the guarantee and any real numbers feed the Stats and Offer sections. The AI will not make them up.`]}),`\n`,_jsxs(_components.li,{children:[_jsx(_components.strong,{children:`Use a clean main photo.`}),` The first photo is treated as the product shot and fills the Offer section and the closing call to action when there is no banner image.`]}),`\n`,_jsxs(_components.li,{children:[_jsx(_components.strong,{children:`Keep selling points short and specific.`}),` “30-hour battery life” beats “great battery”.`]}),`\n`,_jsxs(_components.li,{children:[_jsx(_components.strong,{children:`Use the quick choices.`}),` They change the angle of the page more than any other input.`]}),`\n`,_jsxs(_components.li,{children:[_jsx(_components.strong,{children:`Rewrite one section, not the page.`}),` A section rewrite costs a fraction of a full regeneration and keeps everything else you edited.`]}),`\n`]}),`\n`,_jsxs(_components.p,{children:[`An example of a good `,_jsx(_components.strong,{children:`Product`}),` step:`]}),`\n`,_jsxs(Table,{children:[_jsx(_components.thead,{children:_jsxs(_components.tr,{children:[_jsx(_components.th,{children:`Field`}),_jsx(_components.th,{children:`Example`})]})}),_jsxs(_components.tbody,{children:[_jsxs(_components.tr,{children:[_jsx(_components.td,{children:_jsx(_components.strong,{children:`Product name`})}),_jsx(_components.td,{children:`Aurora ceramic pour-over set`})]}),_jsxs(_components.tr,{children:[_jsx(_components.td,{children:_jsx(_components.strong,{children:`Description`})}),_jsx(_components.td,{children:`Hand-glazed stoneware dripper and server with two cups. Dishwasher safe. Brews 2 to 4 cups. Ships in 2 days. 30-day money-back guarantee.`})]}),_jsxs(_components.tr,{children:[_jsx(_components.td,{children:_jsx(_components.strong,{children:`Price`})}),_jsx(_components.td,{\"data-numeric\":`true`,children:`$49`})]}),_jsxs(_components.tr,{children:[_jsx(_components.td,{children:_jsx(_components.strong,{children:`Compare-at price`})}),_jsx(_components.td,{\"data-numeric\":`true`,children:`$69`})]}),_jsxs(_components.tr,{children:[_jsx(_components.td,{children:_jsx(_components.strong,{children:`Goal`})}),_jsx(_components.td,{children:`Sell online`})]})]})]}),`\n`,_jsx(Heading,{level:`2`,id:`troubleshooting`,children:`Troubleshooting`}),`\n`,_jsxs(Table,{children:[_jsx(_components.thead,{children:_jsxs(_components.tr,{children:[_jsx(_components.th,{children:`Symptom`}),_jsx(_components.th,{children:`Likely cause`}),_jsx(_components.th,{children:`Fix`})]})}),_jsxs(_components.tbody,{children:[_jsxs(_components.tr,{children:[_jsx(_components.td,{children:`Landing Page Builder doesn’t appear for a user`}),_jsx(_components.td,{children:`Plugin not installed, master switch off, plan lacks the feature, or free tier off for a plan-less user`}),_jsx(_components.td,{children:`Install the plugin; enable the master switch; enable the toggle on their plan; or turn on Free Tier Access.`})]}),_jsxs(_components.tr,{children:[_jsx(_components.td,{children:`It appears with a lock icon`}),_jsx(_components.td,{children:`The user’s plan doesn’t include the feature`}),_jsx(_components.td,{children:`Enable it on the plan, or the user upgrades.`})]}),_jsxs(_components.tr,{children:[_jsx(_components.td,{children:`”No AI engine is configured yet”`}),_jsx(_components.td,{children:`No engine has both a key and an enabled text model`}),_jsxs(_components.td,{children:[`Add a key and enable a Copy Studio model in Admin → AI Settings. The engine card shows `,_jsx(_components.strong,{children:`Ready`}),` when fixed.`]})]}),_jsxs(_components.tr,{children:[_jsx(_components.td,{children:`”You need N credits for this”`}),_jsx(_components.td,{children:`Balance is below the cost of the step`}),_jsx(_components.td,{children:`Top up credits or lower the price. A build needs credits for the page plus all its AI images.`})]}),_jsxs(_components.tr,{children:[_jsx(_components.td,{children:`AI imagery options are greyed out`}),_jsxs(_components.td,{children:[`The engine has no active image model or key, or `,_jsx(_components.strong,{children:`AI images per page`}),` is `,_jsx(_components.code,{children:`0`})]}),_jsx(_components.td,{children:`Enable the vendor’s image model in AI Settings, or raise the limit.`})]}),_jsxs(_components.tr,{children:[_jsx(_components.td,{children:`Images stay on “Waiting to render”`}),_jsx(_components.td,{children:`The builder tab was closed, or the background job is not running`}),_jsx(_components.td,{children:`Keep the builder open so it can render images one at a time. Make sure your scheduler/cron is running, since it finishes any deferred images.`})]}),_jsxs(_components.tr,{children:[_jsx(_components.td,{children:`An image says “Did not render”`}),_jsx(_components.td,{children:`The image model rejected or failed the request`}),_jsxs(_components.td,{children:[`Failed images cost nothing. Click `,_jsx(_components.strong,{children:`New AI image`}),`, optionally with a different scene note.`]})]}),_jsxs(_components.tr,{children:[_jsx(_components.td,{children:`”The AI took too long to respond”`}),_jsx(_components.td,{children:`The text model timed out`}),_jsx(_components.td,{children:`Try again. Choose a faster text model in the config if it keeps happening. No credits are charged.`})]}),_jsxs(_components.tr,{children:[_jsx(_components.td,{children:`”The AI ran out of room before finishing” or “response could not be read”`}),_jsx(_components.td,{children:`The text model is too small or returned malformed output`}),_jsx(_components.td,{children:`Pick a stronger text model, shorten the description and try again.`})]}),_jsxs(_components.tr,{children:[_jsx(_components.td,{children:`”The AI declined this request”`}),_jsx(_components.td,{children:`The vendor’s safety filter blocked the input`}),_jsx(_components.td,{children:`Reword the product description.`})]}),_jsxs(_components.tr,{children:[_jsx(_components.td,{children:`Photos are skipped or rejected`}),_jsx(_components.td,{children:`Wrong file type or over the size or count limit`}),_jsxs(_components.td,{children:[`Use JPG, PNG or WebP within the `,_jsx(_components.strong,{children:`Max upload size`}),` and `,_jsx(_components.strong,{children:`Photos per page`}),` limits.`]})]}),_jsxs(_components.tr,{children:[_jsx(_components.td,{children:`ZIP export fails with “The PHP zip extension is required”`}),_jsxs(_components.td,{children:[`The server’s PHP `,_jsx(_components.code,{children:`zip`}),` extension is missing`]}),_jsxs(_components.td,{children:[`Enable the `,_jsx(_components.code,{children:`zip`}),` extension. The single HTML export works without it.`]})]}),_jsxs(_components.tr,{children:[_jsx(_components.td,{children:`Newsletter form shows a thank-you but collects nothing`}),_jsxs(_components.td,{children:[`No `,_jsx(_components.strong,{children:`Newsletter form address`}),` is set`]}),_jsx(_components.td,{children:`Paste the form action URL from your email provider in the Settings panel.`})]}),_jsxs(_components.tr,{children:[_jsx(_components.td,{children:`Exported images are not resized`}),_jsxs(_components.td,{children:[`The PHP `,_jsx(_components.code,{children:`gd`}),` extension is missing`]}),_jsxs(_components.td,{children:[`Enable `,_jsx(_components.code,{children:`gd`}),`. Without it, photos are exported at their original size.`]})]})]})]}),`\n`,_jsx(Note,{children:_jsx(_components.p,{children:`AI images are saved as ordinary Ad Creatives, so they stay in the user’s library even if the page is deleted. Credits are never deducted for failed or cancelled work.`})})]})}function MDXContent(props={}){const{wrapper:MDXLayout}={..._provideComponents(),...props.components};return MDXLayout?_jsx(MDXLayout,{...props,children:_jsx(_createMdxContent,{...props})}):_createMdxContent(props)}return{default:MDXContent};function _missingMdxReference(id,component){throw new Error(`Expected `+(component?`component`:`object`)+\" `\"+id+\"` to be defined: you likely forgot to import, pass, or provide it.\")}","frontmatter":{},"scope":{"config":{},"pageMetadata":{"title":"Landing Page Builder","icon":"window-maximize","description":"Turn a product into an editable, exportable landing page. The AI studies your photos, writes a creative brief with three design directions, then builds a complete, animated page.","href":"/plugins/landing-page-builder"}}},"mdxSourceWithNoJs":null},"mdxExtracts":{"tableOfContents":[{"title":"Introduction","slug":"introduction","depth":2,"children":[{"title":"AI engines","slug":"ai-engines","depth":3,"children":[]}]},{"title":"Purchase \u0026 Installation","slug":"purchase-\u0026-installation","depth":2,"children":[]},{"title":"Configure API keys","slug":"configure-api-keys","depth":2,"children":[{"title":"Where to get each key","slug":"where-to-get-each-key","depth":3,"children":[]}]},{"title":"Configure Landing Page Builder","slug":"configure-landing-page-builder","depth":2,"children":[{"title":"General","slug":"general","depth":3,"children":[]},{"title":"AI engines","slug":"ai-engines-2","depth":3,"children":[]},{"title":"Limits","slug":"limits","depth":3,"children":[]},{"title":"Credit pricing","slug":"credit-pricing","depth":3,"children":[]}]},{"title":"Grant access by plan","slug":"grant-access-by-plan","depth":2,"children":[]},{"title":"Go-live checklist","slug":"go-live-checklist","depth":2,"children":[]},{"title":"How to Use","slug":"how-to-use","depth":2,"children":[{"title":"What each step costs","slug":"what-each-step-costs","depth":3,"children":[]},{"title":"My landing pages","slug":"my-landing-pages","depth":3,"children":[]},{"title":"Step 1: Product","slug":"step-1-product","depth":3,"children":[]},{"title":"Step 2: Strategy","slug":"step-2-strategy","depth":3,"children":[]},{"title":"Step 3: Design","slug":"step-3-design","depth":3,"children":[]},{"title":"The visual editor","slug":"the-visual-editor","depth":3,"children":[]},{"title":"Content","slug":"content","depth":4,"children":[]},{"title":"Design","slug":"design","depth":4,"children":[]},{"title":"Images","slug":"images","depth":4,"children":[]},{"title":"Settings","slug":"settings","depth":4,"children":[]},{"title":"Export and publish","slug":"export-and-publish","depth":3,"children":[]}]},{"title":"Tips for better pages","slug":"tips-for-better-pages","depth":2,"children":[]},{"title":"Troubleshooting","slug":"troubleshooting","depth":2,"children":[]}],"codeExamples":{}},"jsLinks":[],"subdomain":"magicads","siteName":"Magic Ads","title":"Landing Page Builder - Magic Ads","navMaps":{"firstHrefInVersion":{},"firstHrefInLanguage":{}},"lastModified":"2026-11-11T16:02:29.316Z","originalFileLocation":"plugins/landing-page-builder.mdx"},"headHtml":"\u003cscript data-mint-head>(function(){var d=document.documentElement,p=null;if(!p){try{p=localStorage.getItem(\"isDarkMode\")}catch(e){}if(p==='true')p='dark';else if(p==='false')p='light';if(p!=='light'\u0026\u0026p!=='dark'\u0026\u0026p!=='system')p=\"system\"}var r=p==='system'?(matchMedia(\"(prefers-color-scheme: dark)\").matches?'dark':'light'):p;d.classList.remove(r==='dark'?'light':'dark');d.classList.add(r);d.setAttribute(\"data-theme-preference\",p)})();\u003c/script>\u003cmeta data-mint-head name=\"description\" content=\"Turn a product into an editable, exportable landing page. The AI studies your photos, writes a creative brief with three design directions, then builds a complete, animated page.\">\u003cmeta data-mint-head name=\"application-name\" content=\"Magic Ads\">\u003cmeta data-mint-head name=\"generator\" content=\"Mintlify\">\u003clink data-mint-head rel=\"icon\" type=\"image/png\" sizes=\"192x192\" href=\"/mintlify-assets/_mintlify/favicons/magicads/bxFn_8fPres8uAGc/_generated/favicon/android-chrome-192x192.png\" media=\"(prefers-color-scheme: light)\">\u003clink data-mint-head rel=\"apple-touch-icon\" type=\"image/png\" sizes=\"180x180\" href=\"/mintlify-assets/_mintlify/favicons/magicads/bxFn_8fPres8uAGc/_generated/favicon/apple-touch-icon.png\">\u003clink data-mint-head rel=\"icon\" type=\"image/png\" sizes=\"16x16\" href=\"/mintlify-assets/_mintlify/favicons/magicads/bxFn_8fPres8uAGc/_generated/favicon/favicon-16x16.png\" media=\"(prefers-color-scheme: light)\">\u003clink data-mint-head rel=\"icon\" type=\"image/png\" sizes=\"32x32\" href=\"/mintlify-assets/_mintlify/favicons/magicads/bxFn_8fPres8uAGc/_generated/favicon/favicon-32x32.png\" media=\"(prefers-color-scheme: light)\">\u003clink data-mint-head rel=\"shortcut icon\" type=\"image/x-icon\" href=\"/mintlify-assets/_mintlify/favicons/magicads/bxFn_8fPres8uAGc/_generated/favicon/favicon.ico\" media=\"(prefers-color-scheme: light)\">\u003clink data-mint-head rel=\"icon\" type=\"image/png\" sizes=\"192x192\" href=\"/mintlify-assets/_mintlify/favicons/magicads/bxFn_8fPres8uAGc/_generated/favicon-dark/android-chrome-192x192.png\" media=\"(prefers-color-scheme: dark)\">\u003clink data-mint-head rel=\"icon\" type=\"image/png\" sizes=\"16x16\" href=\"/mintlify-assets/_mintlify/favicons/magicads/bxFn_8fPres8uAGc/_generated/favicon-dark/favicon-16x16.png\" media=\"(prefers-color-scheme: dark)\">\u003clink data-mint-head rel=\"icon\" type=\"image/png\" sizes=\"32x32\" href=\"/mintlify-assets/_mintlify/favicons/magicads/bxFn_8fPres8uAGc/_generated/favicon-dark/favicon-32x32.png\" media=\"(prefers-color-scheme: dark)\">\u003clink data-mint-head rel=\"shortcut icon\" type=\"image/x-icon\" href=\"/mintlify-assets/_mintlify/favicons/magicads/bxFn_8fPres8uAGc/_generated/favicon-dark/favicon.ico\" media=\"(prefers-color-scheme: dark)\">\u003cmeta data-mint-head property=\"og:title\" content=\"Landing Page Builder - Magic Ads\">\u003cmeta data-mint-head property=\"og:description\" content=\"Turn a product into an editable, exportable landing page. The AI studies your photos, writes a creative brief with three design directions, then builds a complete, animated page.\">\u003cmeta data-mint-head property=\"og:site_name\" content=\"Magic Ads\">\u003cmeta data-mint-head property=\"og:url\" content=\"https://magicads.mintlify.app/plugins/landing-page-builder\">\u003cmeta data-mint-head property=\"og:type\" content=\"website\">\u003cmeta data-mint-head property=\"og:image\" content=\"https://magicads.mintlify.site/_mintlify/api/og/v2?division=Plugins\u0026amp;title=Landing+Page+Builder\u0026amp;description=Turn+a+product+into+an+editable%2C+exportable+landing+page.+The+AI+studies+your+photos%2C+writes+a+creative+brief+with+three+design+directions%2C+then+builds+a+comple\u0026amp;theme=7fbfecf1a8129ed328e1e0fa\u0026amp;signature=2f7c9f76b77a9ea52c5f797794909c0cca68617bf9e1608f575d455bc7285ffa\">\u003cmeta data-mint-head property=\"og:image:width\" content=\"1200\">\u003cmeta data-mint-head property=\"og:image:height\" content=\"630\">\u003cmeta data-mint-head name=\"twitter:card\" content=\"summary_large_image\">\u003cmeta data-mint-head name=\"twitter:title\" content=\"Landing Page Builder - Magic Ads\">\u003cmeta data-mint-head name=\"twitter:description\" content=\"Turn a product into an editable, exportable landing page. The AI studies your photos, writes a creative brief with three design directions, then builds a complete, animated page.\">\u003cmeta data-mint-head name=\"twitter:image\" content=\"https://magicads.mintlify.site/_mintlify/api/og/v2?division=Plugins\u0026amp;title=Landing+Page+Builder\u0026amp;description=Turn+a+product+into+an+editable%2C+exportable+landing+page.+The+AI+studies+your+photos%2C+writes+a+creative+brief+with+three+design+directions%2C+then+builds+a+comple\u0026amp;theme=7fbfecf1a8129ed328e1e0fa\u0026amp;signature=2f7c9f76b77a9ea52c5f797794909c0cca68617bf9e1608f575d455bc7285ffa\">\u003cmeta data-mint-head name=\"twitter:image:width\" content=\"1200\">\u003cmeta data-mint-head name=\"twitter:image:height\" content=\"630\">\u003cmeta data-mint-head name=\"msapplication-config\" content=\"/mintlify-assets/_mintlify/favicons/magicads/bxFn_8fPres8uAGc/_generated/favicon/browserconfig.xml\">\u003cmeta data-mint-head name=\"apple-mobile-web-app-title\" content=\"Magic Ads\">\u003cmeta data-mint-head name=\"msapplication-TileColor\" content=\"#0D9373\">\u003clink data-mint-head rel=\"canonical\" href=\"https://magicads.mintlify.app/plugins/landing-page-builder\">\u003clink data-mint-head rel=\"alternate\" type=\"application/xml\" href=\"/sitemap.xml\">\u003clink data-mint-head rel=\"alternate\" type=\"text/markdown\" href=\"/plugins/landing-page-builder.md\">\u003cscript data-mint-head type=\"application/ld+json\">{\"@context\":\"https://schema.org\",\"@graph\":[{\"@type\":\"Organization\",\"@id\":\"https://magicads.mintlify.app/#organization\",\"name\":\"Magic Ads\",\"url\":\"https://magicads.mintlify.app\",\"logo\":{\"@type\":\"ImageObject\",\"url\":\"https://mintcdn.com/magicads/oPrLh9qB7egs5WXX/logo/light.png?fit=max\u0026auto=format\u0026n=oPrLh9qB7egs5WXX\u0026q=85\u0026s=402a35581450df33507f4f1b59bfe34f\"}},{\"@type\":\"WebSite\",\"@id\":\"https://magicads.mintlify.app#website\",\"name\":\"Magic Ads\",\"url\":\"https://magicads.mintlify.app\",\"publisher\":{\"@id\":\"https://magicads.mintlify.app/#organization\"}},{\"@type\":\"WebPage\",\"@id\":\"https://magicads.mintlify.app/plugins/landing-page-builder#webpage\",\"url\":\"https://magicads.mintlify.app/plugins/landing-page-builder\",\"name\":\"Landing Page Builder\",\"description\":\"Turn a product into an editable, exportable landing page. The AI studies your photos, writes a creative brief with three design directions, then builds a complete, animated page.\",\"dateModified\":\"2026-11-11T16:02:29.316Z\",\"isPartOf\":{\"@id\":\"https://magicads.mintlify.app#website\"},\"breadcrumb\":{\"@id\":\"https://magicads.mintlify.app/plugins/landing-page-builder#breadcrumb\"}},{\"@type\":\"BreadcrumbList\",\"@id\":\"https://magicads.mintlify.app/plugins/landing-page-builder#breadcrumb\",\"itemListElement\":[{\"@type\":\"ListItem\",\"position\":1,\"name\":\"Plugins\",\"item\":\"https://magicads.mintlify.app/plugins/fasion-studio\"},{\"@type\":\"ListItem\",\"position\":2,\"name\":\"Landing Page Builder\",\"item\":\"https://magicads.mintlify.app/plugins/landing-page-builder\"}]},{\"@type\":[\"Article\",\"TechArticle\"],\"@id\":\"https://magicads.mintlify.app/plugins/landing-page-builder#article\",\"headline\":\"Landing Page Builder\",\"name\":\"Landing Page Builder\",\"description\":\"Turn a product into an editable, exportable landing page. The AI studies your photos, writes a creative brief with three design directions, then builds a complete, animated page.\",\"url\":\"https://magicads.mintlify.app/plugins/landing-page-builder\",\"mainEntityOfPage\":{\"@id\":\"https://magicads.mintlify.app/plugins/landing-page-builder#webpage\"},\"dateModified\":\"2026-11-11T16:02:29.316Z\",\"publisher\":{\"@id\":\"https://magicads.mintlify.app/#organization\"},\"isPartOf\":{\"@id\":\"https://magicads.mintlify.app#website\"}}]}\u003c/script>\u003cscript data-mint-head type=\"application/ld+json\">{\"@context\":\"https://schema.org\",\"@type\":\"WebSite\",\"name\":\"Magic Ads\",\"publisher\":{\"@type\":\"Organization\",\"name\":\"Magic Ads\"},\"provider\":{\"@type\":\"Organization\",\"name\":\"Mintlify\",\"url\":\"https://mintlify.com\"}}\u003c/script>","agentPointerHref":"/plugins/landing-page-builder.md","siteName":"Magic Ads","nav":{"global":{"anchors":[{"anchor":"Buy Magic Ads","icon":"box-open","href":"https://1.envato.market/gbM0b5"},{"anchor":"Support Tickets","icon":"square-info","href":"https://support.berkine.dev/"}]},"groups":[{"group":"Get Started","pages":[{"title":"Introduction","href":"/introduction"},{"title":"Server Requirements","href":"/requirements"},{"group":"Installation","pages":[{"title":"Main Installation Guide","sidebarTitle":"Main","href":"/installation/main"}]},{"title":"Extended License","href":"/extended-license"}]},{"group":"Integrations","pages":[{"group":"AI Providers","pages":[{"title":"OpenAI Setup","sidebarTitle":"OpenAI","href":"/integrations/ai/openai"},{"title":"Anthropic (Claude) Setup","sidebarTitle":"Anthropic","href":"/integrations/ai/anthropic"},{"title":"xAI (Grok) Setup","sidebarTitle":"xAI","href":"/integrations/ai/xai"},{"title":"Google Gemini Setup","sidebarTitle":"Gemini","href":"/integrations/ai/gemini"},{"title":"Black Forest Labs (FLUX) Setup","sidebarTitle":"Black Forest Labs","href":"/integrations/ai/flux"},{"title":"Ideogram Setup","sidebarTitle":"Ideogram","href":"/integrations/ai/ideogram"},{"title":"Recraft Setup","sidebarTitle":"Recraft","href":"/integrations/ai/recraft"},{"title":"Runway Setup","sidebarTitle":"Runway","href":"/integrations/ai/runway"},{"title":"fal.ai (Kling \u0026 Seedance) Setup","sidebarTitle":"fal.ai","href":"/integrations/ai/fal-ai"}]},{"group":"Social Logins","pages":[{"title":"Twitter (X) Login","sidebarTitle":"Twitter","icon":"x-twitter","href":"/integrations/login/twitter"},{"title":"Google Login","sidebarTitle":"Google","icon":"google","href":"/integrations/login/google"},{"title":"Facebook Login","sidebarTitle":"Facebook","icon":"facebook","href":"/integrations/login/facebook"},{"title":"LinkedIn Login","sidebarTitle":"LinkedIn","icon":"linkedin","href":"/integrations/login/linkedin"}]}]},{"group":"SaaS Features","pages":[{"title":"SaaS Business","href":"/saas/saas-business"},{"group":"Payment Gateways","pages":[{"title":"Stripe","href":"/saas/gateways/stripe"},{"title":"PayPal","href":"/saas/gateways/paypal"},{"title":"Razorpay","href":"/saas/gateways/razorpay"},{"title":"Paystack","href":"/saas/gateways/paystack"},{"title":"Mollie","href":"/saas/gateways/mollie"},{"title":"Paddle Classic","href":"/saas/gateways/paddle-classic"},{"title":"Flutterwave","href":"/saas/gateways/flutterwave"},{"title":"Yookassa","href":"/saas/gateways/yookassa"},{"title":"Braintree","href":"/saas/gateways/braintree"},{"title":"Midtrans","href":"/saas/gateways/midtrans"},{"title":"Iyzico","href":"/saas/gateways/iyzico"},{"title":"Coinbase","href":"/saas/gateways/coinbase"},{"title":"Bank Transfer","href":"/saas/gateways/bank-transfer"}]},{"title":"Subscription Plans","href":"/saas/subscription-plan"},{"title":"Prepaid Plans","href":"/saas/prepaid-plan"},{"title":"Referral System","href":"/saas/referral"},{"title":"Finance Settings","href":"/saas/finance-settings"}]},{"group":"Extensions","pages":[]},{"group":"Themes","pages":[{"title":"Themes","icon":"palette","href":"/themes/themes"}]},{"group":"Plugins","pages":[{"title":"Fashion Studio","icon":"shirt","href":"/plugins/fasion-studio"},{"title":"Product Photoshoot","icon":"camera-retro","description":"Turn a plain product photo into studio-grade, conversion-ready imagery — clean e-commerce shots, styled lifestyle scenes, luxury stills, social ad visuals and quick edits, all in one AI studio.","href":"/plugins/product-photoshoot"},{"title":"Landing Page Builder","icon":"window-maximize","href":"/plugins/landing-page-builder"},{"title":"Avatar Studio","icon":"user-tie","description":"Turn scripts and photos into talking AI presenter videos and localize your ads into 175+ languages while keeping the speaker’s face and voice — powered by HeyGen.","href":"/plugins/avatar-studio"},{"title":"UGC Factory","icon":"clapperboard","href":"/plugins/ugc-factory"},{"title":"Social Media Studio","icon":"share-nodes","href":"/plugins/social-media-studio"},{"title":"Prompt Marketplace","icon":"store","href":"/plugins/prompt-marketplace"},{"title":"Channel Broadcast","icon":"tower-broadcast","href":"/plugins/channel-broadcast"},{"title":"Amazon S3 Storage","icon":"aws","href":"/plugins/amazon-s3-storage"},{"title":"Wasabi Storage","icon":"cloud","href":"/plugins/wasabi-storage"},{"title":"Cloudflare R2 Storage","icon":"cloudflare","href":"/plugins/cloudflare-r2-storage"},{"title":"Google Cloud Storage","icon":"google","href":"/plugins/google-cloud-storage"},{"title":"Teams","icon":"users","href":"/plugins/teams"},{"title":"Gift Cards","icon":"gift","href":"/plugins/gift-cards"},{"title":"Coupons","icon":"ticket","href":"/plugins/coupons"},{"title":"Ad Performance Analytics","icon":"chart-line","href":"/plugins/ad-performance-analytics"}]},{"group":"Advanced","pages":[{"title":"Language Manager","href":"/advanced/language"},{"title":"Google Analytics Integration","sidebarTitle":"Google Analytics","href":"/advanced/google-analytics"},{"title":"Google Maps Integration","sidebarTitle":"Google Maps","href":"/advanced/google-maps"},{"title":"SMTP Configuration","sidebarTitle":"SMTP","href":"/advanced/smtp"},{"title":"CRON Job Configuration","sidebarTitle":"CRON Jobs","href":"/advanced/cron"}]},{"group":"Update","pages":[{"title":"Update Instructions","sidebarTitle":"Update Instructions","href":"/update/instructions"},{"title":"Changelogs","href":"/update/changelogs"}]}]},"basePath":"","title":"Landing Page Builder - Magic Ads","deploymentId":"dpl_DyXGnKeCjZyA3sUdfMJ7FjkdBefg","buildId":"dpl_DyXGnKeCjZyA3sUdfMJ7FjkdBefg","dynamics":["07c022d89b","a74be98ba7"],"chunks":["Frame-D0FT0qQs.js","DynamicMarkdown-CQM9Bhbv.js","zoom-image-lightbox-BQ4tbj_9.js","lightbox-handle-r17bVUz3.js"]}